Use 'Print preview' to check the number of pages and printer settings.
Print functionality varies between browsers.
Printable page generated Saturday, 6 June 2026, 2:27 AM
TI-AIE: Shared reading
What this unit is about
This unit introduces a key routine for teaching reading called shared reading. The unit also examines post-reading literacy activities.
In shared reading you read aloud to the whole class or to a group of students from a large book or text that everyone can see. Shared reading integrates a focus on oral language and writing. When you read aloud to students, enthusiastically and with expression, you demonstrate what fluent reading sounds like. You focus students’ attention on the written text and the process of reading it. You also model the enjoyment of reading by encouraging all students to participate orally.
Reading aloud to the class, and reading with students in groups, will help you to improve your own English language skills. Shared reading is also effective for teaching reading in Hindi and other languages.
What you can learn in this unit
- To practise shared reading in English.
- To make a big book for English shared reading.
- To plan post-reading literacy activities.
1 Introducing shared reading
Start by looking at a poem used for sharing reading.
Activity 1: Shared reading
Shared reading means that you lead your students in reading the text and you are a strong role model for reading. Students must be able to see and follow the text along with you.
In shared reading, you:
- encourage all students to follow the text as you read, using your hand or a stick as a pointer
- have students join in the reading, repeat after you or read in chorus
- model how to read with expression
- demonstrate how to read and pronounce new words
- focus on letters, words and sentences as you go along, but always keeping the overall meaning and enjoyment.
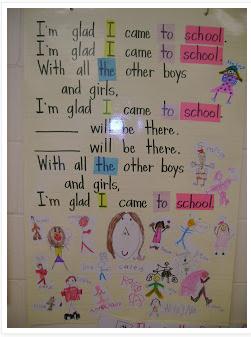
Look at the poem in Figure 1, written out on a large piece of paper. It was created by a teacher for Class II students. Read it aloud.
Pause for thought
|
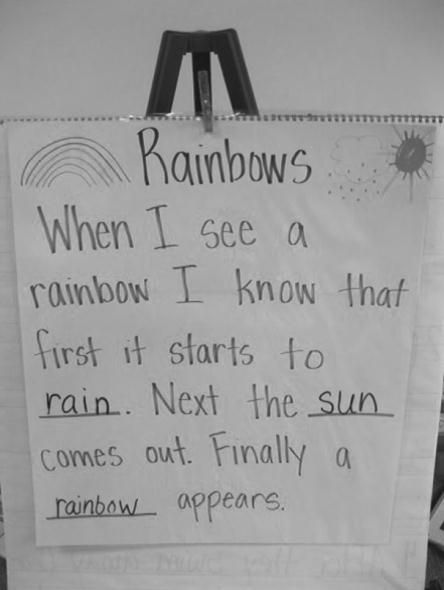
You can make a shared reading text on any subject, such as parts of the body, numbers, a history or geography topic, or the words of a song. See the hand-made example in Figure 2.
If you are a teacher who teaches all the subjects, shared reading can develop and reinforce both subject knowledge and language skills.
2 Selecting a text for shared reading
In Case Study 1, a teacher organises shared reading from a simple story.
Case Study 1: Miss Samreen organises shared reading
Miss Samreen is a Class III teacher in Bihar.
First I prepared a big book, so that my students could see the words and pictures easily. The story was ‘A Little Red Hen’ and I narrated the story to them last week, so the students were already familiar with the story. (You can see this story in Resource 1.)
I grouped the students around me, making sure that they could all see the pages. In my class there are children of seasonal migrant workers who are often absent. I put them in the front of the group to make sure they were included and so I could monitor their participation.
Before the reading, I explained that we would be reading a book together. I showed them the cover and reminded them that they had already heard the story. I asked them if they could remember anything about it. They called out the names of one or two of the characters that they remembered.
I then told them to follow my finger as I moved it under the words in the book, listening to me and reading aloud with me. I checked that they understood the instructions by practising with the title of the book.
I began by asking the students, ‘Are you ready?’ Then I turned to the first page, reading the text aloud slowly and clearly, following it with my finger. The students hesitated a little at first, but after one or two began to copy me, the others joined in, becoming more confident with each new page. In order to emphasise the pronunciation of the words, I exaggerated the intonation slightly, changing the voices to match each character. Where I could, I made gestures and actions that the students could copy as they read, such as nodding or shaking their head, or waving their hand.
Because the students were new to shared reading, I focused mainly on the progression of the story and its characters to capture their attention and keep the momentum. Sometimes we paused before starting to read the page and I pointed to a character or picture, asking them, ‘Who is she?’, ‘What is that?’ or ‘What is he doing?’, and the students responded. Whether they were entirely accurate or not was not so important. My aim was to encourage their participation and build their confidence in reading. In order to vary the pace and create an element of suspense, I also asked them, ‘What do you think happened next?’ before slowly turning to the next page.
The story contains repeating phrases. On the second or third repetitions, I paused slightly at the start and the students continued to say the phrase themselves. They seemed delighted to have done so, seeing it as a kind of game.
When we had finished the book, I asked the students some simple questions about it. I told the students to raise their hands if they knew the answer, rather than selecting one and making them respond. This gave me an idea of how much they had followed the story. Where necessary, I paraphrased their answers in English and in their home language. I welcomed all their contributions. If they became too eager, I reminded them to listen carefully to one another and take their turn.
Pause for thought
|
Miss Samreen used a number of techniques in her lesson to help her students get involved in the story and to support their learning. You may use some of these techniques already with your students, or all the techniques may be new to you. All these techniques are simple to do in the classroom and in the next activities you try out some of these techniques with your students. Don’t be dispiritied if they don’t go smoothly the first time you use them. We all need to practise new ways of doing things – this applies to both you and your students. With repeated practice, both you and your students will become more confident in using these new techniques and your students’ learning will improve.
Activity 2: Choose a text for shared reading – a planning activity
Do this with a fellow teacher if possible. This is a planning activity for you to do in preparation for your lesson.
Select a text you could use for shared reading. It can be a story you have already told aloud, or it can be a story from the textbook of a different class or from any other book. It can be a short poem, or it can be in a subject area, for example, a simple text on the water cycle. If you choose a story or poem, try to find places where students can repeat words or phrases and join in with you.
You can also make up your own story or poem from your imagination. When you do this, you can incorporate students’ names and local landmarks.
The length of the text should be short, and the actual narration should not take more than ten minutes. Consider the criteria for the text, for example:
- students’ interests and backgrounds
- students’ or your own familiarity with the topic
- students’ or your own English confidence
- local people, landmarks or events
- local languages – you can make a shared reading text that combines English and other languages
- possible stereotypes to avoid or to discuss.
See Resource 1 for examples of suitable stories.
When you have chosen your text, practise reading it aloud to a fellow teacher or to a member of your family. Remember it should not take you more than ten minutes to read aloud at a steady pace.
See Resource 2, ‘Planning lessons’, to learn more about classroom organisation and planning ahead for your learners.
3 Making and using a big book
In the next activity you will make a big book of the text you have chosen.
Activity 3: Making a big book – a planning activity
This is an activity for you to do in preparation for your lesson.
A big book with large text and illustrations is a good resource that is easy for students to follow. Students also enjoy making their own big books, either copying and illustrating a story they like or creating their own story or poem.
You can use a big book with the whole class, or you can give a big book to a group and assign one or two able or older students to lead the reading.
- Take the text you selected for shared reading in Activity 2.
- Break the text into chunks of two to three sentences.
- Copy each of these chunks in large writing onto pieces of paper. Do not write more than two to three sentences on one sheet of paper.
- Illustrate each sheet appropriately. You can also stick pictures on it or ask the students to do the illustrations.
- Design an attractive cover page for a story, or invite the students to do this after they read the story.
- Pin/tie together all the sheets along with the cover page.
You can make a simple stand for your big book out of recycled materials.
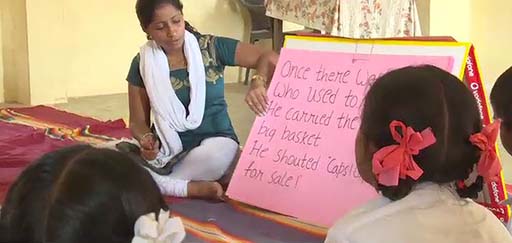
Look at the teacher with her students in Figure 3. She has made a simple stand for the big book out of cardboard.
Activity 4: Using your big book with your students
Now practise reading the big book aloud, slowly and clearly. Read with enthusiasm and expression. Record yourself if possible (you could use your mobile phone for this purpose), or read aloud in front of a colleague or a member of your family.
Point with your hand or a stick to each word as you read. Move your hand or the stick just under the words, so that students will be able to see each word as you read.
Make a list of any vocabulary that you want to introduce to students before reading the story or poem aloud. How will you introduce these words? Will you use picture cards, Hindi or the local language to explain their meaning? Note any specific language points you want to focus on, such as:
- character descriptions
- letters and sounds
- rhyming words
- new vocabulary
- reinforcing word recognition
- sentence structures and grammar
- new concepts.
Think about how you will introduce the text and organise students for the reading.
Identify points in the text where you can stop and ask students to predict a word or a rhyme, or what will happen next.
Think about how you will evaluate students’ understanding after the reading.
Try out your big book in a shared reading session with the whole class or in small groups across the week. Did your students enjoy the activity? Did you enjoy using the big book? Could all the students hear you and see the big book?
An effective way to assess students’ comprehension is to have them re-tell the text. Students can do this in pairs or small groups, as well as individually. This gives students opportunities to practise speaking English. Older and more competent students can write about their understanding.
4 Using post-reading activities
To get the most from shared reading, it is good practice to give students post-reading activities that are related to the story or the poem. These activities will reinforce language learning in an enjoyable way. Students can do these activities across the week.
Activity 5: Post-reading activities
Read the materials in Resource 3. These are examples of activities that students can do after shared reading. Choose, adapt and prepare one of these resources, based on the text that you selected for shared reading or another text.
It is good practice to model for students how you want them to work and complete the task. How would you introduce the activity you chose?
When you use the activity with your class after the shared reading activity, reflect on these questions:
- Did all your students participate?
- Did this activity help you to evaluate their learning?
- Were there students who did not make progress with their learning?
- Try to work out how you can help these students in the next reading lesson – should you choose a different type of text, or an easier or a more difficult text?
Video: Planning lessons |
5 Summary
In this unit you have been introduced to shared reading. In shared reading the focus is on comprehension, overall meaning and enjoyment, as well as particular reading strategies for reading new words. Shared reading integrates oral language and a focus on writing. This unit has also introduced you to post-reading literacy activities.
We hope you have had an opportunity to make a big book and to try it out with your students. When you make your own reading materials you can start to create an inexpensive library in your classroom.
Other Elementary English teacher development units on this topic are:
- Letters and sounds of English
- Storytelling
- Planning around a text
- Developing and monitoring reading
- Promoting the reading environment .
Resources
Resource 1: Examples of stories for shared reading
A story with repeating text lends itself well for shared reading. Students enjoy the repetitions and cue in quickly during choral reading.
Example 1: ‘A Little Red Hen’
A red hen and her three chicks lived on a farm.
A cat, a dog and a pig lived on that farm too.
One day a chick saw something on the ground.
‘What is this?’ the chick asked the hen.
‘This is ragi. We will plant them,’ said the red hen.
‘Please help me, cat,’ the hen said to the cat.
‘No,’ said the cat. ‘I am playing.’
‘Please help me, pig,’ the hen said to the pig.
‘No,’ said the pig. ‘I am tired.’
‘Please help me, dog,’ the hen said to the dog.
‘No,’ said the dog. ‘I am sleepy.’
‘Then I will plant it,’ said the hen.
The ragi plant grew big. It was time to cut the ragi.
‘Please help me, cat,’ said the hen.
‘No,’ said the cat. ‘I am playing.’
‘Please help me, dog,’ said the hen.
‘No,’ said the dog. ‘I am sleepy.’
‘Please help me, pig,’ said the hen.
‘No,’ said the pig. ‘I am tired.’
‘Then I will cut the ragi,’ said the hen.
The hen and the chicks sat down to eat ragi.
Now the cat, the pig and the dog were hungry.
‘Please give me some ragi, hen,’ said the cat.
‘Please give me some ragi, hen,’ said the pig.
‘Please give me some ragi, hen,’ said the dog.
‘No,’ said the hen. ‘No work, no ragi.’
The hen and the chicks ate the ragi. They were very happy.
Example 2: ‘Sharma’s Present’
To view 'Sharma's Present' click here
Resource 2: Planning lessons
Why planning and preparing are important
Good lessons have to be planned. Planning helps to make your lessons clear and well-timed, meaning that students can be active and interested. Effective planning also includes some in-built flexibility so that teachers can respond to what they find out about their students’ learning as they teach. Working on a plan for a series of lessons involves knowing the students and their prior learning, what it means to progress through the curriculum, and finding the best resources and activities to help students learn.
Planning is a continual process to help you prepare both individual lessons as well as series of lessons, each one building on the last. The stages of lesson planning are:
- being clear about what your students need in order to make progress
- deciding how you are going to teach in a way that students will understand and how to maintain flexibility to respond to what you find
- looking back on how well the lesson went and what your students have learnt in order to plan for the future.
Planning a series of lessons
When you are following a curriculum, the first part of planning is working out how best to break up subjects and topics in the curriculum into sections or chunks. You need to consider the time available as well as ways for students to make progress and build up skills and knowledge gradually. Your experience or discussions with colleagues may tell you that one topic will take up four lessons, but another topic will only take two. You may be aware that you will want to return to that learning in different ways and at different times in future lessons, when other topics are covered or the subject is extended.
In all lesson plans you will need to be clear about:
- what you want the students to learn
- how you will introduce that learning
- what students will have to do and why.
You will want to make learning active and interesting so that students feel comfortable and curious. Consider what the students will be asked to do across the series of lessons so that you build in variety and interest, but also flexibility. Plan how you can check your students’ understanding as they progress through the series of lessons. Be prepared to be flexible if some areas take longer or are grasped quickly.
Preparing individual lessons
After you have planned the series of lessons, each individual lesson will have to be planned based on the progress that students have made up to that point. You know what the students should have learnt or should be able to do at the end of the series of lessons, but you may have needed to re-cap something unexpected or move on more quickly. Therefore each individual lesson must be planned so that all your students make progress and feel successful and included.
Within the lesson plan you should make sure that there is enough time for each of the activities and that any resources are ready, such as those for practical work or active groupwork. As part of planning materials for large classes you may need to plan different questions and activities for different groups.
When you are teaching new topics, you may need to make time to practise and talk through the ideas with other teachers so that you are confident.
Think of preparing your lessons in three parts. These parts are discussed below.
1 The introduction
At the start of a lesson, explain to the students what they will learn and do, so that everyone knows what is expected of them. Get the students interested in what they are about to learn by allowing them to share what they know already.
2 The main part of the lesson
Outline the content based on what students already know. You may decide to use local resources, new information or active methods including groupwork or problem solving. Identify the resources to use and the way that you will make use of your classroom space. Using a variety of activities, resources, and timings is an important part of lesson planning. If you use various methods and activities, you will reach more students, because they will learn in different ways.
3 The end of the lesson to check on learning
Always allow time (either during or at the end of the lesson) to find out how much progress has been made. Checking does not always mean a test. Usually it will be quick and on the spot – such as planned questions or observing students presenting what they have learnt – but you must plan to be flexible and to make changes according to what you find out from the students’ responses.
A good way to end the lesson can be to return to the goals at the start and allowing time for the students to tell each other and you about their progress with that learning. Listening to the students will make sure you know what to plan for the next lesson.
Reviewing lessons
Look back over each lesson and keep a record of what you did, what your students learnt, what resources were used and how well it went so that you can make improvements or adjustments to your plans for subsequent lessons. For example, you may decide to:
- change or vary the activities
- prepare a range of open and closed questions
- have a follow-up session with students who need extra support.
Think about what you could have planned or done even better to help students learn.
Your lesson plans will inevitably change as you go through each lesson, because you cannot predict everything that will happen. Good planning will mean that you know what learning you want to happen and therefore you will be ready to respond flexibly to what you find out about your students’ actual learning.
Resource 3: Examples of post-reading activities
First read the short story, ‘A Different Kind of Duck’. Then look at the post-reading activities below.
‘A Different Kind of Duck’
There was once a dog who wanted to be a duck. He lived on a farm with some ducks. Everywhere the ducks went, the dog went too.
The dog knew he did not look like a duck. Ducks have wings, and he didn’t. Ducks’ feet were big and flat, but his were small and round. Ducks had bills, but he had a little black nose. He was white like the ducks, but that was the only thing that was the same.
‘I’ll just be a different kind of duck,’ said the dog.
One morning the dog was with the ducks when they took off into the air. The dog ran after them, calling, ‘Come back, come back!’ He jumped into the air and flapped his legs to fly, but he just fell down instead.
‘This is no fun,’ thought the dog. ‘Maybe I should be happy just being a dog.’
Worksheet
- How is the dog different from the ducks in this story?
- a.The dog lived on a farm.
- b.The dog has a bill
- c.The dog has small, round feet.
- What happened in the story that cannot happen in real life?
- a.The ducks swam in the water.
- b.The dog went everywhere with the ducks.
- c.The dog spoke to the ducks.
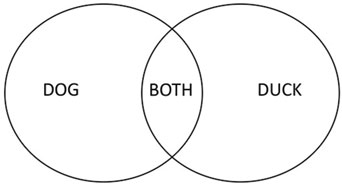
- Fill in the Venn diagram (Figure R3.1) to show how the dog and the duck look alike and different from each other.
- What would happen if the dog had wings? What would happen if you had wings?
Sentence completion
Complete the sentences below using the appropriate words: ‘flew’, ‘fly’, ‘lived’, ‘tried’, ‘wanted’, ‘tried’, ‘knew’, ‘ran’, ‘run’, ‘barked’ and ‘bark’.
- A dog and some ducks ____________ on a farm.
- Ducks can ____________ while a dog can ____________.
- The dog ____________ it cannot ____________, but it ____________ to.
- When the ducks ____________ the dog ____________ behind them.
- Though it ____________ the dog could not ____________. It thought, ‘Ducks cannot ____________ like me.’
In shared reading using a large text, you can ‘hide’ words and ask students to predict the word that is covered. You can also hide part of a word and ask students to predict the covered word based on the first letter they see. This is an effective way to help students focus on initial letter sounds of words. For example: ‘Ducks can f___ while a dog can r___.’
Table completion
Make as many meaningful sentences as possible from Table R3.1.
Table R3.1 Make as many meaningful sentences as possible from this table.
| Dogs | can | bark. |
| swim. | ||
| Ducks | cannot | run. |
| fly. | ||
| I | sing. |
Story wheel
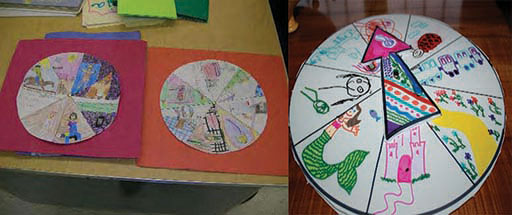
Use the template in Figure R3.2 to make your story wheel. Write the title of the story in the centre circle. Draw pictures or write what the dog did and what the ducks did in the four quadrants of the outer circle. Have students tell their stories, using their story wheels.
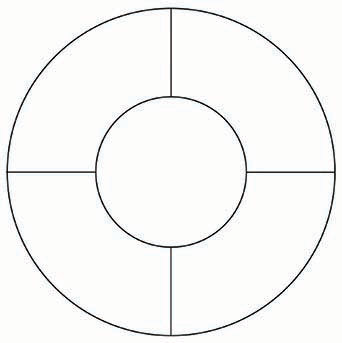
You can make a story wheel with more sections. If you put a pin in the centre of the wheel and attach the wheel to a larger piece of paper, you can turn the wheel to show each section of the story (Figure R3.3). Students can also make paper arrows that point to each section of the story.
Additional resources
- Karadi Tales: http://www.karaditales.com/
- National Book Trust India: http://www.nbtindia.gov.in/
- NCERT textbooks: http://www.ncert.nic.in/ NCERTS/ textbook/ textbook.htm
- Teachers of India classroom resources: http://www.teachersofindia.org/ en
References
Acknowledgements
Acknowledgements
Except for third party materials and otherwise stated below, this content is made available under a Creative Commons Attribution-ShareAlike licence (http://creativecommons.org/ licenses/ by-sa/ 3.0/). The material acknowledged below is Proprietary and used under licence for this project, and not subject to the Creative Commons Licence. This means that this material may only be used unadapted within the TESS-India project and not in any subsequent OER versions. This includes the use of the TESS-India, OU and UKAID logos.
Grateful acknowledgement is made to the following sources for permission to reproduce the material in this unit:
Figure 1: from http://www.peaceloveandfirstgrade.com/ 2013/ 07/ tape-in-classroom.html.
Figure 2: taken for TESS-India.
Resource 1: ‘A Little Red Hen’ (a popular children’s tale) adapted and rewritten by RVEC as part of a handbook we had prepared for teacher educators of elementary pre-service teacher education colleges in Karnataka. ‘Sharma’s Present’ developed by RVEC (http://www.rvec.in/).
Resource 3: ‘A Different Kind of Duck’ (a popular children’s tale) adapted and rewritten by RVEC as part of a handbook prepared for teacher educators of elementary pre-service teacher education colleges in Karnataka.
Figure R3.3: from http://reading.ecb.org/ downloads/ sum_lp_StoryWheel.pdf.
Every effort has been made to contact copyright owners. If any have been inadvertently overlooked the publishers will be pleased to make the necessary arrangements at the first opportunity.
Video (including video stills): thanks are extended to the teacher educators, headteachers, teachers and students across India who worked with The Open University in the productions.