Use 'Print preview' to check the number of pages and printer settings.
Print functionality varies between browsers.
Printable page generated Monday, 29 June 2026, 2:42 AM
TI-AIE: Developing stories: understanding graphs
What this unit is about
Graphs represent information. Much information nowadays is presented in graphs and they are used by all kinds of people, in all sorts of contexts. Knowing how to interpret graphs is important to make sense of the world around us and it has also become a crucial skill to have in the workplace.
People can find reading and interpreting graphs difficult because they can be confusing and misleading. This unit aims to help you to support your students in acquiring the skills of interpreting and constructing graphs to prepare them better for life. It does not focus on the basics of graphs, such as constructing coordinates, plotting points precisely or using equations and formulae to find out the gradient or points of inflection. Instead, the unit aims to help you make working with graphs more accessible to your students by developing a narrative or story to assist them with their understanding of graphs. Underpinning this approach is the notion that ‘every graph tells a story’.
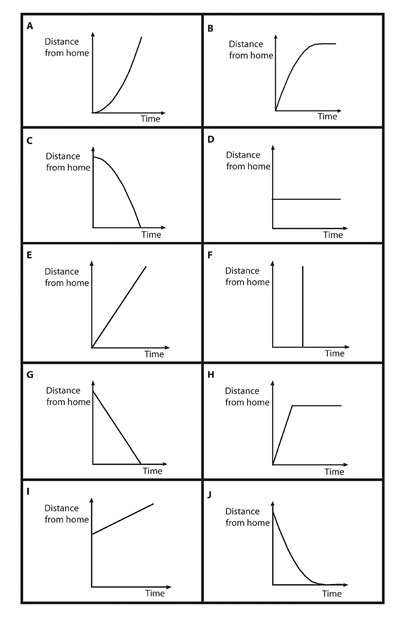
Copies of the graphs and other resources can be found in Resources 1 and 2.
What you can learn in this unit
- How to help students interpret graphs more effectively.
- Some ideas to guide students in using narrative or storytelling as a tool for understanding graphs and mathematics more generally.
- How to assist students in making connections between graphs and the real world.
The learning in this unit links to the NCFTE (2005, 2009) teaching requirements specified in Resource 3.
1 Using a narrative to help learning
Research shows that asking students to develop a story or narrative as part of their learning activities can help their understanding. Bruner (1986) argues that this is the case because ‘human beings are essentially narrative animals, telling stories to themselves and others as a way of making sense of the world’ (Mason and Johnson-Wilder, 2004, p. 68). This unit will help students to develop such storytelling in the context of making sense of graphs. The underlying theme across all the activities is the notion that ‘every graph tells a story’.
Activity 1 focuses on finding out what makes interpreting graphs so hard. In previous years, you may have told your students the factors that are important to include in a graph. Here, the students themselves work together to generate ideas about this.
Before attempting to use the activities in this unit with your students, it would be a good idea to complete all (or at least part) of the activities yourself. It would be even better if you could try them out with a colleague, as that will help you when you reflect on the experience. Trying the activities yourself will mean that you get insights into learners’ experiences that can in turn influence your teaching and your experiences as a teacher. When you are ready, use the activities with your students. After the lesson, think about the way that the activity went and the learning that happened. This will help you to develop a more learner-focused teaching environment.
Activity 1: Finding out what the problem is with graphs
Preparation
This activity works well if done in groups of four students, because more examples are then available for them to examine. Ask your students to collect and bring to school examples of graphs that they have seen from different contexts: newspapers, adverts, brochures, etc.
The activity
Explain to your students what they are required to do in this activity using the following prompts:
- You were asked to bring in examples of graphs that you have seen. Put these on a pile within your group.
- Sort quickly through the graphs and decide which ones you think you understand without much examination (putting these in an ‘easier’ pile) and which ones you think you will need to examine very carefully to understand (which go in a ‘harder’ pile).
- Examine the harder pile and discuss in your group what it is about these graphs that makes them more difficult. Write down your thoughts about this.
- Now examine the easier pile and discuss in your group what it is about these graphs that makes them easier. Write down your thoughts about this.
- Compare the two lists. What is the same and what is different about these two lists?
- Now use your answers to steps 3 and 4 above to write a list of ‘good things to do when constructing graphs’.
As a class, develop a list of ‘good things to do when constructing graphs’ from the groups’ ideas. Pin this up on the wall so that students can refer to it during later graph work.
Case Study 1: Mr Chadha reflects on using Activity 1
This is the account of a teacher who tried Activity 1 with his secondary students.
This activity did not get off to a good start. I had asked students to bring in examples of graphs and they managed to bring in … none. Perhaps it was lack of motivation, or perhaps it was that they did not know where to find any graphs. To motivate them I asked them to think of examples where graphs are used in real life or in the workplace, and where there could be problems if the graphs are not interpreted correctly.
To give them an example, I showed them the magazine and newspaper that I had brought in with some examples of graphs. By the next lesson most students had brought in several examples. Some even managed to download some graphs from the internet.
The students worked in groups of four. They found the graphs related to games and advertisements easy and decided this was because the information it represented was simple. They did notice, however, that some of these ‘easy’ graphs used scales that were not clear, and the labels in the axes were also not always correct. They had more problems with graphs representing medical and economic information: they found it hard identifying the variables and interpreting the relations between the variables.
I collected the graphs to use for later activities and told the students to bring in more so we could have a whole library of graphs to use for years to come.
Reflecting on your teaching practice
When you do such an activity with your class afterwards, reflect on what went well and what went less well. Consider the questions that led to the students being interested and being able to get on and those where you needed to clarify. Such reflection always helps with finding a ‘script’ that helps you engage the students to find mathematics interesting and enjoyable. If they do not understand and cannot do something, they are less likely to become involved. Use this reflective exercise every time you undertake the activities, noting, as Mr Chadha did, some quite small things that made a difference.
Pause for thought Good questions to trigger such reflection are:
|
2 Reading and interpreting graphs
What are the variables (or characters) in the story that graphs tell?
The first thing students have to understand in order to read graphs is that they are a visual representation of the relationship between variables. This is important and yet it is often overlooked. Information regarding which variables these are can be found by looking at the labels on the axes. For example, a distance/time graph shows the relationship between time lapsed (or the time of day) and the distance travelled. The x-axis (horizontal) tends to be labelled with the time variable, the y-axis (vertical) with distance.
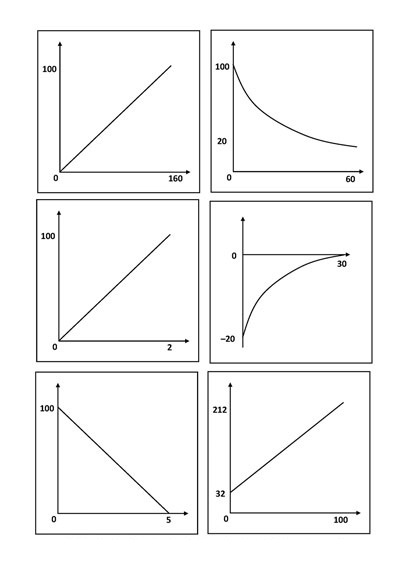
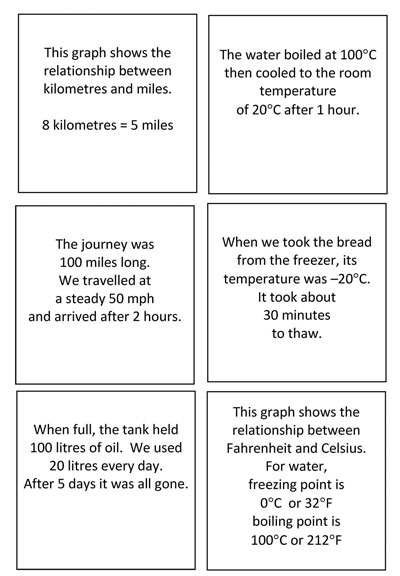
The first part of Activity 2 is a card sort to make students aware of the variables involved in the graphs. This type of activity helps you to evaluate student learning. You need to keep the group size small to enable all students to engage in the learning activity. In Part 2, the students are asked to use similar approaches with the examples they looked at in Activity 1. The card sort consists of two types of cards: some with graphs and some with descriptions. The activity involves matching a description to a graph and being able to explain the reasons for that choice.
Activity 2: Using card sorts to develop characters in stories
Part 1: Identifying variables in graphs
Preparation
Prepare enough copies of the card sort in Resource 1.
This task works well for work in pairs or in threes. It is less effective for bigger groups because the students will not all be able to see and easily read what is on the cards.
Remember to tell the class that ‘every graph tells a story’.
The activity
Ask the students to look at the card and match the descriptor to the graph.
Tell them that it can be helpful to use the following phrases:
- Is this graph telling me the story that is described on the cards?
- Who are the characters (or the ‘variables’, in mathematical language) in this story?
Part 2: Making your own card sort to identify variables in graphs
Explain to your students what they are required to do in this activity, using the following prompts:
- In Part 1 you used a card sort to become aware of the variables, or characters, that the graphs are telling a story about.
- Look again at the examples you brought in to school and used in Activity 1. What variables are the graphs telling a story about?
- Make your own card sort by writing descriptors similar to the ones you used in the card sort in Activity 2.
- Now exchange these card sorts with other groups and do one another’s card sorts.
Read Resource 4, ‘Using pair work’, to find out more.
Case Study 2: Mr Chadha reflects on using Activity 2
Getting organised for the card sort meant that I had to get several copies of the cards and cut them out – which is time-consuming and also costs money. However, I have since used them with other classes and colleagues have borrowed them as well, so it has been worth it.
I first asked the students to work in pairs on the card sort and to think carefully about the justification for their choices. I then asked them to compare their answers with the pairs of students sitting in front or behind them. What I really liked about these card sorts is that they asked students to focus on variables. They also triggered some really good mathematical discussions.
The students found making their own card sorts straightforward for the graphs in the ‘easier’ pile, but more difficult for those in the ‘harder’ pile – as I had expected. To help them with the harder graphs, I asked them: ‘What was it you did with the easy graphs?’ This helped them to get ‘unstuck’. As a result of this activity, many of the graphs in the harder pile moved to the easier pile. I also asked them to amend the notes they made for the last part of Activity 1, where they created a list of ‘good things to do when constructing graphs’.
By asking the students to bring in examples of graphs, working on developing our own tasks and exchanging these, we now have an impressive amount of teaching material about a large variety of graphs in the class! The students feel proud and seem more self-assured, because they actually made the teaching resources themselves.
Pause for thought
|
3 Building the story of what happens between variables
The previous activity asked students to identify the variables, or characters, in the ‘story’ that a graph represents. Now it is time to find out what happens between these ‘characters’. In mathematical terms, this means examining the graph for how the variables relate to each other at different points and whether that relationship changes.
Students often find it difficult to interpret what a gradient signifies, especially in distance/time graphs. Activity 3 asks the students to think about this through a card sort. Activity 4 then asks the students to use their knowledge about reading and interpreting graphs by making up a story as reporters for the Big Rickshaw Race.
Activity 3: Thinking about gradients and distance/time graphs
Preparation
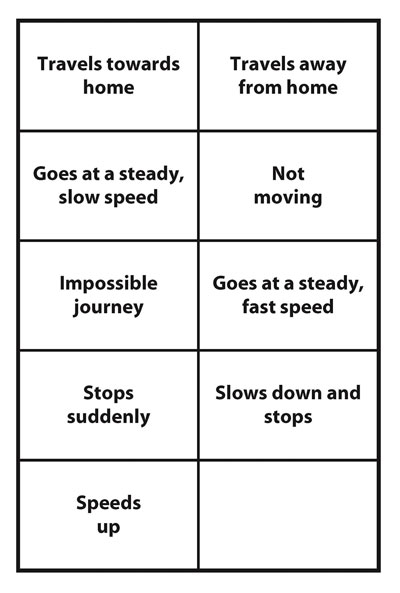
Prepare enough copies of the card sort in Resource 2.
This activity works well in pairs or in threes. It is less effective for bigger groups, because the students will not all be able to see and read what is on the cards easily.
Remember to tell the class that ‘every graph tells a story’.
The activity
Explain to your students what they are required to do in this activity, using the following prompts:
- Prepare enough copies of the card sort in Resource 2.
- Match the card to its descriptors.
- What do you think the gradients in the graphs are telling you?
- Can you make up some more examples?
Activity 4: The Big Auto Rickshaw Race

Explain to your students what they are required to do in this activity, using the prompts below.
Figure 2 is a graph that represents the motion of two of the auto rickshaws racing each other as they approach and go around a bend in the road in the annual Big Auto Rickshaw Race.
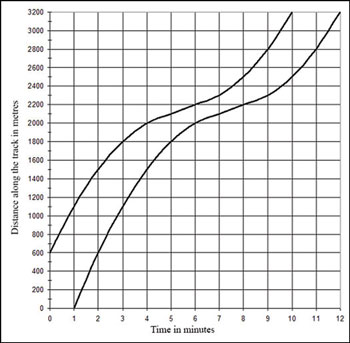
Try to visualise what is going on and answer the following questions:
- How far along the road is the bend?
- Do the two auto rickshaws travel the same distance?
- Do they travel at the same speed?
- On this graph, the auto rickshaws do not start together from the same point. What do you think is happening?
- The auto rickshaw that is ahead seems to lose some of its lead when it approaches the bend, and then opens up a gap again afterwards. Why is this? Is the chasing auto rickshaw really catching up?
- Imagine you are a Big Auto Rickshaw Race reporter, commentating live on the radio. What would you say?
Case Study 3: Mrs Meganathan reflects on using Activities 3 and 4
I thought that using Activity 3 would be too easy for the students. However, while we were using it, both I and the students became aware of the many misconceptions they had. I asked them to work on the card sort in pairs at first. We then had whole-class discussions that I orchestrated by holding up a graph card and asking what the story was, or holding up a descriptor card and asking what the matching graph was. I insisted on the students giving their justifications for what they said. After each justification, I asked the class who agreed, who disagreed and who was not too sure about the justification. This is how the misconceptions got aired and worked on. The task did take longer than I had anticipated but it was very worthwhile.
Activity 3 gave the students the knowledge and confidence to tackle Activity 4. The graph seemed simple at first, but the questions drew attention to some unusual elements – the students expressed surprise when they noticed them. The part where they had to be a reporter was funny. At first they were rather shy about engaging with it, so I invited Shamira, who I know loves acting, to come and sit at my desk and pretend to be the reporter. She had a go and I then asked others to comment constructively on what she had said, including on the interpretation of the graph. Shamira adjusted her story and had another go at it. After that the students were happy to try it out for themselves. Some did it in pairs, some in threes or fours. What I liked was that, while they were ‘reporting’, they were looking at the graph and interpreting the information that was there.
There was an addition to this activity that I loved. During break time I saw two students ‘racing’ against each other and another student pretending to be reporting on the race, including mimicking holding a microphone.
Pause for thought
|
4 Making up your own story and your own graph
So far in this unit, the focus has been on finding out what story a graph tells; that is, the interpretation of graphs. Constructing and interpreting graphs are very closely related; however, constructing graphs also involves another way of thinking. Instead of simply inventing a plausible story, it also requires representing the story in a graph and paying attention to all its elements, then checking whether the graph actually tells the story that was intended.
To practise these skills, the next activity asks the students to write a film script for an action movie and to construct a graph to tell that story. You might ask your students to spend five minutes at the start choosing their favourite action hero - they might choose Shaktimaan or Kangna Ranaut from Krrish or even James Bond.
Activity 5: The fast getaway
Explain to your students what they are required to do in this activity, using the following prompts:
You are writing a script for a big action movie! The scene you are working on requires the hero to get away as far as they can from the place where they are in one hour – which is the mathematics classroom you are in now! It is a race against time. Any mode of transport can be used, including wheelbarrows or roller skates, as long as it is sensible and can be filmed. For example, a plane taking off from the school playground would not be sensible because planes require a long runway.
Describe your route and tell your story by drawing a graph.
- Give your reasons for your choices. How far away will the hero get?
- Exchange your graph with your friend and try to reconstruct each other’s stories from the graphs. Do your stories match what you depicted in your graphs? Do you have to make some changes?
- Then ask several students to present their stories to the class – can other students draw the graphs to go with their stories?
You can read more in Resource 4, ‘Storytelling, songs, role play and drama’.
Case Study 4: Teacher Elisha reflects on using Activity 5
I was slightly apprehensive about doing this exercise. However, it sounded like a lot of fun and excitement, and an opportunity for the students to use their imagination. I should not have worried – they loved it! I did put some time limits on parts of the activity: 20 minutes to produce their script and graph, then another 20 minutes to swap stories and graphs and make changes. I used the stopwatch on my mobile phone to time this. Although I thought this might not be enough time, the students had no issues with it. It seemed to be part of the ‘race against time’ in the activity.
As a result, the class was energised and the students worked frantically. Some students got stuck and asked for help. I decided the best help they could get was from seeing examples, so I told them to ask their classmates whether they could have a look at their work. The effect of this seemed to be that those students worked in a supportive and collaborative way while still making their own stories, which was lovely to see.
The students ended up exchanging their graphs and stories with many other students. They were all curious to see what the others had done. They were very proud of their work and asked voluntarily whether they could take it home to show their family. I agreed. I also asked them to make an improved version of their work, with ‘perfect’ graphs that used a sensible scale, properly labelled axes and a title to then put on the walls in the classroom. I was very impressed by the quality of the mathematics in their stories and graphs.
Pause for thought
|
5 Summary
This unit explored ways of helping students make sense of graphs while becoming familiar with the ideas behind variables. From the start, the students were asked to relate their learning to the real world, bringing in graphs that they found in newspapers, adverts and anywhere else. The underpinning concept throughout was that ‘every graph tells a story’; this idea was reinforced by asking students to first match stories with graphs and then write their own stories for the graphs that they found. Modelling an action hero escape story using graphs provided an engaging and imaginative way to encourage the students to draw their own graphs, linking the variables appropriately so that the story emerged from their graph.
Resources
Resource 1: Card sort 1
This resource is a card sort that you will find useful for Activity 2.
Resource 2: Card sort 2
This resource is another card sort that you will find useful for Activity 4.
Resource 3: NCF/NCFTE teaching requirements
This unit links to the following teaching requirements of the NCF (2005) and NCFTE (2009), and will help you to meet those requirements:
- View students as active participants in their own learning and not as mere recipients of knowledge; to encourage their capacity to construct knowledge; to ensure that learning shifts away from rote methods.
- View learning as a search for meaning out of personal experiences and knowledge generation as a continuously evolving process of reflective learning.
- Support students to learn to enjoy mathematics rather than fear it.
- Help students to see mathematics as something to talk about, to communicate through, to discuss among themselves, to work together on.
- Connect school knowledge with community knowledge and life outside the school.
Resource 4: Using pair work
In everyday situations people work alongside, speak and listen to others, and see what they do and how they do it. This is how people learn. As we talk to others, we discover new ideas and information. In classrooms, if everything is centred on the teacher, then most students do not get enough time to try out or demonstrate their learning or to ask questions. Some students may only give short answers and some may say nothing at all. In large classes, the situation is even worse, with only a small proportion of students saying anything at all.
Why use pair work?
Pair work is a natural way for students to talk and learn more. It gives them the chance to think and try out ideas and new language. It can provide a comfortable way for students to work through new skills and concepts, and works well in large classes.
Pair work is suitable for all ages and subjects. It is especially useful in multilingual, multi-grade classes, because pairs can be arranged to help each other. It works best when you plan specific tasks and establish routines to manage pairs to make sure that all of your students are included, learning and progressing. Once these routines are established, you will find that students quickly get used to working in pairs and enjoy learning this way.
Tasks for pair work
You can use a variety of pair work tasks depending on the intended outcome of the learning. The pair work task must be clear and appropriate so that working together helps learning more than working alone. By talking about their ideas, your students will automatically be thinking about and developing them further.
Pair work tasks could include:
- ‘Think–pair–share’: Students think about a problem or issue themselves and then work in pairs to work out possible answers before sharing their answers with other students. This could be used for spelling, working through calculations, putting things in categories or in order, giving different viewpoints, pretending to be characters from a story, and so on.
- Sharing information: Half the class are given information on one aspect of a topic; the other half are given information on a different aspect of the topic. They then work in pairs to share their information in order to solve a problem or come to a decision.
- Practising skills such as listening: One student could read a story and the other ask questions; one student could read a passage in English, while the other tries to write it down; one student could describe a picture or diagram while the other student tries to draw it based on the description.
- Following instructions: One student could read instructions for the other student to complete a task.
- Storytelling or role play: Students could work in pairs to create a story or a piece of dialogue in a language that they are learning.
Managing pairs to include all
Pair work is about involving all. Since students are different, pairs must be managed so that everyone knows what they have to do, what they are learning and what your expectations are. To establish pair work routines in your classroom, you should do the following:
- Manage the pairs that the students work in. Sometimes students will work in friendship pairs; sometimes they will not. Make sure they understand that you will decide the pairs to help them maximise their learning.
- To create more of a challenge, sometimes you could pair students of mixed ability and different languages together so that they can help each other; at other times you could pair students working at the same level.
- Keep records so that you know your students’ abilities and can pair them together accordingly.
- At the start, explain the benefits of pair work to the students, using examples from family and community contexts where people collaborate.
- Keep initial tasks brief and clear.
- Monitor the student pairs to make sure that they are working as you want.
- Give students roles or responsibilities in their pair, such as two characters from a story, or simple labels such as ‘1’ and ‘2’, or ‘As’ and ‘Bs’). Do this before they move to face each other so that they listen.
- Make sure that students can turn or move easily to sit to face each other.
During pair work, tell students how much time they have for each task and give regular time checks. Praise pairs who help each other and stay on task. Give pairs time to settle and find their own solutions – it can be tempting to get involved too quickly before students have had time to think and show what they can do. Most students enjoy the atmosphere of everyone talking and working. As you move around the class observing and listening, make notes of who is comfortable together, be alert to anyone who is not included, and note any common errors, good ideas or summary points.
At the end of the task you have a role in making connections between what the students have developed. You may select some pairs to show their work, or you may summarise this for them. Students like to feel a sense of achievement when working together. You don’t need to get every pair to report back – that would take too much time – but select students who you know from your observations will be able to make a positive contribution that will help others to learn. This might be an opportunity for students who are usually timid about contributing to build their confidence.
If you have given students a problem to solve, you could give a model answer and then ask them to discuss in pairs how to improve their answer. This will help them to think about their own learning and to learn from their mistakes.
If you are new to pair work, it is important to make notes on any changes you want to make to the task, timing or combinations of pairs. This is important because this is how you will learn and how you will improve your teaching. Organising successful pair work is linked to clear instructions and good time management, as well as succinct summarising – this all takes practice.
Resource 5: Storytelling, songs, role play and drama
Students learn best when they are actively engaged in the learning experience. Your students can deepen their understanding of a topic by interacting with others and sharing their ideas. Storytelling, songs, role play and drama are some of the methods that can be used across a range of curriculum areas, including maths and science.
Storytelling
Stories help us make sense of our lives. Many traditional stories have been passed down from generation to generation. They were told to us when we were young and explain some of the rules and values of the society that we were born into.
Stories are a very powerful medium in the classroom: they can:
- be entertaining, exciting and stimulating
- take us from everyday life into fantasy worlds
- be challenging
- stimulate thinking about new ideas
- help explore feelings
- help to think through problems in a context that is detached from reality and therefore less threatening.
When you tell stories, be sure to make eye contact with students. They will enjoy it if you use different voices for different characters and vary the volume and tone of your voice by whispering or shouting at appropriate times, for example. Practise the key events of the story so that you can tell it orally, without a book, in your own words. You can bring in props such as objects or clothes to bring the story to life in the classroom. When you introduce a story, be sure to explain its purpose and alert students to what they might learn. You may need to introduce key vocabulary or alert them to the concepts that underpin the story. You may also consider bringing a traditional storyteller into school, but remember to ensure that what is to be learnt is clear to both the storyteller and the students.
Storytelling can prompt a number of student activities beyond listening. Students can be asked to note down all the colours mentioned in the story, draw pictures, recall key events, generate dialogue or change the ending. They can be divided into groups and given pictures or props to retell the story from another perspective. By analysing a story, students can be asked to identify fact from fiction, debate scientific explanations for phenomena or solve mathematical problems.
Asking the students to devise their own stories is a very powerful tool. If you give them structure, content and language to work within, the students can tell their own stories, even about quite difficult ideas in maths and science. In effect they are playing with ideas, exploring meaning and making the abstract understandable through the metaphor of their stories.
Songs
The use of songs and music in the classroom may allow different students to contribute, succeed and excel. Singing together has a bonding effect and can help to make all students feel included because individual performance is not in focus. The rhyme and rhythm in songs makes them easy to remember and helps language and speech development.
You may not be a confident singer yourself, but you are sure to have good singers in the class that you can call on to help you. You can use movement and gestures to enliven the song and help to convey meaning. You can use songs you know and change the words to fit your purpose. Songs are also a useful way to memorise and retain information – even formulas and lists can be put into a song or poem format. Your students might be quite inventive at generating songs or chants for revision purposes.
Role play
Role play is when students have a role to play and, during a small scenario, they speak and act in that role, adopting the behaviours and motives of the character they are playing. No script is provided but it is important that students are given enough information by the teacher to be able to assume the role. The students enacting the roles should also be encouraged to express their thoughts and feelings spontaneously.
Role play has a number of advantages, because it:
- explores real-life situations to develop understandings of other people’s feelings
- promotes development of decision making skills
- actively engages students in learning and enables all students to make a contribution
- promotes a higher level of thinking.
Role play can help younger students develop confidence to speak in different social situations, for example, pretending to shop in a store, provide tourists with directions to a local monument or purchase a ticket. You can set up simple scenes with a few props and signs, such as ‘Café’, ‘Doctor’s Surgery’ or ‘Garage’. Ask your students, ‘Who works here?’, ‘What do they say?’ and ‘What do we ask them?’, and encourage them to interact in role these areas, observing their language use.
Role play can develop older students’ life skills. For example, in class, you may be exploring how to resolve conflict. Rather than use an actual incident from your school or your community, you can describe a similar but detached scenario that exposes the same issues. Assign students to roles or ask them to choose one for themselves. You may give them planning time or just ask them to role play immediately. The role play can be performed to the class, or students could work in small groups so that no group is being watched. Note that the purpose of this activity is the experience of role playing and what it exposes; you are not looking for polished performances or Bollywood actor awards.
It is also possible to use role play in science and maths. Students can model the behaviours of atoms, taking on characteristics of particles in their interactions with each other or changing their behaviours to show the impact of heat or light. In maths, students can role play angles and shapes to discover their qualities and combinations.
Drama
Using drama in the classroom is a good strategy to motivate most students. Drama develops skills and confidence, and can also be used to assess what your students understand about a topic. A drama about students’ understanding of how the brain works could use pretend telephones to show how messages go from the brain to the ears, eyes, nose, hands and mouth, and back again. Or a short, fun drama on the terrible consequences of forgetting how to subtract numbers could fix the correct methods in young students’ minds.
Drama often builds towards a performance to the rest of the class, the school or to the parents and the local community. This goal will give students something to work towards and motivate them. The whole class should be involved in the creative process of producing a drama. It is important that differences in confidence levels are considered. Not everyone has to be an actor; students can contribute in other ways (organising, costumes, props, stage hands) that may relate more closely to their talents and personality.
It is important to consider why you are using drama to help your students learn. Is it to develop language (e.g. asking and answering questions), subject knowledge (e.g. environmental impact of mining), or to build specific skills (e.g. team work)? Be careful not to let the learning purpose of drama be lost in the goal of the performance.
Additional resources
- A newly developed maths portal by the Karnataka government: http://karnatakaeducation.org.in/ KOER/ en/ index.php/ Portal:Mathematics
- Class X maths study material: http://www.zietmysore.org/ stud_mats/ X/ maths.pdf
- National Centre for Excellence in the Teaching of Mathematics: https://www.ncetm.org.uk/
- National STEM Centre: http://www.nationalstemcentre.org.uk/
- OpenLearn: http://www.open.edu/ openlearn/
- BBC Bitesize: http://www.bbc.co.uk/ bitesize/
- Khan Academy’s math section: https://www.khanacademy.org/ math
- NRICH: http://nrich.maths.org/ frontpage
- Mathcelebration: http://www.mathcelebration.com/
- Art of Problem Solving’s resources page: http://www.artofproblemsolving.com/ Resources/ index.php
- Teachnology: http://www.teach-nology.com/ worksheets/ math/
- Maths is Fun: http://www.mathsisfun.com/
- National Council of Educational Research and Training’s textbooks for teaching mathematics and for teacher training of mathematics: http://www.ncert.nic.in/ ncerts/ textbook/ textbook.htm
- LMT-01 Learning Mathematics, Block 1 (‘Approaches to Learning’) Block 2 (‘Encouraging Learning in the Classroom’), Block 6 (‘Thinking Mathematically’): http://www.ignou4ublog.com/ 2013/ 06/ ignou-lmt-01-study-materialbooks.html
- Learning Curve and At Right Angles, periodicals about mathematics and its teaching: http://azimpremjifoundation.org/ Foundation_Publications
- Central Board of Secondary Education’s books and support material (also including the Teachers Manual for Formative Assessment – Mathematics (Class IX)) – select ‘CBSE publications’, then ‘Books and support material’: http://cbse.nic.in/ welcome.htm
References
Acknowledgements
Except for third party materials and otherwise stated below, this content is made available under a Creative Commons Attribution-ShareAlike licence (http://creativecommons.org/ licenses/ by-sa/ 3.0/). The material acknowledged below is Proprietary and used under licence for this project, and not subject to the Creative Commons Licence. This means that this material may only be used unadapted within the TESS-India project and not in any subsequent OER versions. This includes the use of the TESS-India, OU and UKAID logos.
Grateful acknowledgement is made to the following sources for permission to reproduce the material in this unit:
Activity 4: © The Adventurists: http://www.flickr.com/photos/adventurists/7461888474/sizes/k/in/ photostream/, http://creativecommons.org/ licenses/ by-nc-nd/ 2.0/; rickshaw graph: adapted from http://www.nationalstemcentre.org.uk/ elibrary/ resource/ 4252/ interpreting-distance-time-graphs-a6.
Resource 1 : © Nuffield Foundation.
Resource 2: adapted from: http://www.nationalstemcentre.org.uk/ elibrary/ resource/ 4252/ interpreting-distance-time-graphs-a6.
Every effort has been made to contact copyright owners. If any have been inadvertently overlooked the publishers will be pleased to make the necessary arrangements at the first opportunity.
Video (including video stills): thanks are extended to the teacher educators, headteachers, teachers and students across India who worked with The Open University in the productions.