Use 'Print preview' to check the number of pages and printer settings.
Print functionality varies between browsers.
Printable page generated Sunday, 28 June 2026, 7:45 PM
TI-AIE: Brainstorming: sound
What this unit is about
This unit aims to help to develop your expertise in using the technique of brainstorming with your students.
Brainstorming involves giving the students a topic or theme such as sound and asking them to give you all the ideas that come into their minds. This way, you build up a picture of their understanding about a topic. It is a way to encourage students to participate more in lessons without being worried about being wrong, because you accept all their answers.
The unit shows you how to use brainstorming and helps you plan how to use the information you gather to plan more effective lessons. These lessons build on what your students already know rather than just focusing on what is in the textbook, especially if they already know what is in the chapter. You will have a chance to assess the impact of such techniques on your students’ learning and their active participation.
What you can learn in this unit
- How to use the technique of brainstorming in your lessons.
- How to use brainstorming to find out what your students know.
- How to use a brainstorm to plan more effective lessons to meet your students’ needs and extend their understanding.
Why this approach is important
Brainstorming is important because it is a useful and quick strategy that you can employ to find out what your students know before you start teaching a new topic. It can be used at the beginning, middle or end of a lesson or topic so that you can see what connections students may be making within it. It helps you see what things the students regard as important, and may highlight some misunderstandings that they hold.
Pause for thought Have you ever asked your students for their ideas about new topics or about a particular phenomenon in science or environmental studies? If so, was it helpful? How? Why could this be a useful strategy? |
1 What is brainstorming?
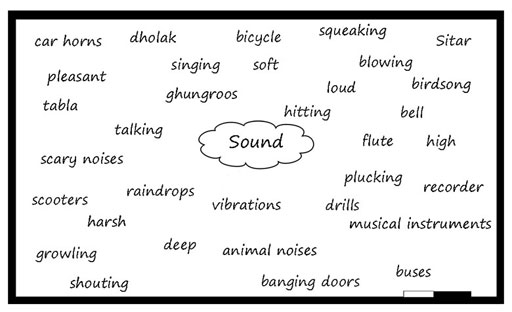
Brainstorming is a technique that encourages students to share their ideas about a topic. By using a single word or question, such as ‘sound’ or ‘How sound is made?’, you can ask the class to give you any ideas that come into their heads. As the students respond, all their answers are recorded on the blackboard by you (or a student), as shown in Figure 1.
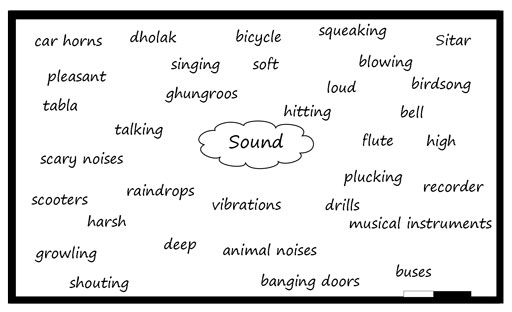
Brainstorming can be done with a whole class – even a very large class – because all students can be given a chance to voice their ideas. Using the technique with groups or pairs is also possible. Allowing students a few minutes to talk with their neighbour about the topic before brainstorming can help them to think more deeply about what they know. As each student speaks, so others are stimulated to think more widely as they hear what is said. The key idea is to encourage students to think more deeply and creatively around a topic such as sound.
Now read Case Study 1, which shows how one teacher first experienced the technique and then used it with her class.
Case Study 1: Mrs Khan’s first experience of brainstorming
Mrs Khan relates how she first experienced brainstorming and how excited she was by the way it gave her confidence to talk in a big group. It also helped her to think more deeply about making her classes more interactive.
I first heard about brainstorming when I went on a course for a day about making my EVS lessons more interactive for my students. As a group of 20 teachers we were asked to brainstorm all the ideas that came to mind when the tutor wrote ‘interactive teaching’ on a blackboard. The tutor asked us to call out our thoughts as they came to mind and I was nervous at first about saying anything. As the tutor wrote all these words on the board, it made me think a lot about what had been said. I began to have my own ideas, so I said ‘sharing ideas’, which she said was a good idea. This comment made me feel more confident and so I began to offer other ideas. I had been to several in-service training days but had never spoken in them, so I was very pleased with myself.
Eventually the tutor had to stop writing, because the blackboard was full of a wide range of suggestions. She then looked very closely at our ideas and asked us if there were ways we could group these ideas, such as those that were for the teacher to do and those for students.
I found this a quite helpful way to organise the large number of ideas and strategies. During the rest of the day we focused on how to use some of these suggestions. One was how to brainstorm with my students, which I found really helpful. I went home thinking about how I might use the technique with my class. I decided to talk to a colleague who I often share ideas with about lessons and topics, before I had a try in my own class.
Mrs Khan was impressed by the experience she had and its impact on her. Try the next the activity with a colleague if possible.
Activity 1: Brainstorming on your own or with a colleague
Look at the next few topics you are going to teach in environmental science or science, and choose one where you think it would be useful to know what your students know already. Either on your own or preferably with another colleague who teaches the same grade or who is interested in using new and different strategies in the classroom, try to brainstorm what you know about sound (or another topic).
Say the word ‘sound’ out loud to yourself and listen to the ideas that spring into your mind. Write down these ideas. Do this fairly quickly as you talk with each other. After a few minutes, stop and look at what you have written.
Next, think about how you can group the words together. To do this you will need to think about what the focus of a lesson on sound might be and then group the words together according to the learning intentions. If you were exploring how sounds are made, you would group the words differently than if you were exploring the types of sound that different objects or animals make.
Also, discuss how the strategy made you both focus more on the topic of sound.
Pause for thought Did you enjoy doing this with your colleague? How much did it help you think of more ideas about sound? Think about how you might do this with your class or a group in your class. |
2 Brainstorming in the classroom
Stimulating your students’ imagination and encouraging them to think about what they know means that you need to be creative in the ways you work. The exercise you tried in Activity 1 is just one way of brainstorming; as you will have experienced, it stimulates the brain and encourages you to think more widely. Now try this approach with your class before exploring other ways to use brainstorming.
Activity 2: Brainstorming sound with your class
Students need to be introduced to the technique of brainstorming. Before you do the brainstorm, think about how you will introduce the technique. What are the key things they need to know about what they have to do?
It is important that during brainstorming:
- students respect whatever is said
- that everyone has the right to speak
- taking turns is accepted
- the more varied the answers, the better.
You need to be clear about why you are brainstorming with your class. What do you want to find out from your students about what they know about sound or another topic?
Once you have written your plan, you are ready to try out brainstorming with your students. Try the brainstorming strategy with your class. If you can, get your colleague to do it as well with one of their classes.
After you have both tried brainstorming, spend some time thinking about how well the session went and why you think this.
Pause for thought After the brainstorming session, think about the following:
|
All of your students will have some knowledge about most topics that you teach, including sound. But not all students will have the same ideas and the ideas they do have are unlikely to be fully developed.
As you plan a teaching session, be it a practical or more theoretical lesson, it is important to know what your students already understand so that you can target your teaching more directly. You need to extend their learning, not waste time teaching what they already know and understand. So brainstorming is a good way of helping learners to think about a topic and share their ideas.
A brainstorm on sound might show where students have confused or underdeveloped ideas about how sounds are made. With this knowledge you will be able to target your teaching more directly to their learning needs and challenge their thinking further. To do this you might, for example, plan some short activities that help them to think about what is happening when sounds are made and why the sound is produced as it is.
Some students who have special educational needs will require more support and may benefit from activities being broken down into more manageable parts.
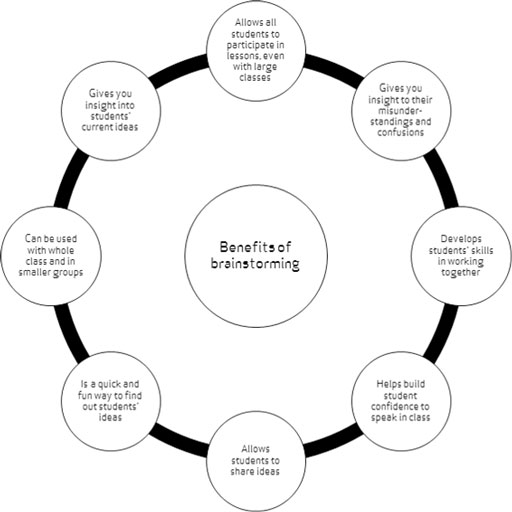
Not only does brainstorming help you understand what your learners already know, but it can also build your students’ confidence by encouraging them to participate more actively in the lesson. Some of the key benefits are summarised in Figure 2.
Resource 1, ‘Talk for learning’, provides insight into the benefits of talk for students in aiding their learning. You might find it useful to read this now before you continue working with your students – it will help you explore ways to encourage students to talk about their ideas and understanding.
3 Using the information generated by a brainstorm effectively
There are different ways of recording brainstorming responses. The way in which you ask your students to record information will depend on what you want to get out of the activity.
At the end of the brainstorming session, you should have a range of responses to use as a starting point for extending your students’ understanding. You may wish to highlight a few that have real possibilities for the topic that you are studying, and others may be returned to at a later date. Or you may just want to let the students choose ideas to work with individually. In any case, show them how their ideas grew as they developed their thinking by talking with each other.
You could focus your lesson on how sound is made by perhaps planning some simple activities to see that sound is produced by creating vibrations. This could include simple tasks like plucking a rubber band or string, putting some seeds on a drum and watching what happens when the drum is beaten gently. The way you respond to their brainstorm will depend on your learning intentions and what you know about your students as learners. Because you teach the class regularly, you will know what kind of activities and ways of organising practical work benefit your students best.
In the next case study, Mrs Sharma shows how she uses musical instruments to capture her students’ interest and to explore how sound is made. Musical instruments are fairly easy to find in the local community and students can bring these in.
Case Study 2: Using musical instruments and small groups to brainstorm
Mrs Sharma is a science teacher in an MG government school. It is preparing for its annual function, so she uses the opportunity to introduce her students to the next topic of sound.
Dance practice for the function was going on and sitting in my classroom I could hear the sound of the instrumental music accompanied by the sound of ghungroos made by the tapping of dancing feet. I tried to identify the sound made by each instrument. I later visited the music room to have a closer look at the instruments [Figure 3]. There was the dholak, the tabla, the harmonium, the sitar and the flute, and some ghungroos. I tried playing each of them. I asked the music teacher to play each instrument separately and I recorded the sound of each instrument on my mobile phone. I also made a recording of sounds made by coins, marbles, stones and local birds. I wanted to use these recordings in the class and asked the students to identify the objects that produced these sounds.

In the next lesson I played the recordings and asked the students to identify the source of each sound in their heads. I then asked the students to work in groups and list some commonly heard sounds from the surroundings and their sources. [The key resource ‘Using groupwork’ will help you to plan and organise groups in your lessons.] I gave each group a piece of paper to write their answers around the heading ‘Common sounds’. I had saved the paper from the back of some big envelopes that had been delivered to the school, as paper is hard to come by in my classroom.
Next, I asked each group to share their ideas with the rest of the class. As they spoke I picked out some key words and ideas and wrote these on the blackboard. These helped me to summarise what the class has said about what kind of sounds they had heard and how they were made.
By letting them talk in smaller groups, Mrs Sharma gave all of her class more chances to speak and join in the discussion. They were not frightened or embarrassed at speaking in front of the whole class and may not worry as much if their ideas are not well expressed or clear. This is very good for students who find learning difficult, as you can ask the rest of the group to help and support these learners.
Having to explain things to other students helps students to clarify their own understanding. Gradually students will become more confident in speaking out and sharing their thoughts. Brainstorming is a good activity for students of different abilities, since it helps both the talented and those who find learning more difficult work together without being in competition.
Video: Involving all |
If you have young students, you will need to make sure that one of the group is able to act as the group leader and that another student can write their answers down. With older students this will not be such an issue.
You might also think of other ways to set up your groups rather than just on ability. You may do it by dividing the class into sections, so that you have groups of mixed ability. In such groups a more able student could act as the recorder of the group’s ideas, but everyone in the group would be able to contribute to the final brainstorms. If you have a large class, this may be the best way to organise group brainstorming, as the students do not have to move far. They may even just be able to turn around. Alternatively you could group the students according to their interests.
Another way to explore a topic is to choose one that has several different aspects to explore. You can ask each group to explore a different aspect. So if your topic was sound, you could ask each group to explore its own area, such as musical instruments, types of sound, how sound is made or sound pollution.
Activity 3: Using small groups for brainstorming
You need to spend some time planning your brainstorming session by considering the following:
- What you want to brainstorm. Then decide how you will divide your class into groups.
- How are you going to tell your students what they have to do? Remember also the thoughts you had about how to improve your use of this strategy in Activity 2.
- As the students brainstorm, go round the classroom and listen as they talk. If they need your help in taking turns, guide them. Try not to interrupt their talk about the ideas they have, as it is crucial that they share (and maybe learn) from each other.
- Give them time to do the task.
- How will you deal with each group’s brainstorm? Will you display their charts and ask them to look at each other’s, or perhaps ask someone from each group to explain their thinking about how sounds are made? Sharing their ideas will provide more information on how each group is progressing and show you if their ideas are well understood or very simple or muddled. Tell the students that they will explore some of these ideas in the next lesson to make sure they understand better.
Pause for thought Think how this information you have gathered from the brainstorm will help you to plan your next lesson. Look at it and try to group similar ideas together. You may also want to look at the key resource ‘Planning lessons’. For instance, do you need to help them try a few simple activities or investigations to extend their experience of making sounds before analysing how the sounds are made like Mrs Sharma did? |
4 Using the brainstorms for learning
There are many ways to use the outcomes from brainstorming. They can be your way of seeing the students’ initial ideas about sound or another area of science so that you can plan how to extend their understanding into the more scientific concepts that appear in the science textbooks.
The results of a brainstorm can be used to monitor students’ progress – they can do this either themselves or in conjunction with you. Brainstorming is fun, quick and fast to do, and so a good way of gathering pertinent information from a range of students with different abilities in your class.
Now read Case Study 3, which describes how one teacher worked with the results of her class’s brainstorm to plan a lesson that would extend their thinking about how sound is produced. Resource 2, ‘Assessing progress and performance’, provides insight into how make use of information gathered about students’ understanding and progress.
Case Study 3: Using information from a class brainstorm
Ms Dha had done a brainstorm on ‘sound’ with her class, which is shown below. She explored their understanding further with a few questions before she used the brainstorm to plan her next lesson.
I asked for all the words and ideas that had come into my students’ minds when I said the word ‘sound’. I listed them randomly on the blackboard. After a few minutes I stopped and thanked the class for their ideas. I asked a few questions about some of their answers so that I could explore what they knew about what they had said. I realised that most of them could describe types of sounds easily but were not as able to describe how sounds were made and what caused the variations in sound. I decided to use the outcomes of this brainstorm to plan how to help them understand how sounds are made and can be modulated.
First I looked closely at the brainstorm again and grouped the words into different areas [Figure 4].
I listed the instruments that students mentioned first, then the descriptions of sounds and types of sound they had suggested. Finally I looked for words that could be related to how sounds are made. In this list I put ‘blowing’, ‘banging’, ‘vibrations’, ‘talking’ and ‘plucking’. Then I did the same with types of sounds. I had asked them to explain more about these ways of making sound, but they had not been able to explain what really happened.
To start my planning I had the idea of using four musical instruments that you had to hit, pluck or blow to make a sound, as well as gathering a few ordinary objects that could be used to make sound, like an empty tin, a gourd, some string and rubber bands. I realised that the students could make sound but did not know what caused the sound, so I also took in some rice that I could put on the drum to show the vibrations.
I planned a series of short activities where students working in pairs could try out different ways of making sound. As they did this I could ask them to think about what causes the sound. I will encourage them to put their hands on the objects and instruments so that they can feel the vibrations. I will then draw them a diagram about how sound is made when I think all of them have the idea of vibrations.
I will arrange all the little activities around the room and they can move in turn from one to another. They will not have to do all of them but at least four or five.
Activity 4: Using the outcomes of your student’s brainstorm to plan next steps
Try doing a similar kind of activity to Mrs Dha in Case Study 3, where she explored how sounds are made.
- How you could adapt such a plan for your class?
- What areas of sound do your students need help in understanding?
- Having identified these, think what activity (or activities) you could do to help the students explore how sounds are made.
- If you have a large class, it may be that you work with one group at a time to try some simple activities about vibrations, while the rest of the class are working on some text-based activity.
- Try the activities.
- Write a few notes on how the students responded and what you think they learnt from the experience. How do you know this?
You saw how Ms Dha found out what her class knew and where gaps occurred in their knowledge. She analysed their responses and categorised them to into key aspects of sound, choosing to first focus on how sound is caused. Her next step might be to explore the range of sound that can be produced by modifying the way that instruments and objects are played. Giving students concrete experiences of producing sounds will help them understand vibrations much better.
Brainstorming has helped Ms Dha to direct her teaching more directly to her students’ needs. Such an approach could have the same positive impact for you.
5 Summary
Brainstorming is a useful way of determining and activating prior knowledge of a topic by your students. (See Resources 3 and 4 about setting up a brainstorming session and effective brainstorming.)
As you have observed, brainstorming has a great role to play in your teaching. Through brainstorming your students are encouraged to learn about the subject by actively sharing information, experiences and opinions. At the same time, this gives you information and insight into their current understandings so that you can plan their next steps in learning about sound or other science topics such as electricity, water and light. By using brainstorming you will find out which students need extra support with certain tasks if they are to understand a topic.
You may now want to revisit Resource 3, ‘Assessing progress and performance’, to remind yourself that knowing what your students already know can improve your teaching.
Resources
Resource 1: Talk for learning
Why talk for learning is important
Talk is a part of human development that helps us to think, learn and make sense of the world. People use language as a tool for developing reasoning, knowledge and understanding. Therefore, encouraging students to talk as part of their learning experiences will mean that their educational progress is enhanced. Talking about the ideas being learnt means that:
- those ideas are explored
- reasoning is developed and organised
- as such, students learn more.
In a classroom there are different ways to use student talk, ranging from rote repetition to higher-order discussions.
Traditionally, teacher talk was dominant and was more valued than students’ talk or knowledge. However, using talk for learning involves planning lessons so that students can talk more and learn more in a way that makes connections with their prior experience. It is much more than a question and answer session between the teacher and their students, in that the students’ own language, ideas, reasoning and interests are given more time. Most of us want to talk to someone about a difficult issue or in order to find out something, and teachers can build on this instinct with well-planned activities.
Planning talk for learning activities in the classroom
Planning talking activities is not just for literacy and vocabulary lessons; it is also part of planning mathematics and science work and other topics. It can be planned into whole class, pair or groupwork, outdoor activities, role play-based activities, writing, reading, practical investigations, and creative work.
Even young students with limited literacy and numeracy skills can demonstrate higher-order thinking skills if the task is designed to build on their prior experience and is enjoyable. For example, students can make predictions about a story, an animal or a shape from photos, drawings or real objects. Students can list suggestions and possible solutions about problems to a puppet or character in a role play.
Plan the lesson around what you want the students to learn and think about, as well as what type of talk you want students to develop. Some types of talk are exploratory, for example: ‘What could happen next?’, ‘Have we seen this before?’, ‘What could this be?’ or ‘Why do you think that is?’ Other types of talk are more analytical, for example weighing up ideas, evidence or suggestions.
Try to make it interesting, enjoyable and possible for all students to participate in dialogue. Students need to be comfortable and feel safe in expressing views and exploring ideas without fear of ridicule or being made to feel they are getting it wrong.
Building on students’ talk
Talk for learning gives teachers opportunities to:
- listen to what students say
- appreciate and build on students’ ideas
- encourage the students to take it further.
Not all responses have to be written or formally assessed, because developing ideas through talk is a valuable part of learning. You should use their experiences and ideas as much as possible to make their learning feel relevant. The best student talk is exploratory, which means that the students explore and challenge one another’s ideas so that they can become confident about their responses. Groups talking together should be encouraged not to just accept an answer, whoever gives it. You can model challenging thinking in a whole class setting through your use of probing questions like ‘Why?’, ‘How did you decide that?’ or ‘Can you see any problems with that solution?’ You can walk around the classroom listening to groups of students and extending their thinking by asking such questions.
Your students will be encouraged if their talk, ideas and experiences are valued and appreciated. Praise your students for their behaviour when talking, listening carefully, questioning one another, and learning not to interrupt. Be aware of members of the class who are marginalised and think about how you can ensure that they are included. It may take some time to establish ways of working that allow all students to participate fully.
Encourage students to ask questions themselves
Develop a climate in your classroom where good challenging questions are asked and where students’ ideas are respected and praised. Students will not ask questions if they are afraid of how they will be received or if they think their ideas are not valued. Inviting students to ask the questions encourages them to show curiosity, asks them to think in a different way about their learning and helps you to understand their point of view.
You could plan some regular group or pair work, or perhaps a ‘student question time’ so that students can raise queries or ask for clarification. You could:
- entitle a section of your lesson ‘Hands up if you have a question’
- put a student in the hot-seat and encourage the other students to question that student as if they were a character, e.g. Pythagoras or Mirabai
- play a ‘Tell Me More’ game in pairs or small groups
- give students a question grid with who/what/where/when/why questions to practise basic enquiry
- give the students some data (such as the data available from the World Data Bank, e.g. the percentage of children in full-time education or exclusive breastfeeding rates for different countries), and ask them to think of questions you could ask about this data
- design a question wall listing the students’ questions of the week.
You may be pleasantly surprised at the level of interest and thinking that you see when students are freer to ask and answer questions that come from them. As students learn how to communicate more clearly and accurately, they not only increase their oral and written vocabulary, but they also develop new knowledge and skills.
Resource 2: Assessing progress and performance
Assessing students’ learning has two purposes:
- Summative assessment looks back and makes a judgement on what has already been learnt. It is often conducted in the form of tests that are graded, telling students their attainment on the questions in that test. This also helps in reporting outcomes.
- Formative assessment (or assessment for learning) is quite different, being more informal and diagnostic in nature. Teachers use it as part of the learning process, for example questioning to check whether students have understood something. The outcomes of this assessment are then used to change the next learning experience. Monitoring and feedback are part of formative assessment.
Formative assessment enhances learning because in order to learn, most students must:
- understand what they are expected to learn
- know where they are now with that learning
- understand how they can make progress (that is, what to study and how to study)
- know when they have reached the goals and expected outcomes.
As a teacher, you will get the best out of your students if you attend to the four points above in every lesson. Thus assessment can be undertaken before, during and after instruction:
- Before: Assessing before the teaching begins can help you identify what the students know and can do prior to instruction. It determines the baseline and gives you a starting point for planning your teaching. Enhancing your understanding of what your students know reduces the chance of re-teaching the students something they have already mastered or omitting something they possibly should (but do not yet) know or understand.
- During: Assessing during classroom teaching involves checking if students are learning and improving. This will help you make adjustments in your teaching methodology, resources and activities. It will help you understand how the student is progressing towards the desired objective and how successful your teaching is.
- After: Assessment that occurs after teaching confirms what students have learnt and shows you who has learnt and who still needs support. This will allow you to assess the effectiveness of your teaching goal.
Before: being clear about what your students will learn
When you decide what the students must learn in a lesson or series of lessons, you need to share this with them. Carefully distinguish what the students are expected to learn from what you are asking them to do. Ask an open question that gives you the chance to assess whether they have really understood. For example:

Give the students a few seconds to think before they answer, or perhaps ask the students to first discuss their answers in pairs or small groups. When they tell you their answer, you will know whether they understand what it is they have to learn.
Before: knowing where students are in their learning
In order to help your students improve, both you and they need to know the current state of their knowledge and understanding. Once you have shared the intended learning outcomes or goals, you could do the following:
- Ask the students to work in pairs to make a mind map or list of what they already know about that topic, giving them enough time to complete it but not too long for those with few ideas. You should then review the mind maps or lists.
- Write the important vocabulary on the board and ask for volunteers to say what they know about each word. Then ask the rest of the class to put their thumbs up if they understand the word, thumbs down if they know very little or nothing, and thumbs horizontal if they know something.
Knowing where to start will mean that you can plan lessons that are relevant and constructive for your students. It is also important that your students are able to assess how well they are learning so that both you and they know what they need to learn next. Providing opportunities for your students to take charge of their own learning will help to make them life-long learners.
During: ensuring students’ progress in learning
When you talk to students about their current progress, make sure that they find your feedback both useful and constructive. Do this by:
- helping students know their strengths and how they might further improve
- being clear about what needs further development
- being positive about how they might develop their learning, checking that they understand and feel able to use the advice.
You will also need to provide opportunities for students to improve their learning. This means that you may have to modify your lesson plans to close the gap between where your students are now in their learning and where you wish them to be. In order to do this you might have to:
- go back over some work that you thought they knew already
- group students according to needs, giving them differentiated tasks
- encourage students to decide for themselves which of several resources they need to study so that they can ‘fill their own gap’
- use ‘low entry, high ceiling’ tasks so that all students can make progress – these are designed so that all students can start the task but the more able ones are not restricted and can progress to extend their learning.
By slowing the pace of lessons down, very often you can actually speed up learning because you give students the time and confidence to think and understand what they need to do to improve. By letting students talk about their work among themselves, and reflect on where the gaps are and how they might close them, you are providing them with ways to assess themselves.
After: collecting and interpreting evidence, and planning ahead
While teaching–learning is taking place and after setting a classwork or homework task, it is important to:
- find out how well your students are doing
- use this to inform your planning for the next lesson
- feed it back to students.
The four key states of assessment are discussed below.
Collecting information or evidence
Every student learns differently, at their own pace and style, both inside and outside the school. Therefore, you need to do two things while assessing students:
- Collect information from a variety of sources – from your own experience, the student, other students, other teachers, parents and community members.
- Assess students individually, in pairs and in groups, and promote self-assessment. Using different methods is important, as no single method can provide all the information you need. Different ways of collecting information about the students’ learning and progress include observing, listening, discussing topics and themes, and reviewing written class and homework.
Recording
In all schools across India the most common form of recording is through the use of report card, but this may not allow you to record all aspects of a student’s learning or behaviours. There are some simple ways of doing this that you may like to consider, such as:
- noting down what you observe while teaching–learning is going on in a diary/notebook/register
- keeping samples of students’ work (written, art, craft, projects, poems, etc.) in a portfolio
- preparing every student’s profile
- noting down any unusual incidents, changes, problems, strengths and learning evidences of students.
Interpreting the evidence
Once information and evidence have been collected and recorded, it is important to interpret it in order to form an understanding of how each student is learning and progressing. This requires careful reflection and analysis. You then need to act on your findings to improve learning, maybe through feedback to students or finding new resources, rearranging the groups, or repeating a learning point.
Planning for improvement
Assessment can help you to provide meaningful learning opportunities to every student by establishing specific and differentiated learning activities, giving attention to the students who need more help and challenging the students who are more advanced.
Resource 3: Setting up a brainstorming session
What is brainstorming?
Brainstorming is a group activity that generates as many ideas as possible on a specific issue or problem then decides which idea(s) offers the best solution. It involves creative thinking by the group to think of new ideas to address the issue or problem they are faced with. Brainstorming helps pupils to:
- understand a new topic
- generate different ways to solve a problem
- be excited by a new concept or idea
- feel involved in a group activity that reaches agreement.
How to set up a brainstorming session
Before starting a session, you need to identify a clear issue or problem. This can range from a simple word like ‘energy’ and what it means to the group, or something like ‘How can we develop our school environment?’ To set up a good brainstorm, it is essential to have a word, question or problem that the group is likely to respond to. In very large classes, questions can be different for different groups. Groups themselves should be as varied as possible in terms of gender and ability.
There needs to be a large sheet of paper that all can see in a group of between six and eight pupils. The ideas of the group need to be recorded as the session progresses so that everyone knows what has been said and can build on or add to earlier ideas. Every idea must be written down, however unusual.
Before the session begins, the following rules are made clear:
- Everyone in the group must be involved.
- No one criticises anyone else’s ideas or suggestions.
- Unusual and innovative ideas are welcomed.
- Lots of different ideas are needed.
- Everyone needs to work quickly. Brainstorming is a fast and furious activity.
Running the session
The teacher’s role initially is to encourage discussion, involvement and the recording of ideas. When pupils begin to struggle for ideas, or time is up, get the group (or groups) to select their best three ideas and say why they have chosen these. Finally:
- summarise for the class what they have done well
- ask them what they found useful about their activity – what did they discover in the brainstorming that they didn’t realise before?
Resource 4: Effective brainstorming
For brainstorms to be effective you need to:
- define the purpose of the brainstorm
- encourage all students to participate, letting ideas ‘come into their heads’
- write down the students’ contributions – it is important to emphasise that all contributions are recorded
- discuss and decide suitable categories with student help, if possible, to organise the information
- select a method of recording the information from the brainstorming session using the categories discussed
- discuss the information recorded then decide on areas requiring further research (‘What do we want to find out more about?’)
- write down the questions that still need to be answered
- plan how these question or areas for development can be answered in the classroom in ways that allow students to experience aspects of sound that make sense to them
- plan how you will organise your students and how you will support their learning – which students will need more support than others, and how will you do this?
Additional resources
- ‘How to jumpstart your child’s mind with brainstorming’ by Heather Vale Goss: http://www.education.com/ magazine/ article/ brainstorming-solutions-jumpstart-child-mind/
- Sound theme page: http://www.kathimitchell.com/ sound.htm
References
Acknowledgements
Except for third party materials and otherwise stated below, this content is made available under a Creative Commons Attribution-ShareAlike licence (http://creativecommons.org/ licenses/ by-sa/ 3.0/). The material acknowledged below is Proprietary and used under licence for this project, and not subject to the Creative Commons Licence. This means that this material may only be used unadapted within the TESS-India project and not in any subsequent OER versions. This includes the use of the TESS-India, OU and UKAID logos.
Grateful acknowledgement is made to the following sources for permission to reproduce the material in this unit:
Resource 4: from http://www.tessafrica.net/ files/ tessafrica/ kr_brainstorming.pdf (CC-BY-SA).
Every effort has been made to contact copyright owners. If any have been inadvertently overlooked the publishers will be pleased to make the necessary arrangements at the first opportunity.
Video (including video stills): thanks are extended to the teacher educators, headteachers, teachers and students across India who worked with The Open University in the productions.