Use 'Print preview' to check the number of pages and printer settings.
Print functionality varies between browsers.
Printable page generated Friday, 24 July 2026, 12:38 PM
DIY Learn Trainers’ Handbook
1 What is DIY Learn?
Development Impact and You (DIY) is a set of practical tools to trigger and support social innovation. The DIY Toolkit, available as individual downloadable templates, has been especially designed for development practitioners and social entrepreneurs to invent, adopt or adapt ideas that can help them deliver increased positive social impact through their work.
DIY Learn is a set of modules that support a deeper understanding of how to get the most out of each DIY tool, and know where and when it is most appropriate and applicable. The modules have primarily been designed for learners to work through on their own, but this is not the only way in which they can be of value. This Handbook provides guidance on using the DIY Learn modules as a basis for group training in a classroom setting.
The DIY Learn modules are designed as online Open Educational Resources (OER) under a Creative Commons licence. This means that they are free to download, adapt and use within the terms and conditions of the licence. The online version of the modules can be found on the OpenLearn Works website, at www.open.edu/ openlearnworks/ DIYLearn.
2 DIY Learn modules
The DIY Toolkit modules have been developed to support understanding of each template in the toolkit.
The modules can be used individually or in combination. Although they cross-reference each other, they are designed to stand alone and there are no learning dependencies between them. You can use one or more modules in any combination as a programme of study, according to your requirements. They can be studied in any order, although there are some logical orders in which to use certain tools for generating, selecting, evaluating and refining ideas. See Section 5.1 for more suggestions on this for assembling a training programme.
The DIY Toolkit draws on a study of many hundreds of tools currently being used, and includes only the ones which practitioners found most useful. Many of them are well-documented and have been widely used in other sectors. In that sense, this toolkit is standing on the shoulders of giants, and the DIY team are happy to acknowledge that. All the tool descriptions at www.diytoolkit.org include a key reference, so it is easy to trace how the tools were created and dive deeper into other publications about their application.
The DIY Learn modules have been written by expert authors for The Open University UK. The style of writing follows pedagogic principles and techniques for distance learning that have been used over many years in Open University courses. This means that the modules are designed for use by someone who is reading and studying on their own. They have several features that are designed to ensure active learning by the student. Using these techniques creates greater flexibility because the modules are more resilient to variations in the resources available for teaching and learning in a classroom context. It enhances their value as the basis for training because the approach puts the ‘teacher in the text’. In practice, the modules can be used in a combined approach that is partly face-to-face teaching in a classroom and partly independent study. They can also be combined with practical training, work experience or other learning activity.
3 Module components
Each module is designed for approximately two to three hours of independent study time for a learner with good English and at least secondary level education. Each study session follows a standard template that provides users with a familiar framework and so makes it easier to plan study activities. The main components of each study session are as follows:
- a title that concisely and clearly describes the session contents
- learning outcomes, each tested by at least one SAQ (see below)
- an introduction that lays out what will be covered in the study session
- core content, text with illustrations, diagrams, graphs, examples etc.
- key points that are highlighted
- a summary, which includes key points covered in the study session
- at the end of each study session there are four self-assessment questions (SAQs) to help students test their learning.
The structure creates a learning pathway for the student that links the components in a narrative route through the text. They can track the introduction of a topic and a statement of the corresponding goal in a learning outcome, through the relevant section of core content to the summary points and SAQs at the end. Table 1 describes some of these components in more detail and highlights the reasons why they are included in each study session.
| Component | Description | Purpose |
| Learning outcomes | A set of statements that indicate what students should have achieved by the time they have completed a particular study session. | Learning outcomes are goals. They are important tools for both trainers and students. For trainers, learning outcomes provide a way of making it clear to students what they are expected to have accomplished by the end of a study session. Learning outcomes indicate a knowledge outcome (what the trainer wants students to know) or a skill outcome (what the trainer wants students to be able to do). For students, learning outcomes highlight what is expected of them. Outcomes provide a way for students to assess their own learning. For example, students should be encouraged to turn learning outcomes into questions and see if they can answer them. |
| Key points | Important terms, highlighted in boxes, that students should be familiar with by the time they complete the study session. | Students can often feel overwhelmed by the number of ideas, concepts and principles that they encounter in a session. The highlighted points are words and concepts that they really need to focus on and understand by the end of the study session. |
| Core content | Materials authored by experts, covering the topics outlined by the module title and learning outcomes. | DIY Learn modules provide new teaching material and can also reinforce or complement existing teaching and curriculum. Trainers in a classroom setting should integrate this material into a session, and not just read out the written material to a class. Instead, trainers are ‘learning guides’, creating sessions that comprise short talks and activities based on the DIY materials (see Section 5). |
| In-text activities | Interactive activities embedded within the core content that learners are expected to complete as they read through the materials. | In-text activities encourage students to pause in their study and check their understanding of what they are learning. The activities are based on preceding sections of the study session or may refer back to earlier study sessions in the same module, or invite students to consider how their own experiences are relevant to the topic. This reinforces prior learning and encourages students to reflect on what they have read. This Handbook provides group alternatives for each activity in Appendix 2 – see Section 5 for more detail. |
| Summary | A brief overview of the main concepts covered in the study session. | The summary brings together the key ideas and concepts from the different parts of the study session. For trainers, the summary (and any subsequent discussion) can be used to recap important ideas and concepts at the end of the session. |
| Self-assessment questions (SAQs) | Another set of tools for learners and trainers to use to evaluate learning achievements in the session. | We outlined above how students should be encouraged to transform learning outcomes into questions that can help them assess their learning. That task is essentially completed for them in the SAQs that appear at the end of each session. They can be used to test the student’s knowledge of the material. |
| Badged quizzes | Each has a set of 15 questions, with three alternative presentation styles for each, which further test understanding. Students receive an immediate score, and hints to help them try again when they have got an answer incorrect. | Mozilla Open Badges are an online standard to recognise and verify learning. The badged quiz questions are optional, and students can complete the module and test their learning without engaging with the quiz. However, satisfactory completion of the quiz will award them a Mozilla Open Badge to acknowledge that they have completed this short, informal course of study. |
4 Assessment
Assessment can be used to support learning. It does not only demonstrate achievement and ‘passing’ a course. It also:
- acts as a powerful tool for teaching
- coupled with feedback from the trainer, helps students to improve their learning and achieve better outcomes
- is a source of encouragement and builds confidence.
The DIY Learn modules incorporate two types of informal assessment: in-text activities with immediate feedback in the main text, and self-assessment questions (SAQs) at the end of the module. Students should answer these questions to help reinforce their studies and assess their own progress.
In-text activities are intended to engage the student in ‘active’ reading. This reinforces learning more effectively than giving information passively.
SAQs provide an opportunity for students and for you as the trainer to assess whether students have achieved against the learning outcomes for the module. The SAQs help students to see what they have learned well and identify what they may need to revise or ask you about.
Note that, in the printed version of the modules, the SAQ answers are all included at the back of the book. In the online version, the answers appear below the question by clicking on the ‘Check your answer’ or 'Reveal answer/discussion' button.
The DIY Learn modules provide a semi-formal means of assessment through the quiz at the end of each topic. Mozilla Open Badges verify that the student has completed the module, linking back to the qualifying criteria and verifying evidence, and can be recognised by employers and other agencies as a measure of skill and achievement.
For further formal assessment, you may wish to develop further assignments based on the DIY Learn modules. These could be designed to meet criteria and test learning outcomes set by an accrediting institution or organisation. For example, the assessment could be linked to progress towards a partnership agreement or funding award.
5 Using DIY Learn modules for classroom teaching
Student success with the DIY Learn modules relies on the following teaching practices:
- ensuring students successfully achieve the learning outcomes of the study session
- encouraging students to discuss the topics together
- encouraging students to think how they could apply what they learn in a work context.
In the training room you need to decide how you can make best use of the modules. Remember that they are designed for independent study, so you do not have to include everything in your face-to-face training session. You can use the modules to guide study time outside the training room and for homework. Use training time for activities, discussions, challenging topics, practical exercises, questions, developing examples and scenarios, and relating the content to your local context.
Before you start using the modules, there are practical matters to consider. You will need to adapt your session plans according to answers to these questions:
- Do you have enough printed copies of the DIY Learn module to give to each student, and one for yourself? Or will they access the material online?
- Will your students have access to and be motivated to study the materials independently outside the classroom?
- Are there other components of the training to consider, such as formal assessments, practical sessions, etc.?
- Do you have access to a computer and projector for PowerPoint presentations, or internet access? Can you make use of audio or video material, on DVD or via the internet, to support your teaching?
Another practical point to be aware of is that students might need a dedicated study notebook to capture notes, reflections and record answers to questions. Students may need support and encouragement in using their notebooks. You should stress the value of students keeping all their relevant notes in one place so they can easily be referred to when needed. If students are studying on their own for some of the time, you should encourage them to write down any questions that occur to them so that they can be raised with you or in the training session later.
We suggest you consider the following general points when planning your teaching:
- Although they are all approximately the same length, some study session topics might be more challenging for students than others, so you should consider how to build in more time for those sessions.
- Students will get the most out of the materials if you guide them through the most important principles, ideas and concepts in the modules.
- Build in time for students to share and discuss their thoughts during sessions. This is just as important as setting aside time to go over the written materials.
- Consider getting the students to work together in small groups rather than individually and think creatively about activities and exercises that could be suitable for group work in addition to those we have suggested.
- Reading text to students or getting the students to read the text in class is likely to be the least effective teaching or learning strategy.
5.1 What is the correct order for teaching the DIY Learn modules?
The DIY tools can all be studied and used independently, but will probably have most value (particularly for a group) when seen in the context of a process of innovation. The following section of the Handbook is taken from http://diytoolkit.org/ background, where you will find further detail and references if needed.
Innovation is sometimes written about as something almost magical. However it is wrong to see innovation as a mystery. It is true that innovation is rarely simple or predictable but, looking closely at what actually happens, it is also true that the overall innovation process is structured and systematic.
Although every real innovation is a complex story of loops and jumps, there are various stages that most innovations pass through. This framework is useful for understanding how to put ideas to work, and focusing on the different methods, and different mindset, needed at each stage.
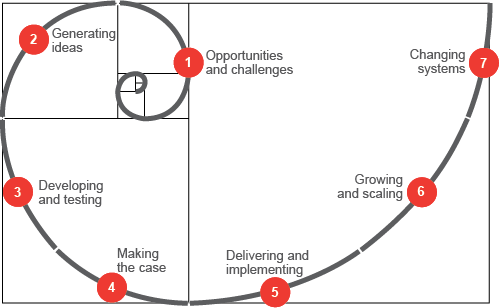
The seven stages are:
1. Opportunities and challenges: These include all the initiating factors like a crisis, new evidence, inspirations etc. that highlight the need for change. This might involve diagnosing the root causes of a problem, or identifying the opportunities that a new change could bring about.
2. Generating ideas: Most of the ideas you come up with at first won’t work. But it’s only through the process of constant idea creation that you arrive at something that is radical and transformative. Use creative methods like design to increase the number of solution options from a wide range of sources.
3. Developing and testing: New ideas are always helped by robust criticism. It is through trial and error that ideas are iterated and strengthened. This can be done by simply trying things out, or through more rigorous prototyping and randomised controlled trials.
4. Making the case: Before you try to implement your idea, you need to prove that it can work and is better than what is already there. Build up firm evidence to back it up and then share it honestly.
5. Delivering and implementing: This is when the solution becomes everyday practice. It includes identifying what is working well, and what is not, as well as securing income streams that enable the long-term financial sustainability to carry the innovation forward.
6. Growing and scaling: In this stage there are a range of strategies for growing and spreading an innovation – from organisational growth to licensing and franchising. Emulation and inspiration also play a critical role in spreading an idea or practice in a more organic and adaptive manner.
7. Changing systems: Systemic innovation is where maximum social impact can be created. It usually involves changes in the public and private sector over long periods of time, and the interaction of many elements and new ways of thinking.
The tools in the DIY toolkit are grouped to help you understand how they fit into this process of innovationFootnote 1. According to your needs, you could pick one or two tools from each stage to explore in order, or focus in on all the tools for one stage that might be proving especially challenging for your group.
5.2 How do I create a session from the DIY Learn modules?
There is no set approach for delivering the content in a session. The structure of your session – what you teach, the materials that you use – is likely to depend on a range of factors in your local context or setting.
However, the DIY Learn team believes that you will have the most success in using the materials if you do the following:
- Base each training session on one module at a time. You could create a workshop from two or three training sessions, divided up with food and comfort breaks.
- Make sure you are completely familiar with the material in the module and have an understanding of how it fits into the process of innovation as a whole before the session.
- Consider what you want students to focus on during the training session and what you may want students to work on outside the session (either before or afterwards).
- Take sections of the core content and turn them into short talks lasting approximately 10–15 minutes. You probably need three or four of these short talks for a two-hour session. These will work best if there is an activity or exercise between each talk that will keep students engaged.
- Adapt the activities and exercises provided, and/or your own activity ideas, to relate topics to your location/context and to the students’ own experiences. Incorporate these between your short talks on the core content.
- If you have the facilities, you could produce accompanying PowerPoint slides that you can put up on a screen, or give students handouts. Alternatively, make a list of the key ideas and concepts that you can write on a board and talk through in the class.
5.3 Basic session plan
In this part of the Handbook we provide details of a basic session plan in three parts that has been designed to engage students and maximise their learning from a complete DIY Learn study session.
| Part 1: Introducing the session | Part 2: Core teaching and learning | Part 3: Summary and learning reflection | |
| Purpose of this part of the session | Set out the main objective of the session. Outline what students should have learned by the end of the session. | Present information, concepts and principles. Engage students in exercises and discussions to assess whether they can apply the information encountered. | Present an overview of the information covered in the session. Provide an opportunity for students to reflect on their learning in relation to the learning outcomes of the study session. |
| What study session components will be used in this part of the session | Learning outcomes | Core content Adapted in-text activities Key points | Summary Self-assessment questions (SAQs) |
| Suggested timings for a two-hour session | 10 minutes | 90 minutes (divided into shorter sub-sections) | 20 minutes |
Part 1: Introducing the session
This section outlines ways in which the topic and learning outcomes associated with each DIY Learn study session can be integrated into the introduction to the session. The introduction:
- summarises the purpose of the session
- highlights some of the key concepts and principles that students will be exploring.
When thinking about how to integrate the topic, key terms and learning outcomes into a session, consider the following ideas:
- Spend five to ten minutes introducing the session.
- Write the topic on the board for students to see. Ask the group why they think this topic is important. Suggest students read the introduction section of the study session before they answer to help them to think about why it is important.
- You could ask a few quick starter questions to stimulate discussion and get students to think about their background knowledge of the topic.
- Write any key terms and/or learning outcomes on the board for the group to see and keep them visible throughout the session. As the session progresses, cross them out or tick them off when they have been covered.
Part 2: Core teaching and learning
When constructing your session plan, consider the following tips:
- Prepare your short talks in advance. Assuming you have allocated 90 minutes of a two-hour session to the core teaching, make sure you have broken this time down into three or four subsections from the core module content. During your talks, encourage students to ask you questions if they do not understand something. This will help them to remain engaged.
- Break up the talks with activities. Try to ensure students do something different every 15–20 minutes to keep their attention focused on the topic. Avoid a long lecture or a group activity that takes a long time as this will make students feel bored.
- Use the group versions of the in-text activities, as provided in Appendix 2 of this Handbook. Adapt the activities according to your needs, your group size and the content that you want to emphasise. Use plenary discussions – bringing the whole group back together – to help students share and reflect on their learning.
- You don’t have to fit everything into the suggested two-hour session. Students can be instructed to complete homework, either beforehand to bring to the session or afterwards.
Part 3: Summary and learning reflection
The final section of your session will focus on the summary section and self-assessment questions (SAQs). We suggest it would be most effective if you split it into three parts:
- Recap the learning outcomes covered by the session – try turning these into questions and asking students to raise their hands if they think they can answer them. This is a really good way of easily evaluating how students have understood the session and the concepts and ideas covered.
- Go over each of the main points made in the summary. You could try modifying some of these points to include the word ‘not’ and asking students if the statements you make are true or false. Again, this is a way of evaluating how students have engaged with the concepts and ideas presented in the session.
- Go through the SAQs with the students, or ask them to work on their own or in groups to answer these questions. You don’t need to go through all the questions, but do use some of them as they are excellent tools for evaluating students’ engagement with the session content. You could also devise some alternative questions of your own, especially if you can relate them to your local area and the students’ experience. If you want to leave time for class discussion about the SAQs and their answers, you may need more than the 20 minutes suggested in Table 2 for Part 3 of your session.
Finally, remember that a session plan is a proposed course of action – in the training room you may need to change and alter your plan according to your students’ needs. Remember to capture these changes in a revised plan so that you or colleagues know what is likely to work best for students next time.
6 Using DIY Learn modules for group study
Another approach to using the modules is a combination of independent study with some elements of distance learning. This can be particularly useful in a work-based context.
If you are the supervisor or leader of a group of staff, these modules provide a convenient way of providing training without sending them away for a residential course, which may be expensive and take them away from their jobs. You can set them the task of studying one or more of the DIY Learn modules or part of a module within a set time. The only resources required would be (ideally) internet access or offline copies of the relevant modules. You could also consider setting tasks for your group of staff to link their study to their work activities.
You will need to allocate some time for discussion and feedback sessions with your group of staff, but this will be significantly less than conventional training. Your staff will improve their skills and knowledge, and they will also have the benefit of support from you and from their colleagues who are studying with them.
Appendix 1
Module Learning Outcomes
Module title: Building Partnerships Map
Learning outcomes
After studying this module, you should be able to:
- describe a building partnerships map and explain when it can be useful and appropriate
- identify key activities involved at each step of the building partnerships map
- plan a partnership process using the building partnerships map
- explain how and when to use the building partnerships map to resolve difficulties and challenges.
Module title: Business Model Canvas
Learning outcomes
After studying this module, you should be able to:
- understand why business models are important
- explain how the business model canvas would be useful for your own ideas
- describe the nine elements of a business model canvas
- explain why a good value proposition is central to a successful business model canvas.
Module title: Creative Workshop
Learning outcomes
After studying this module, you should be able to:
- describe why you would use a creative workshop
- recognise and understand the key steps in planning a creative workshop
- plan a creative workshop
- evaluate and select other DIY tools to facilitate key steps for a creative workshop.
Module title: Evidence Planning
Learning outcomes
After studying this module, you should be able to:
- describe what evidence planning is and when you would use it
- understand the evidence planning tool and its usefulness for constructing an evidence base for the impact of a project, organisation or business
- explain the difference between tacit and explicit assumptions
- use evidence planning to identify the mistakes you have made, and what you want to retain and change.
Module title: Fast Idea Generator
Learning outcomes
After studying this module, you should be able to:
- describe when the fast idea generator is appropriate and useful
- explain why ‘thinking differently’ can help to generate new ideas
- understand the nine elements of the fast idea generator which help you to explore and challenge a wide range of perspectives on a problem or opportunity by bending, stretching and breaking accepted conventions
- identify and select the most useful ideas from the fast idea generator process to take forward for further investigation/discussion.
Module title: Personas
Learning outcomes
After studying this module, you should be able to:
- describe what a persona is and identify why and when to use it
- explore how personas can be applied to create empathy between planners and their target audience
- use a persona to create an identity for a target group
- know how to construct a persona.
Module title: Problem Definition
Learning outcomes
After studying this module, you should be able to:
- describe when it is useful and appropriate to spend time on a detailed definition of a problem
- recognise and understand the steps in defining a problem
- complete a problem definition analysis for a problem that you face
- revise or reframe a problem to make it manageable and solvable.
Module title: Question Ladder
Learning outcomes
After studying this module, you should be able to:
- describe when a question ladder is a useful and appropriate tool
- understand the layout of the question ladder template and how it works
- select the most relevant questions to challenge the core issues of a problem or opportunity
- explain the strengths and weaknesses of a question ladder.
Module title: SWOT Analysis
Learning outcomes
After studying this module, you should be able to:
- describe what a SWOT analysis is and where you would use it
- explain the terms strength, weakness, opportunity and threat in the context of a SWOT analysis
- distinguish between the internal and external issues in an organisation and its environment using the SWOT Model
- conduct and interpret a simple SWOT analysis.
Module title: Theory of Change
Learning outcomes
After studying this module, you should be able to:
- describe the purpose and value of using a Theory of Change model
- identify the steps involved in reaching a goal using the Theory of Change model
- lead a participatory process of identifying the Theory of Change for a programme or idea
- recognise how assumptions help to identify key risks.
Appendix 2
Group work activities for each module
The instructions in this section are designed to be read alongside the corresponding individual activity within the online module. For example, the following instructions for individual work come from Activity 2 in the Evidence Planning module:
Identify the tacit assumptions in the following statements:
- There’s nothing wrong with using a mobile phone during church, other people do it all the time.
- Stealing from the bank isn’t as bad as stealing from a real person.
- Marking students at a fail grade will damage their confidence, therefore we shouldn’t fail students.
- I know that boy and girl are dating because I saw them holding hands.
- He didn’t say anything when I asked, so it must be that he doesn’t know.
- People are not engaging with our website so it must be that they don’t know where to find it.
The group work suggestion draws on this activity, and therefore only makes sense when you reference it back to the module:
You could ask the group to break into pairs to work through these sentences and then present and discuss their answers during plenary. If you want to spend more time on this activity, then ask students to come up with their own sentences to illustrate tacit assumption. It is likely that some of them won’t be quite right, so you’ll need to allow plenty of time for thinking, feedback and discussion.
We have set out the instructions this way because the activities – whether individual or group – are designed to sit at specific points in the flow of learning in order to test understanding and/or help students engage with particular ideas or concepts. Group activities should not be considered in isolation from the text!
Module title: Building Partnerships Map
Activity 1
If you are carrying out this exercise with others you could work in small groups and note the common themes from the experiences of group members. As the facilitator you should draw out the point that partnerships involve a number of overlapping stages.
Note relating to all the activities in Section 2
With any of the phases discussed in Section 2, ask small groups to identify what they think the phase involves, and then feed back to the wider group. You could even turn it into a competition, awarding marks or prizes to the group that best captures a particular stage. For groups that frequently work together, you could ask them to identify elements of existing partnerships that correspond to the phases being discussed.
Activity 3
You could make this into a competition to see which group can complete the crossword first. Alternatively, adapt the questions and make it into a quiz.
Activity 4
This activity could be made into a group quiz. You could identify some key processes, such as the example of the teaming agreement used in this activity, and ask groups to decide during which stage the process may occur.
Activity 5
This activity lends itself to group discussion. You could pose the questions below to each group and ask them to discuss their own experiences and then feed back to the wider group.
Activity 6
This activity could be done with role play. Assign individuals to different hypothetical partners and present a challenge. Encourage one person to act as a facilitator to identify the phase in the Map to which the difficulty relates, and have the group develop an action plan to develop that phase and move forward.
Module title: Business Model Canvas
Activity 1
This would work as a brief discussion with the whole group, making sure that the key points are drawn out. Depending on your group, people might have examples to offer of when development has been carried out poorly, and you could talk about how the Business Model Canvas might have helped to avoid particular pitfalls.
Activity 2
This could be a snowball activity in which individuals make notes and share those notes with partners. Those partners then share with other partners, and so on until everyone feeds their notes back into the group. The group’s responses could be quite broad, such as those given as feedback in the Activity 2 itself, or your group might identify very specific examples that could provide more basis for detailed discussion.
Activity 3
You could split the group into three and ask each smaller group to focus on either the unique idea, the value to the beneficiary or the value to the donor. When the groups come together, conduct a discussion on how well the three elements become one statement and what, if anything, could be done to refine it.
Activity 4
Depending on individual requirements within the group, this could be an individual activity in which everyone works separately on plans that you provide as a template, or the group could complete a single plan together using a flipchart. Either way, make it as practical as possible and, if appropriate, follow up with people after the workshop to make sure that actions have taken place.
Module title: Creative Workshop
Activity 1
This activity lends itself to group discussion. Ask the group to think about a time when a Creative Workshop would have been useful for their organisation or department. How might it have helped? Then ask how they might use a Creative Workshop for a particular initiative or project design they are currently involved with, or one that is in the future.
Activity 2
This activity could be carried out as an informal chat in pairs or small groups. Ask each pair or group to reflect on when you are at your most creative and innovative, and then think about what influencing factors you could replicate at the Creative Workshop. If you have time to prepare, think of some objects that might assist creative thinking and provide pictures to represent them, for example:
- a sofa (comfortable seating)
- jeans (comfortable clothing)
- 3D puzzles (something to play with while thinking).
Then in plenary go around the groups/pairs asking each to suggest one thing or choose a picture and describe how it contributes to a good environment for creative thinking. Invite further comments from the pairs or groups on what they can do in their own contexts to support a creative environment for a workshop.
Activity 3
This activity lends itself to working in small groups. Print A4-size pages with the six steps of the Creative Workshop on them (one page for each step). Give them to each group to arrange in the correct order on the floor or table. Ask each group to come up with a tip for each stage, like the example in Box 2.
Activity 4
Ask for suggestions from individuals who already have strong ideas about the Creative Workshops they would like to plan. Pick the best three or four and allocate them to small groups to work on together, presenting back at the end of the session.
Activity 5
Divide into four groups and ask each group to review one of the following four tools from the DIY Toolkit:
- Personas
- Promises and Potential Map
- Business Model Canvas
- Theory of Change.
Each group then adds its tool to its Creative Workshop plan with some guidance on where, how and why it is to be used.
Module title: Evidence Planning
Activity 1
Divide into groups of five. Ask all of the groups to consider a project or piece of work they are involved in. (You might want to specify something that is familiar to everyone.) Depending on numbers, one (some) group(s) considers why the current approach is taken and why it should remain in place. The other group(s) consider whether this is the best approach, and if so, how it could be improved; if not, what might replace it. Ask the groups to come together in plenary to share their discussions.
Activity 2
Ask the group to break into pairs to work through the statements presented in the main text and then present and discuss their answers during plenary. If you want to spend more time on this activity, ask students to come up with their own statements to illustrate tacit assumption. It is likely that some of them won’t be quite right, so you’ll need to allow plenty of time for thinking, feedback and discussion.
Activity 3
In plenary, discuss the positives and negatives of conflict in groups and teams as a basis for using the Evidence Planning tool. Why is it important to be able to air conflict and explore contested evidence? How might conflict be negotiated and brokered in a setting like the Teemac case study? The discussion should be steered to demonstrate that conflict is normal and healthy, and for the Evidence Planning tool to be truly useful, it needs to be part of the process.
Activity 4
Working with a team or department, divide the group into four evenly sized smaller groups and ask them to complete one of the quadrants for their team or department on a flip chart page.
Bring the groups together and pin up the four flip chart pages in the order they are presented in the template. Ask the ‘replace’ group to comment on the ‘enhance’ group’s work, and vice versa. Ask the ‘reuse’ group to comment on the ‘limit’ group’s work, and vice versa. Make additions, amendments and annotations as necessary.
Activity 5
Allow 15 minutes for this activity. Working in the same groups as for Activity 4, allocate a task to each group as below:
- enhance group: how can you correct any mistakes?
- replace group: identify what you want to retain
- limit group: identify any evidence gaps and false assumptions
- reuse group: identify what is working well.
Ask each group to capture their ideas on a flip chart page.
Bring the groups together and pin up the flip chart pages. Ask the ‘replace’ group to comment on the ‘enhance’ group’s work, and vice versa. Ask the ‘reuse’ group to comment on the ‘limit’ group’s work, and vice versa. Make additions, amendments and annotations as necessary.
Module title: Fast Idea Generator
Activity 1
You could replicate the same activity with buckets or boxes and have the statements written on paper or card so that your group members could drop them into the correct buckets. Ask the members to write down their own ideas and discuss as a group in which bucket they should be placed. Generate and explore a range of ideas and select and build upon the best ideas.
Activity 2How you manage this activity will depend on the makeup of the group and how/whether they work together. You could ask people to work in pairs and then feed back to the wider group for discussion, looking for common points and good ideas across the pairs.
Activity 3
You could use a blank template with your group and ask them to role play as Rikta and other members of the community (perhaps giving them named roles) to generate ideas that can be compared with the completed Fast Idea Generator template shown in the activity (Figure 2). This would make for quite a long activity. Alternatively, chair a discussion to check the group’s understanding of how the template has been completed, and what could have been done differently.
Activity 4
You might already have a shared problem on which the group could work for this exercise. Alternatively, ask each person to make one suggestion, then either select or allow voting on the one to work with. Run this as a complete creative-thinking activity, appointing one person as the facilitator and then reallocating that role periodically so that (ideally) everyone gets a turn. For example, the first facilitator could allow everyone to shout ideas for the inversion approach; the second facilitator could place a time restriction on working through the integration section; the third facilitator could ask for one idea from each person for the extension section; etc.
Module title: Personas
Activity 1
a) This is a quick understanding check. Ask the group to vote on the statement they agree with. If anyone chooses Statement 1, ask them to explain their choice. Check that everyone is happy with the correct answer before moving on.
b) Ask the group to work in pairs to discuss and capture their ideas and report back to plenary, when you can manage the discussion to draw out the key points.
Activity 2
It’s not a good idea to ask people to do this exercise on each other when they’re in the same room, as it may feel too personal and invasive. Instead, pick someone that the group will know who is significantly removed, perhaps even famous. As them to work in pairs to make two lists, one of ‘Facts’ and one of ‘Feelings’ (reflecting the empathy-based approach), and bring back into plenary to discuss.
Activity 3
This could be a discussion activity or you could create two groups and ask one group to prepare arguments for responding to the Doris persona while the other group argues for further research to be conducted. Make sure that all the key teaching points come out in the debate.
Activity 4
Depending on the needs of your group, this could be an individual activity where individuals work on action plans that you have provided in template form. Alternatively, you could do it as a group and fill in a plan on a flipchart together. Either way, make it as practical as possible and, if appropriate, follow up with people after the workshop to make sure that actions have taken place.
Module title: Problem Definition
Activity 1
If the group are work colleagues, perhaps within the same social enterprise or business department, ask them to discuss a recent change initiative, considering how the problem was understood before and after the change. (The long-term effects of a change initiative can never be fully understood because ‘change’ involves moving to a new, and to some extent, unknown state.) Then ask them to reflect on how the change could have been better implemented if the initial situation had been better understood. Alternatively, if the group are not work colleagues, ask them to individually think through a recent change initiative and then ask for volunteers to share their reflections with the group.
Activity 2
Allocate each of the statements (listed below) to an individual or pair, then ask them to write a short persuasive argument to counter it and present back to the group. Lead a discussion on the importance of proper preparation.
- The sooner the project starts, the sooner it will be finished.
- A rough understanding of the problem will do because we can work out the detail as we go along.
- We have to see the problem clearly, which means keeping it tightly controlled.
- There’s no point unpacking the problem because it will change.
- The more we unpack the problem, the more we won’t be able to solve it.
- If we look too deeply we won’t just have one problem, but many problems.
- Defining the problem too closely can bring competing factions out fighting.
- We have the resource for fixing this problem, so let’s set about fixing it.
- Some things are better left unknown/unsaid.
Activity 3
Divide into groups of five that mix representatives from key stakeholders, and ask each group to identify one problem they would each like to investigate. The groups then vote on one priority problem together for investigation for the rest of the activity.
Breaking into groups again, each group takes one of the questions from the Problem Definition Tool and fully answers it in relation to the chosen problem. If there are fewer than five groups (one for each question), double up to answer two of the questions etc. The groups could capture their thoughts on a large piece of paper.
The groups then report back in a plenary session, pinning their paper up and taking turns to talk everyone through their answers to the questions in the order that they should be asked.
Activity 4
Ask each group to identify one lesson learned and one benefit from using the Problem Definition Tool. The groups then reveal these in a plenary session. Ask the groups to reflect on these lessons and benefits from the perspective of the stakeholders, and to think about the unity it may bring to different stake-holder groups for resolving the problem.
Module title: Question Ladder
Activity 1
Ask learners to think of ideas individually, then place them in pairs, and then groups of four, before bringing the whole group back together. Produce a final list, and keep this up on the wall through the rest of the training activity, referring to it in order to provide examples from time to time.
Activity 2
Ask learners to work in groups of five to discuss the reasons they are engaging with the question ladder. Each member of the group should randomly select a cell from the Question Ladder Template, making sure there is no duplication within the group (although there could be between groups), and use it to construct the question about motivation.
Each person then shares their question with the others in their group and invites them to answer it.
Bring the groups together in a plenary session and ask each group to reflect on why a question might be difficult to answer. It could be because the question isn’t relevant. This leads on to a discussion of the redundancy in a completed Question Ladder, which is discussed below.
Allow around 30 minutes for this activity with a group size of 10.
Activity 3
a) Ask people to work in pairs or small groups to complete the partially completed Question Ladder Template for Margaret’s social enterprise. Afterwards, give groups the completed template to compare with their own. Ask them what cells were the most difficult to complete and why? (It is likely to have been the ‘would’ and ‘might’ columns because they relate to an unknown future position.)
b) Working in pairs or small groups, ask each group to select their top ten questions. The groups will then bring all these together in a plenary session, and the frequency of each question type counted. (There are 36 cells so 36 possible questions.) What are the top ten of the plenary session? If there are any ties, get the plenary session group to discuss the merits of the questions and decide on one.
Activity 4
Ask learners to work in small groups (or pairs) to consider a problem or opportunity and complete a Question Ladder Template together. (You could provide a topic relevant to the learners.) Depending on the size of the whole group, you might ask the small groups/pairs to consider particular types of questions. For example, Group 1 could consider ‘Who’ and ‘Is’ questions, Group 2 could consider ‘What’ and ‘Did’ questions etc. Once the template is completed, ask each small group/pair to select and blend the questions that they feel are the most relevant to the problem or opportunity. You can allow the groups to choose as many or as few questions as they need, or limit the number to standardise for group feedback in a plenary session. If the exercise is going to be a particularly practical one, assign action points to follow up, such as gathering information after the workshop.
Module title: SWOT Analysis
Activity 1
This is a quick understanding check. You could read out the three statements and ask learners to vote either by raising their hands or by moving to a specific area of the room.
Activity 2
Print or write out all the factors on separate pieces of paper before the session. If you have a small group, you could ask everyone to work together to discuss each factor and place it in the internal or external pile. With a larger group, you could provide two sets and make it a competition – set a time limit for the activity and then talk through the right answers, awarding a small prize (or maybe just a cheer from the losing team) to the winners.
Activity 3
This is a very broad activity, so it would probably be practical to ask the group to think of threats for a specific context that will be familiar to them. You could ask for two contributions from each individual, and encourage discussion around the points raised.
Activity 4
This could be a simple activity for individuals to work on and then discuss as a group. Alternatively, you could ask participants to role-play as
- Syed
- Syed’s employees
- Syed’s friend/advisor
They could then discuss the decision based on the information they have in the SWOT analysis. If necessary, support the discussion with hints based on the feedback to the individual activity.
Module title: Theory of Change
Activity 1
If you are working in a group, you could focus on a project familiar to participants and lead a group discussion about components of the project and how they correspond to elements of the Theory of Change template.
Activity 2
Using the above example, or others that your participants are familiar with, you could ask groups to identify longer-term goals and begin to recognise the distinction between longer-term goals and the measurable effects of the project activities.
Activity 3
After talking through the project example above, or one of your own that your participants are familiar with, you could ask your participants to work in small groups and complete the template, then bring them together to discuss any differences of opinion.
Activity 4
Ask each group to identify stakeholders for the project used in the text or another that the group is familiar with. Bring them together to discuss any differences and to identify which are primary and which are secondary stakeholders.
Activity 5
Ask your groups to develop the agenda for the day. Bring them together to compare their thoughts and discuss their ideas. You could have a prize for the most creative agenda.
Activity 7
Assumptions can be very contentious and this activity lends itself to group discussion. You could build on the templates that groups have completed above and ask other groups to challenge some of the assumptions that are implied in the template. Each group could then defend their assumptions and discuss ways to mitigate risks.
Footnotes
- 1 See http://diytoolkit.org/tools/Back to main text