Week 6: Shapes around us
Use 'Print preview' to check the number of pages and printer settings.
Print functionality varies between browsers.
Printable page generated Saturday, 20 June 2026, 10:49 AM
Week 6: Shapes around us
Introduction
The study of shapes is fundamental to understanding the world that people see around them. Being able to define the properties of both two dimensional shapes, such as triangles, and solid shapes, such as cylinders, enables engineers and designers to build bridges and design new products. Here you’ll begin this area of study by concentrating on basic four-sided shapes, triangles and circles, as well as some solid shapes and how to calculate some of the basic properties of these, such as area and volume.
Maria introduces Week 6 in the video:
Transcript
After this week's study, you should be able to:
- understand some terms used to describe shapes
- understand the notation used when drawing shapes
- work out the perimeter and area of simple shapes
- calculate the volume of simple solids.
1 Geometry
The word geometry comes from two Greek words: ‘geo’ meaning earth and ‘metros’ meaning measurement. So, geometry literally means earth-measurement and in the sense of the earth that is around us, this is what geometry does. It is a branch of maths that, at its basic level, is concerned with describing shapes and space, such as triangles and circles. In order to do this effectively, and to be able to communicate with others exactly what is being measured or described, there is a set of vocabulary and basic definitions that is used to describe angles, lines and shapes. These will be the focus of the first part of this week.
1.1 Angles and lines
Angles measure the amount of turning from one position to another, so for example, you can describe how far around a circle you have moved. Imagine looking straight ahead and then turning around until you return to your starting position. The angle you have turned through is a full turn. If you turn so that you are facing in the opposite direction, you will have made half of a full turn. If you turn from looking straight ahead to facing either directly to your right or directly to your left, you will have made a quarter turn.
A full turn, or a circle, is defined as having 360º (said as 360 degrees). A circle is split into 360 equal parts, each part being 1º. Week 3 of Succeed with maths – Part 1 looks at fractions by using pizzas, and this is very similar. This system was inherited from the Babylonians, whose counting system was based on 60 and who were the first people to use degrees in astronomy.
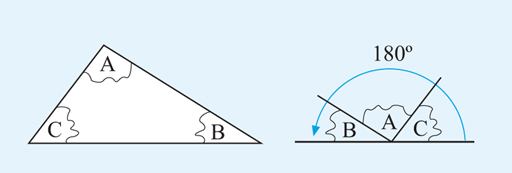
If one full turn is 360º, this means that a half turn is 180º and a quarter turn is 90º, as shown in Figure 1. This helps us to define some basic ideas in geometry.
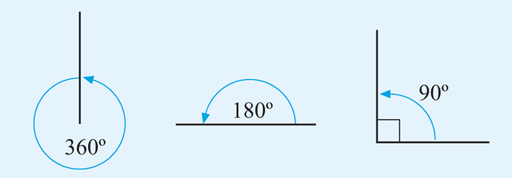
Figure 1 helps us to define some of the basic ideas of geometry.
These are:
- A circle is 360º.
- A straight line is 180º.
- A right angle is 90º.
Now, you’ve looked at one common way of measuring the amount of rotation, let’s think briefly about how to describe and show lines precisely.
Figure 1 shows a right angle, which is denoted by a small square drawn at the angle. This tells us that the angle is exactly 90º and not 89º or 91º. When two lines are at right angles to each other, they are also said to be perpendicular.
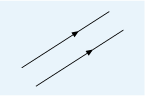
Lines that will never meet and are always the same distance apart, however far you extend them in either direction are called parallel lines. A railway track is an example of a set of two parallel lines and these are shown on diagrams by using an arrow (or double arrow) drawn on each line, as shown in Figure 2.
This use of precise language and definitions removes any confusion when you assess angles and lines on a diagram. These also allow us to move onto looking at shapes and the angles and lines that these are constructed from, in the next section.
1.2 Circles and triangles
There are many shapes in everyday life: rectangular windows, triangular roof sections and circular ponds. It is these types of more familiar shapes that will be the focus of this section.
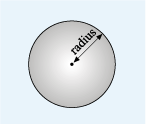
Let’s start with circles, since there is only one type of circle! A circle possesses the property that any point on the circle is always the same distance from the centre point. This distance is known as the radius of the circle. The diameter of a circle is the distance from one edge of the circle to the other, passing through the centre. Finally, the edge of the circle (or the length of this edge) is known as the circumference. You can see all these properties of a circle in Figure 3.
As shown in Figure 3:

Of course, you also know that a circle has 360º.
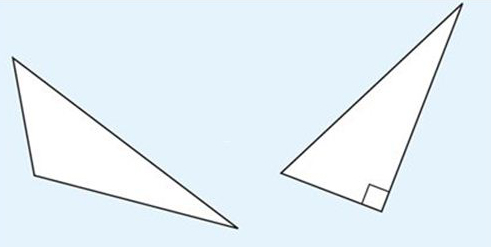
Moving on now to think about triangles. These present us with more to consider, as there are several different standard forms that a triangle can take. Some of these, the right-angled triangle, isosceles triangle and equilateral triangle, are shown in Figure 4. Note that sides that are the same length are marked with the same symbol, usually a short line, perpendicular, to the side.
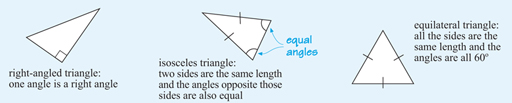
A triangle in which all the sides have different lengths is known as a scalene triangle. Some examples are shown below. You will see that a right-angled triangle can also be described as a scalene triangle, as all the sides are different lengths.
Another important fact is that the angles of a triangle always add up to 180º. To illustrate this, if you cut out any triangle and then tear off the angles, you will be able to arrange them to form a straight line as shown in Figure 6. You might like to try this yourself.
The next section moves to four-sided shapes.
1.3 Four-sided shapes
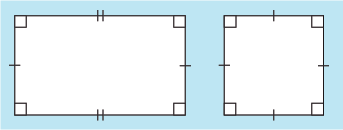
Shapes that have four straight edges are known collectively as quadrilaterals. The most familiar of these are squares and rectangles. It might seem very obvious how these are defined but a rectangle (it’s not called an oblong in maths!) has four straight sides that are all at right-angles to each other, with opposite pairs of lines being the same length. A square is a special kind of rectangle, where all the sides are the same length. This means that in both shapes, opposite pairs of lines are also parallel. These are both shown in Figure 7 – lines of the same length have been marked with a single or double short perpendicular line.
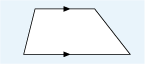
What if you have a four-sided shape where only one pair of lines is parallel? This is known as trapezium and an example is shown below in Figure 8. The parallel lines are marked with arrows.
If the quadrilateral, a four-sided shape, has two sets of parallel sides, it is called a parallelogram:
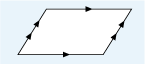
Of course, this definition also means that squares and rectangles are parallelograms!
Now these more familiar shapes have been defined, it is useful to look at how to refer to specific sides or angles in a shape so that these can be clearly communicated to others. This is the subject of the next brief section.
1.4 Describing shapes
When you are describing a geometrical figure or shape, you often need to refer to a particular line or angle on the diagram, so others know what you are referring to. This can be done by labelling the diagram with letters. For example, Figure 10 shows a triangle labelled clockwise at the corners with A,B,C. This is then known as triangle ABC, in which the longest side is AB and the angle is a right angle. is the angle formed by the lines AC and CB. The point where two lines meet is known as a vertex (the plural is vertices). So A, B and C are vertices of the triangle.
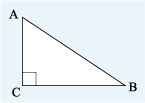
Note that you can use the shorthand notation ‘’ for ‘the triangle ABC’ if you wish. There is a lot of new maths vocabulary in these last few sections, so you might find it useful to make a note of these to refer back to when completing this next activity, or for this week’s quiz and the badged quiz in Week 8.
Activity 1 What can you see?
Look at the image below and then answer the following questions using the letters shown.

- a.Which sets of lines appear to be parellel?
Answer
a.
b.AB is parallel to DC.
AD is parallel to GI and BC.
AI is parallel to EH.
BD is parallel to HJ
- b.Which lines are perpendicular?
Answer
b.AB is perpendicular to AD and to BC.
DC is perpendicular to AD and BC.
EH is perpendicular to DB and HJ.
AI is perpendicular to HJ and DB.
- c.How many triangles can you see?
Answer
- c.
- d.What other shapes can you see?
Answer
d.The parallelogram, GBJI.
The squares, ABCD and EFIH.
The trapeziums, DHIF, EHIG, DBJH, BJHE and DGIH.
This completes your work on defining shapes and how to label them in order to describe them clearly to others.
The next section looks at the different ways for measuring shapes.
2 Perimeters
One of the properties of a shape that is measured is its perimeter. This is the distance around the edge of a shape. For a shape with straight edges, you can work out the perimeter by measuring the length of each edge and then adding these together.
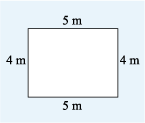
For example, one practical application of this would be someone wanting to decorate the room shown in Figure 12, using a border along the top of all the walls. To determine the length of the border they would need to work out the perimeter. So the border would measure:
An alternative way to calculate this would be to note that the pairs of sides are the same length, giving us:
Have a go yourself in this next activity.
Activity 2 Around the edge
When a shape has straight sides, you can measure the perimeter fairly easily by considering each side in turn. However, measuring lines that are not straight can be more difficult. If you need the measurement for some practical purpose, then you can use a piece of string to wrap around an object and then measure the string. However, as you’ll discover in the next section there more precise methods to calculate these in maths.
2.1 Perimeters of circles
As you saw earlier in this week, the perimeter of the circle has its own name: the circumference. But is there an easy way to calculate the circumference of a circle as there is with a rectangle?
Let’s investigate this in the following practical activity. For this you will need a tape measure (or a piece of string and a ruler) and five objects such as mugs, cans, bowls or buckets that have a circular top or bottom.
Activity 3 Circles
Measure the circumference and diameter of each object in centimetres to the nearest 0.1 cm (or 1 mm). Use the tape measure (or string and ruler) to find the circumference and the ruler to find the diameter.
Write down the diameter and the circumference of each object in a table and calculate the ratio . What do you notice about your answers?
Answer
Here are some results that were obtained when carrying out the activity. The important data to consider are the ratios between the circumferences and the diameters.
Some sample results:
| Item | Diameter (in cm) | Circumference (in cm) | (rounded to 1 decimal place) |
|---|---|---|---|
| Spice jar | 4.4 | 14.1 | 3.2 |
| Drinking glass | 6.6 | 20.9 | 3.2 |
| Tin container | 8.6 | 27 | 3.1 |
| Mug | 10.3 | 32.3 | 3.1 |
| Bowl | 23.0 | 72.8 | 3.2 |
It is difficult to measure these quantities accurately. However, it is noticeable that in each case, the ratio of the circumference to the diameter seems to be about 3.1 or 3.2. In other words, the circumference is just over three times the length of the diameter.
2.2 Using π (pi)
If you could measure these objects more accurately, you would find that the circumference divided by the diameter always gives the same answer. This value is known as ‘pi’ (pronounced ‘pie’) and it is denoted by the Greek letter . The value of is approximately 3.142, although for most calculations you will be using the button on your calculator, which shows pi to many more decimal places.
In fact, pi is an irrational number. This means that it can’t be represented exactly as a fraction and has an infinite number of decimal places, with no repeating pattern of numbers.
This knowledge that the circumference divided by the diameter for any circle gives a constant value of around 3.142 enables a formula to calculate the circumference from the diameter or the radius of a circle to be formed. Therefore:
Because the diameter is twice the radius, this can also be written as:
You will now be asked to select the relevant formula to use in the next activity.
Activity 4 Circumference of a circle
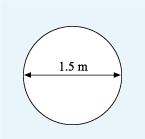
Suppose a circular table has a diameter of 1.5 metres. How many people can sit down comfortably for a meal at the table, assuming that each person requires a space of about 0.75 m? Use the button marked with π on your calculator. If you need a hint or tip simply click on ‘reveal comment’.
Comment
If you want some help to visualise the problem you could draw a quick sketch of the table and gaps for each person.
Answer
To see how many people will fit comfortably around the table you need to first work out the circumference of the table.
The diameter is given, so the circumference can be found with the formula:
Each person needs a space of about 0.75 m in width.
Therefore, six people should be able to fit around the table.
More often than not, the shape of which you need to know the perimeter will not be a simple circle, or rectangle. So, what do you do then? You’ll find out in the next short section.
2.3 Perimeters of mixed shapes
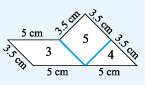
Suppose the shape that you wanted to determine the perimeter of is as shown in Figure 15.
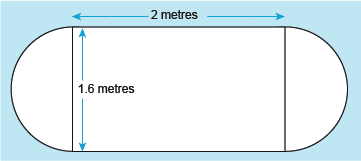
Start by noticing that the shape is formed of one rectangle and two semicircles. The distance around the two semicircles combined is the same as around a circle with a diameter of 1.6 m. So, calculating the circumference of a circle with this diameter will give us part of the answer. To find the total distance, or perimeter, you then just need to add in the lengths of the longest edges of the rectangle. This gives us the following calculation:
So, if you are faced with a complex shape, look for ways to split these up to help you calculate the perimeter.
Another property of a shape that can be useful to know is the area, or space that it occupies. This is slightly more complicated than the perimeter, but for regular shapes there are a set of formulas to help with this, as you will see in the next section.
3 Areas
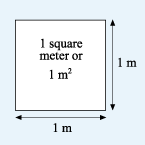
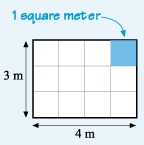
If someone is planning to paint a wall, one of the first questions to ask will be how much paint they need. This will obviously depend on the size of the wall and how many coats needed. Fortunately, paint cans usually include information about the area that the paint will cover. For example, on the back of a 2.5-litre can of emulsion paint, it says that the paint will cover ‘up to 35 square metres.’ A square metre is the area that is covered by a square whose sides measure 1 m, as shown in Figure 16. This can also be written as 1 m2. So 35 m2 will be the same area as the area of 35 of these 1-metre squares.
Areas can also be measured in other square units, such as square centimetres (cm2) or square kilometres (km2), depending on what is appropriate to the situation. For example, if you wanted the area of a country, it would not make sense to show this in cm2 or m2 as the value would be very large! Similarly to a square metre, a square centimetre is a square whose sides are 1 cm long, and a square kilometre has sides that are 1 km long. If the diagram below (Figure 17) is drawn on a grid in which the lines are 1 cm apart, then each grid square will have an area of 1 cm2. One way to work out the total area is counting the number of these squares. This gives us 16, so the grid shown is 16 cm2 altogether.
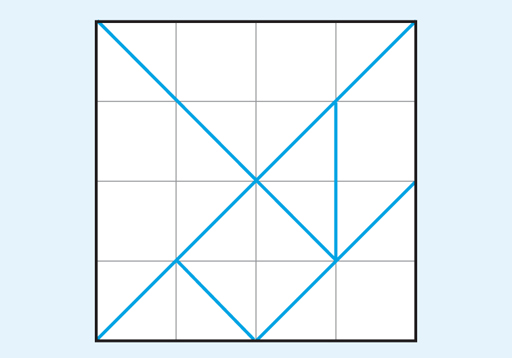
You can use the same technique to determine the areas of the shapes shown on the diagram. Try this now in the next activity.
Activity 5 Counting squares
All the shapes on the diagram in Figure 17 are made up out of whole squares or half squares. Use this information to work out the areas of each of the shapes.
Answer
The areas in square centimetres are shown in Figure 18:
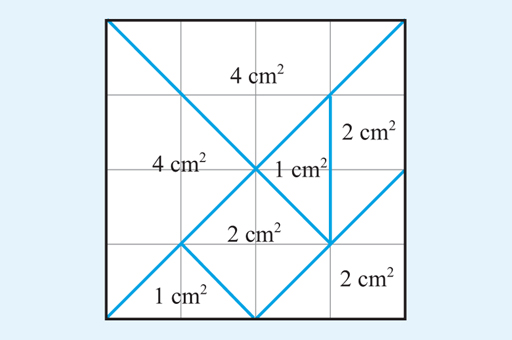
Let’s take the top triangle as an example to show how this was worked out.
This triangle is made up of two full squares and four half squares. Four half squares are the same as 2 full squares, so the total area of the top triangle is 4 cm2.
To check the answers, you can add the individual areas and see if they total 16 cm2.
The sum of the individual areas in cm2 = 4 + 4 + 1 + 2 + 1 + 2 + 2 = 16.
This gives confidence in the individual answers and acts as a very useful check.
Counting squares is one way to work out the area of shapes, particularly if they are irregular. However, it is not very convenient in a lot of situations so this is where the power of formulas comes into play once again.
3.1 Formulas for areas
Many areas can be built out of basic shapes such as rectangles, triangles or circles, and these areas can be calculated using formulas. For example, if a rectangular room measures 4 m by 3 m and you are covering it in carpet tiles that are each 1 m square, the tiles can be arranged in three rows, each with four tiles. So the total number of tiles will be 3 x 4 = 12 and the area covered is written as 12 m2.
This area could have been calculated directly, without the need for squares, by multiplying the length of the room by its width. Provided both measurements are in the same units, the following formula holds for any rectangle (including a square):
From the formula for the area of a rectangle, the formulas for the area of a parallelogram and a triangle can be derived. Starting with a parallelogram, cut off the left edge and place it next to the right edge to make a rectangle, as in Figure 20. This must have the same area as the parallelogram, as nothing has been added or taken away.
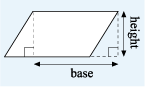
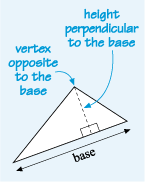
The area of the rectangle can be found by multiplying its length by its height. In the case of a parallelogram, the length is called the base and the width the height. This gives the formula:
Now if this parallelogram is cut in half along a diagonal, this gives two possibilities, as illustrated in Figure 21:
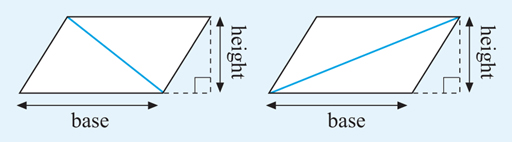
In each case, the parallelogram has been split into two triangles that are each half the area of the parallelogram.
This then gives a general formula for the area of a triangle:
The height goes through the vertex (the point where two lines meet) that is opposite, the base and is always perpendicular, to the base, as shown in Figure 22:
You’ll look at an example in the next section before having a go yourself.
3.2 Finding an area using formulas
Figure 23 is a rough sketch of the gable end of a house that needs weatherproofing.
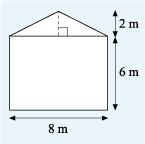
To work out the quantity of materials required, the area of the wall is needed. This problem can be broken down by splitting the area into a rectangle and a triangle, then working out these areas and finally adding the two areas together to get the total.
The triangle has a base of length 8 m and a perpendicular height of 2 m. So, the area can be calculated as follows:
That means the total area of the gable end = 48 m2 + 8 m2.
Now, it’s your turn to put what you’ve learned in this section to use.
Activity 6 Using formulas to calculate areas
Figure 24 shows the same diagram as you have already seen in previous activities. This time though, instead of counting the squares to determine the areas, use the relevant formulas from the previous section. Remember that the whole grid measures 4 cm by 4 cm, and each small square is 1 cm by 1 cm.
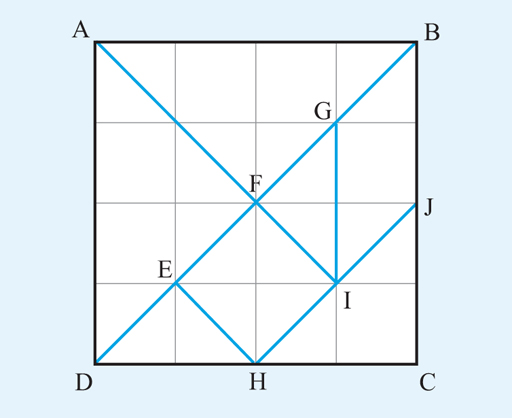
Calculate the areas of the following shapes.
- a.Triangle ADF with AD as the base
Answer
a.The base of the triangle is AD. AD = 4 cm.
The perpendicular height from F onto AD = 2 cm.
- b.Parallelogram GBJI with BJ as the base
Answer
b.BJ = 2 cm. The perpendicular height from G onto BJ = 1 cm.
Now that you know how to calculate the areas of basic shapes, you can calculate more complicated areas by breaking each shape into basic shapes and adding the individual areas together.
Many area problems can be calculated by using combinations of squares, rectangles and triangles. However, you often need to find circular areas, too. The next section will cover this aspect of areas.
3.3 Areas of circles
You can show that the area of a circle is calculated by multiplying the square of the radius by , by splitting the circle into equal sized segments and then arranging these to form a rectangle as shown in Figure 25:
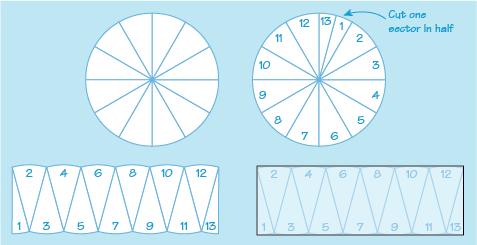
If each segment is made gradually smaller, any ‘bumps’ along the top and bottom edges will be smoothed out to form a line that is closer and closer to being straight. The height of the rectangle will then be the same as the radius of the circle and the length half of the circumference. The area of this rectangle will therefore be equivalent to that of the circle.
The
The circumference and radius are related by the following formula:
So
So putting this together gives:
The formula for the area of a circle is therefore:
If you are given the diameter of a circle instead of the radius, the first step to take when working out the area would be to halve the diameter.
See how you get on with applying this new formula in the next activity.
Activity 7 Everyday structures
Calculate the areas of the following road and town developments, assuming that the measurements are sufficiently accurate to allow answers to the nearest whole number. Remember to click on ‘reveal comment’ for a hint or tip.
- a.A roundabout of radius 15.6 m.
Answer
a.
- b.A circular building with a diameter of 54 metres.
Comment
Remember that you need the radius, not the diameter for the formula for area of a circle.
Answer
b.Here you are given the diameter. The radius is half the diameter.
- c.A semicircular lecture hall with a diameter of 46 m.
Answer
c.The area of a semicircle is half the area of a circle.
So the
The lecture hall has a diameter of 46 m so the radius is 23 m.
The last few sections have included a number of different formulas, so you might appreciate a quick summary to bring them altogether. You might also like to take a note of them alongside any new vocabulary you’ve come across
From your study of measurement in Week’s 1 and 2 of the course you will know that there is one final property of shapes that hasn’t been covered, that is capacity or volume. So, you’ll move onto that now in the final part of this week’s study.
4 Volumes
So far you have considered measuring perimeters and areas. But most things in life are not flat; that is, two-dimensional.
Questions like ‘How much does that hold?’ need you to be able to specify the volume of an object. Extending the ideas you learned earlier you can count how many cubes of a certain size will fit into the space. All the sides of a cube are the same length and its six faces are all square.
Useful cubic measurements to use are the cubic millimetre (written as mm3), the cubic centimetre (written as cm3) and the cubic metre (written as m3).
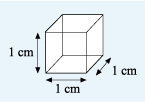
In each case, the length of the side of the cube is 1 unit. So a cubic centimetre has all its sides of length 1 cm, as shown.
Now imagine filling a cubic centimetre with cubic millimetres. Since there are 10 mm in 1 cm, a cubic centimetre will contain 10 layers with each layer made up of 10 rows, each of 10 cubic millimetres.
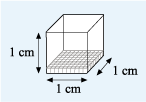
So,
Or a 1 cm by 1 cm by 1 cm cube will hold 1000 cubic millimetres.
Now, suppose you have a box that measures 6 cm by 5 cm by 4 cm. What is its volume? Since all the dimensions are given in centimetres, you can measure the volume in cubic centimetres. Imagine filling the box with 1 cm3 cubes: six rows with five cubes in each row would cover the bottom of the box, and the box would be filled by four of these layers.
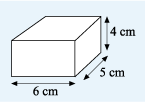
So, the total number of cubes used = 6 x 5 x 4 = 120. The volume of the box is therefore 120 cm3. Before you move on to the next section, can you think of a suitable formula for working out the volume of a rectangular box, known as a cuboid?
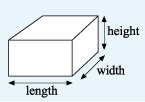
4.1 Volume formulas
You may have already worked out that the formula for the volume of a cuboid can be calculated using the formula shown below.
Here are the formulas of various other shapes that you may encounter as well. Remember to make a note of them somewhere, as you may need one or another for the quizzes!
Use the relevant formulas to complete this next activity and apply what you have learned in this section.
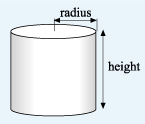
Activity 8 A fuel tanker
- a.The container on a fuel tanker is approximately cylindrical, with an internal diameter of about 2.25 m and an internal length of 10 m. Roughly how many cubic metres of fuel will it hold?
Answer
a.
The length is 10 m, which is in this case equivalent to the height.
Substituting these values into the formula for the volume of a cylinder:
Rounding to the nearest cubic metre, the volume is 40 m3.
- b.The petrol station has an underground tank that measures 2.5 m by 4 m by 3 m. If the tank is empty, will it hold all the fuel in the tanker?
Answer
b.The tank must be a cuboid, as there are 3 dimensions given.
Since the fuel tanker will hold about 40 m3 the petrol station’s tank is not large enough to hold all the fuel.
This activity completes your study of shapes this week.
5 This week's quiz
Well done, you've just completed the last of the activities in this week's study before the weekly quiz.
Go to:
Open the quiz in a new tab or window (by holding ctrl [or cmd on a Mac] when you click the link).
6 Summary
This week you may well have encountered some new mathematical language and different ways of drawing shapes to precisely communicate their properties. As well as this new knowledge, there were also quite a few formulas introduced for perimeters, areas and volumes. That’s a lot to take in, so congratulations for working your way through the week!
You should now be able to:
- understand some terms used to describe shapes
- understand the notation used when drawing shapes
- work out the perimeter and area of simple shapes
- calculate the volume of simple solids.
You can now go to Week 7.
Acknowledgements
This course was written by Hilary Holmes and Maria Townsend.
Except for third party materials and otherwise stated (see FAQs), this content is made available under a Creative Commons Attribution-NonCommercial-ShareAlike 4.0 Licence.
Every effort has been made to contact copyright owners. If any have been inadvertently overlooked, the publishers will be pleased to make the necessary arrangements at the first opportunity.
Don't miss out:
1. Join over 200,000 students, currently studying with The Open University – http://www.open.ac.uk/
2. Enjoyed this? Find out more about this topic or browse all our free course materials on OpenLearn – http://www.open.edu/ openlearn/ free-courses/
3. Outside the UK? We have students in over a hundred countries studying online qualifications – http://www.openuniversity.edu/ – including an MBA at our triple accredited Business School.