Part 5: Propagation by grafting and layering
| Site: | OpenLearn Create |
| Course: | Plant propagation |
| Book: | Part 5: Propagation by grafting and layering |
| Printed by: | Guest user |
| Date: | Friday, 10 July 2026, 6:09 AM |
1. Introduction
Layering and grafting are cloning techniques (so offspring plants are genetically identical to parent plants) using the stems of trees, shrubs or herbaceous perennials.

Veneer graft
Malcolm Manners via Flickr / CC BY 2.0
2. Propagation by grafting
Grafting is a technique in which a rootstock and a scion are bonded (grafted) together and grow together to form a single plant.
Rootstock = a plant, usually grown from seed, which has desirable attributes such as being dwarf in form (for example, to make a dwarf fruit tree so that the fruit can be picked without a ladder). The plant contributes its roots and main stem to the graft
Scion = a section of plant, for example a bud or a stem, cut from a plant with desirable attributes such as flavourful fruit. This section is grafted onto the rootstock.
By carrying out this method, a new plant can be produced that has the attributes of both the rootstock plant and the scion plant.
Do internet searches for ‘grafted trees’ and ‘grafted plants’ to see the great selection of grafted plants available. Try to work out why some of them have been grafted, for example a weeping scion onto a tall straight rootstock or fruit or flower interest.
Do a YouTube search for ‘Sam Van Aken grafting’ and watch some of the videos. Sam has grafted 40 different fruits onto a single tree!
3. Saddle grafting
Saddle grafting = joining a scion onto a rootstock with a particular shape of cut called a saddle.
This method is a simple type of graft, although not the most stable (the two pieces of wood sometimes move around, breaking the bond). It is a great one to start learning the grafting technique with, as the cuts are simple to understand and match up.
Saddle grafting (YouTube, 3:09)
()
Have a go at saddle grafting, being extremely careful not to cut yourself. You can learn the technique using any two twigs that are about the same thickness until you feel confident enough to have a go on a real rootstock and scion.
Do some research online about the best plants to propagate by grafting. Make a note of any favourites that you would like to try to propagate by grafting in the future.
4. Whip and tongue grafting
Whip and tongue grafting = joining a scion onto a rootstock with a particular shape of cut called a whip and tongue.
This method is a bit more fiddly than saddle grafting, but produces a more stable graft with better contact between the cambium layers and so it is more likely to produce a successful graft.
Whip and tongue grafting (YouTube, 3:33)
()
Have a go at whip and tongue grafting, being extremely careful not to cut yourself. You can learn the technique using any two twigs that are about the same thickness until you feel confident enough to have a go on a real rootstock and scion.
Search YouTube for ‘whip and tongue grafting’ to see some videos of practiced professionals carrying out this technique.
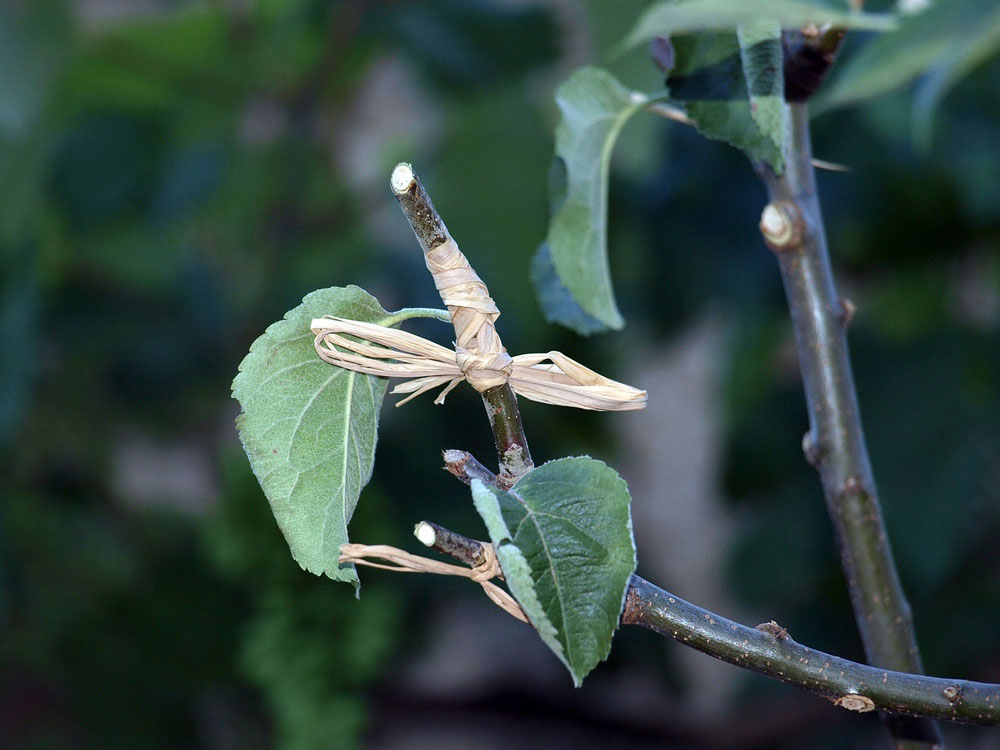
5. Budding
Budding = attaching a scion, in this case a bud (or node), that has been removed from a plant, to a rootstock which is cut to receive the bud.
This method is more straightforward to carry out than saddle or whip and tongue grafting. However, the small scion bud does not contain enough energy or water to support itself for long and so the graft needs to bond quickly, otherwise it will not be successful.
Have a go at budding, being extremely careful not to cut yourself. You can learn the technique using any two twigs that are about the same thickness until you feel confident enough to have a go on a real rootstock and scion.
Search YouTube for ‘budding grafting’ to see some videos of practiced professionals carrying out this technique.
6. Propagation by layering
Pearson Scott Foresman via Wikimedia / public domain
Layering = the development of roots on a stem while the stem is still attached to the parent plant.
There are several different ways to achieve layering but the principle, unlike stem cuttings, is that the stem remains attached to the parent plant, being fed by the parent plant’s root system, while the rooting occurs. This removes the need for carefully controlled temperature and humidity conditions.
Layering can be carried out in the Autumn or in Spring.
The six types of layering are described in the following pages.
6.1. Simple layering
Simple layering is a commonly used technique and simple to carry out. The parent plant continues to feed the stem while the roots are forming which can make it more successful than stem cuttings in some instances.

Amber Crowley / public domain
Method
- Choose a branch that will bend down to ground level without snapping. It is easier if it a branch without too many side shoots.
- Dig a shallow trench (about an inch deep) in the soil along the line of where the branch will lie along the ground. Add some well rotted manure or garden compost to the soil in the trench to improve it.
- Slice through the bark of the branch at each internode on the underside of the branch. Rub some rooting hormone into the cuts if you wish.
- Lay the branch down into the trench and pin it down with wire pegs.
- Cover the branch with about 1 inch of mixed soil and compost or well rotted manure.
- Steak the tip of your branch up so that it is protruding out of the soil in a vertical position.
- In 6-8 weeks dig away some of your soil and check for root growth. If strong roots are present cut through the branch, removing it and leaving the new roots attached to the branch tip, and you will have a new plant.
6.2. Tip layering
This type of layering is suitable for plants that have shorter branched which don’t reach so easily to the soil or if you would like to do lots of layers. It works well on blackberry plants.

Amber Crowley / public domain
Method
- Choose a branch that will bend down to ground level without snapping. It is easier if it a branch without too many side shoots.
- Dig a short, shallow trench (about an inch deep) in the soil along the line of where the branch will lie along the ground. Add some well rotted manure or garden compost to the soil in the trench to improve it.
- Slice through the bark of the branch near the tip, at an internode on the underside of the branch. Rub some rooting hormone into the cut if you wish.
- Lay the branch down into the trench and pin it down a couple of inches from the tip with a wire peg.
- Cover the branch with about 1 inch of mixed soil and compost or well rotted manure.
- Steak the tip of your branch up so that it is protruding out of the soil in a vertical position if it is very bendy, otherwise this is not always necessary.
- In 6-8 weeks dig away some of your soil and check for root growth. If strong roots are present cut through the branch, removing it and leaving the new roots attached to the branch tip, and you will have a new plant.
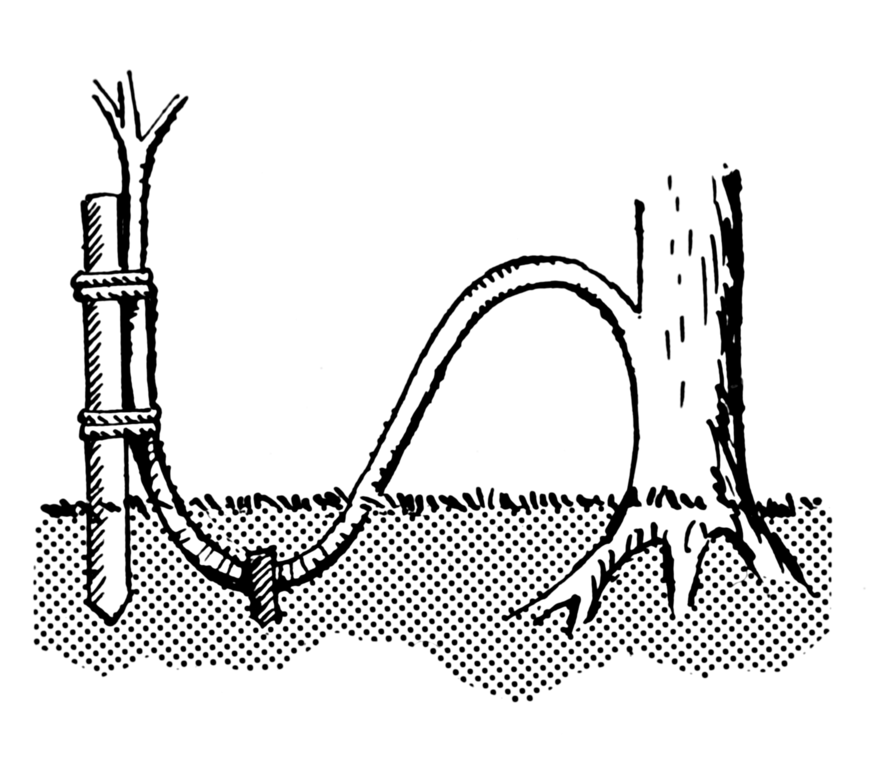
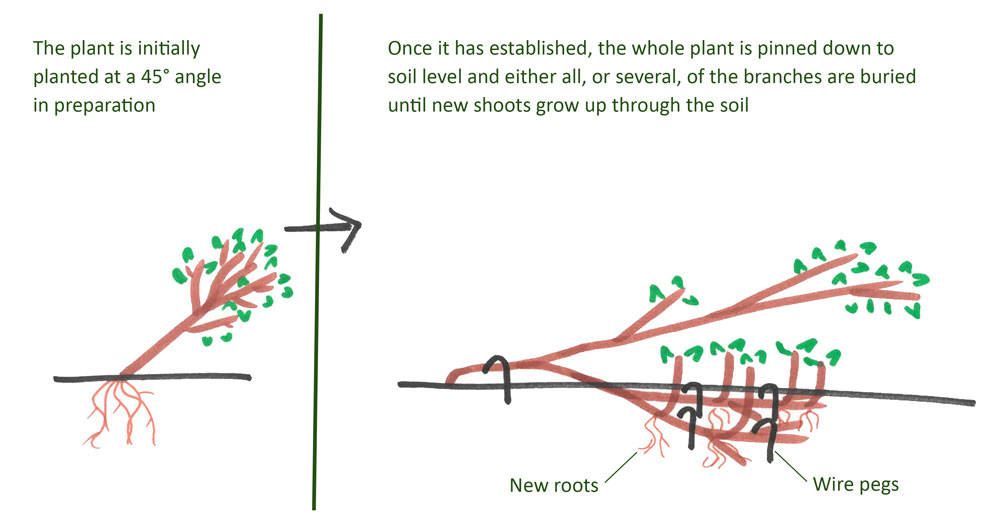
6.3. Trench layering
This technique is often used for fruit trees.
Amber Crowley / public domain
Method
- Plant your fruit tree at a 45 degree angle and leave for a year.
- Bend the whole tree down towards the soil surface and pin down.
- Dig a wide shallow trench which will fit all of the branches you would like to layer into it. This might be all the branches on the small tree, or just some of them. Add some well-rotted manure or garden compost to the soil in the trench to improve it.
- Slice through the bark of the branches at internodes on the underside of the branch. Rub some rooting hormone into the cuts if you wish.
- Lay the branched down into the trench and pin them down with wire pegs.
- Cover the branches in soil improved with compost or well-rotted manure.
- In 6-8 weeks dig away some of your soil and check for root and shoot growth. If strong roots are present and a shoot is growing at each place the branch was pinned down then cut through the branch between each new shoot, making sure you have roots attached to each shoot.
6.4. Serpentine layering
This technique is suitable for plants with long and bendy stems and several layers can be made from a single stem.

Amber Crowley / public domain
Method
- Choose a long branch that will bend down to ground level without snapping. It is easier if it a branch without too many side shoots.
- Dig a long, shallow trench (about an inch deep) in the soil along the line of where the branch will lie along the ground. Add some well-rotted manure or garden compost to the soil in the trench to improve it.
- Slice through the bark of the branch at internodes on the underside of the branch. Rub some rooting hormone into the cuts if you wish.
- Lay the branch down into the trench and pin it down in loops so that each cut internode is pinned to the soil, and in between the stem loops up above the soil surface level.
- Cover the branch in each place it is pinned down to the soil with about 1 inch of mixed soil and compost or well-rotted manure.
- Steak the tip of your branch up so that it is protruding out of the soil in a vertical position if it is very bendy, otherwise this is not always necessary.
- In 6-8 weeks dig away some of your soil and check for root and shoot growth. If strong roots are present and a shoot is growing at each place the branch was pinned down then cut through the branch between each new shoot, making sure you have roots attached to each shoot.
6.5. Mound layering
This type of layering is a little different to those on the previous pages.

Amber Crowley / public domain
Method
- In spring, cut your young fruit tree right off, a few inches from the ground.
- As new shoots start to grow mound soil improved with well-rotted manure or compost, up around the newly developing shots. You may need to do this a few times as they grow.
- After 6-8 weeks check for root growth. If the roots are strong, then cut each shoot away from the parent plant below the new roots.
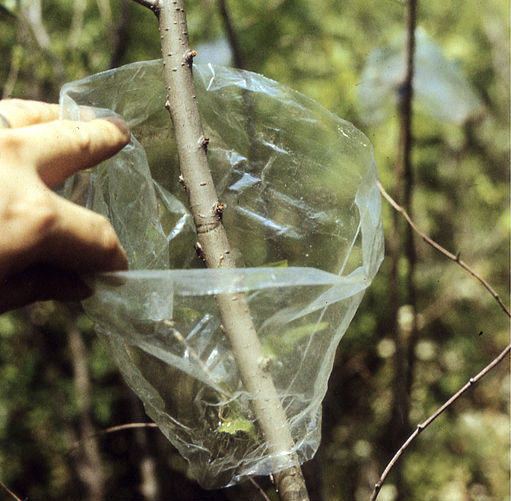
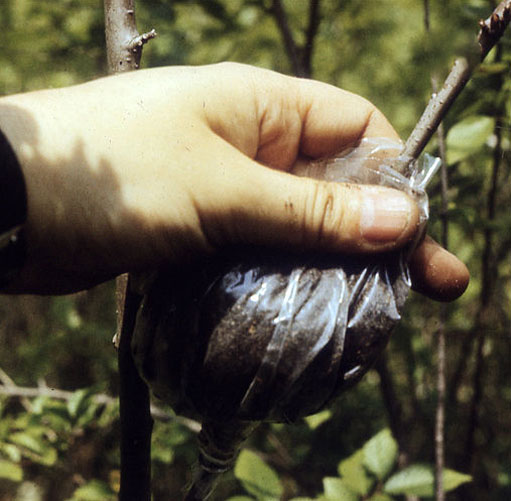
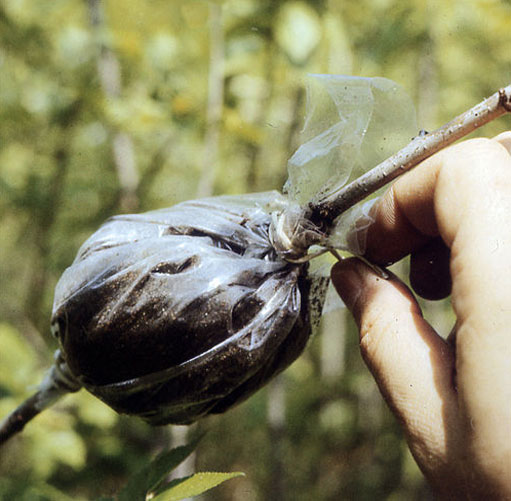
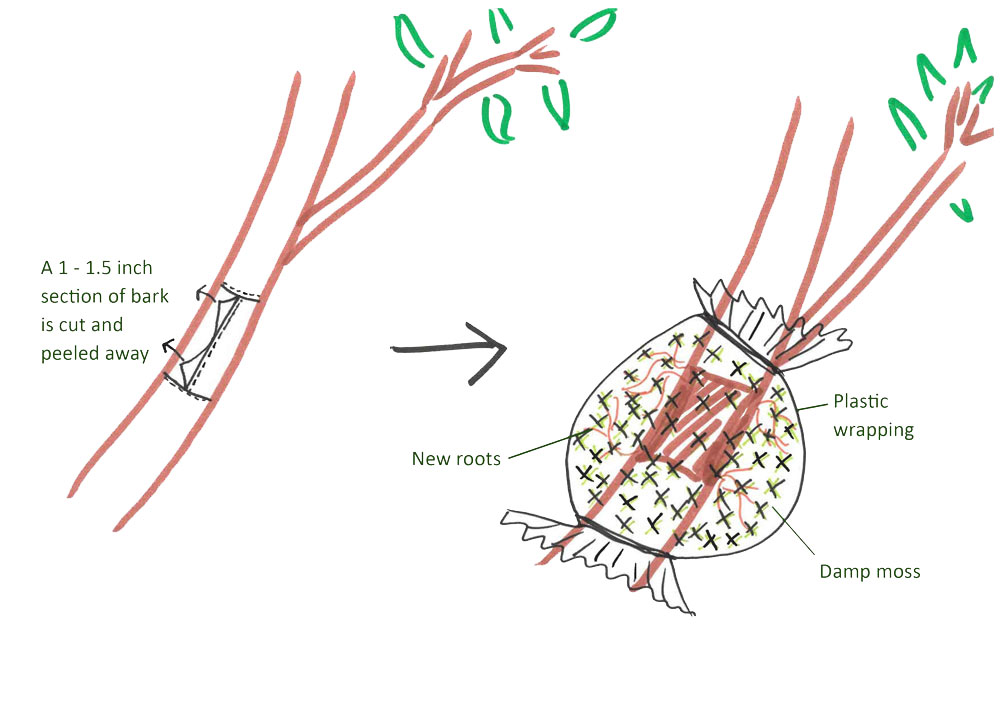
6.6. Air layering

Air layering of Ulmus pumila
Mihailo Grbic via Wikimedia / CC BY-SA 3.0 RS
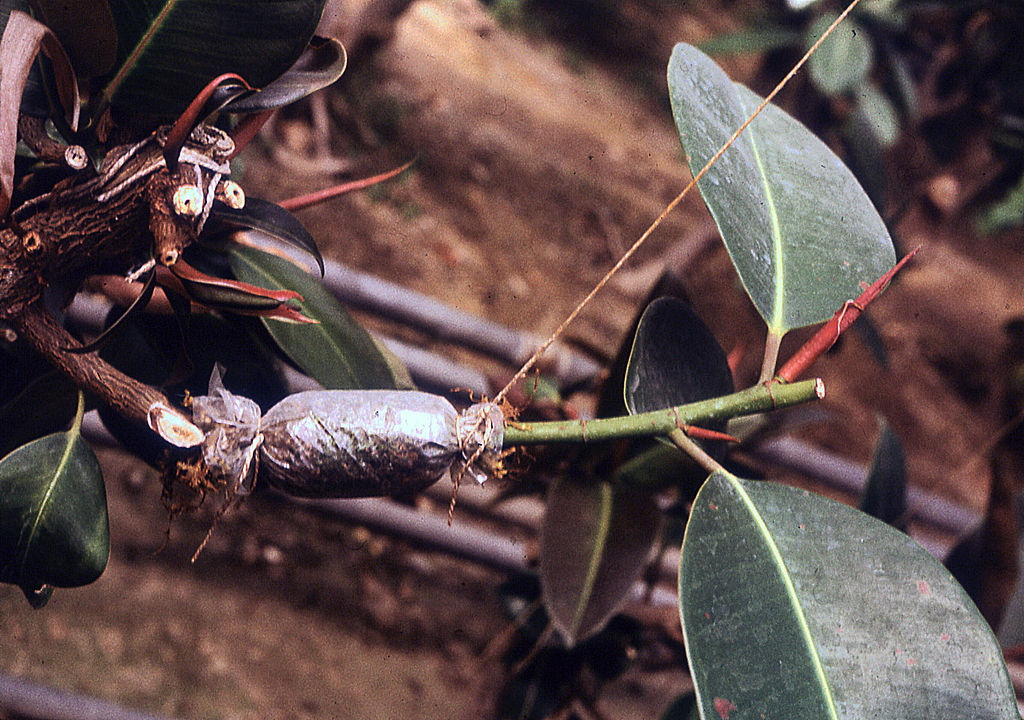
Air layering of Ficus decora
Mihailo Grbic via Wikimedia / CC BY-SA 3.0 RS
Amber Crowley / public domain
Method
- Choose a strong, healthy branch.
- Cut all the way round the branch in two places, about 1 or 1.5 inches apart and peel off the bark in that section, exposing the green cambium layer underneath.
- Wrap the area with a handful of damp moss, making sure all the cut surface is covered.
- Wrap the moss in plastic, such as cling film or a sandwich bag, so that the moss is all sealed inside. Tie above and below the moss to form a sealed pouch which will keep the moisture in.
- Leave for 6-8 weeks, then check for root formation. Once roots have formed, cut through the branch below the roots, remove the plastic and plant the branch.
7. Layering activities
Have a go at any of the types of layering that you fancy, or have suitable plants for.
Do some research online about the best plants to propagate by layering Make a note of any favourites that you would like to try to propagate by bulb scaling in the future.