
3.5 GearsBot – a virtual robotics environment
GearsBot can be accessed via the Exten(DT)² platform or independently through GearsBot.
Note: If you access GearsBot independently, you will not be able to save and publish your creation – you’ll only be able to save it locally on your personal hard drive.
It is an application that supports a 3D robotics simulator using either drag-and-drop blocks of code or Python. An example of a design thinking project using GearsBot can be that students choose the ‘world’ of ‘fire rescue’ and try to improve how a robot is constructed and controlled to complete a rescue mission.
In design thinking, GearsBot can be used:
- to ‘define and ideate’ (Stage 2)
- for ‘rapid prototyping and iteration’ (Stage 3)
- to ‘respond and deliver’ on work (Stage 5).
For help using GearsBot, watch Video 9.
Transcript: Video 9 GearsBot Mini Tutorial
 Activity 8 Try GearsBot
Go to GearsBot.
Select the ‘Worlds’ > Line Following Challenges > Simple Curves
Select the ‘Robot’ > Single Sensor Line Follower
Write the block codes as shown in the image X below. For this, click on motion and control tabs under blocks to gain specific block codes, link them as shown in image X and modify the content as shown below. Finally, run the code in the simulator.
After running the codes in the simulator, you will see the following.
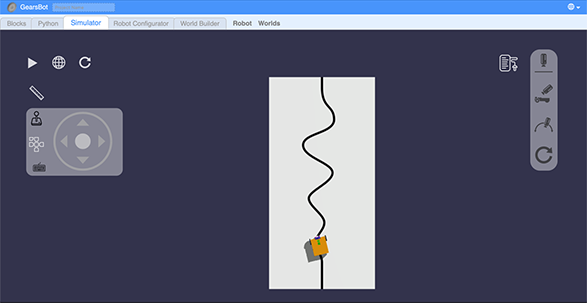 GearsBot screenshot after the simulator is run
Define and ideate how the robot will achieve your goal (i.e. Fire Rescue). Think about the following questions:
- Which scenario does the ‘Line’ map stand for you? (e.g. does it represent a part of the school where someone is trapped after a fire breakout? Does it represent the place where rescue supplies need to be distributed?)
- What should the robot look like? (e.g. does the Single Sensor Line Follower robot look like a good fit? What changes are needed?)
- What functions are needed to make this robot move in the most efficient way?
- What fire rescue problems can such a robot solve?
Continue with GearsBot and create a first demo of your robot based on what you defined before:
- i.Change the code (from what is shown in the example) to control the movements of the robot, like, adding the ‘move steering’ block, or duplicating the previous sequences (e.g. move the tank with left speed X and right speed Y for Z rotations) and then adjust the speed and rotation.
- ii.Change the challenge of ‘Simple Curve’ to other more complex challenge maps that fit your chosen scenario.
- iii.Change the listed ‘Robot’ to make it fit the chosen scenario by going to ‘Robot Configurator’ and change the colour or size of the robot, or add more sensors.
Test your demo by playing your robot in the ‘Simulator’ and test its functionality and while testing, write down any new ideas or things that don’t work well.

3.4 MaLT2 – designing and printing 2D and 3D shapes