
Resource 4: Lesson plan on East African masks
![]() Teacher resource for planning or adapting to use with pupils
Teacher resource for planning or adapting to use with pupils
There are generally three kinds of mask: face masks, helmet masks (which as the name suggests are worn over the head like a helmet), and body masks, which cover a good part of the dancer's torso and are intended to disguise the dancer's identity from people in close proximity. The body mask sometimes only covers the torso and is worn together with a face or helmet mask.
All masks represent spirits or ancestors, and were most powerfully used in initiation ceremonies as expressions of continuity, fear and morality. They were also used in dances for festive occasions, for instance in harvest celebrations.
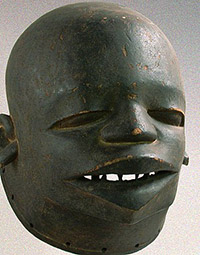
The helmet masks (mapiko; singular lipiko) are notable for their strong, portrait-like features. Many have real human hair applied in shaved patterns, raised or incised facial scarification, open mouths with bared teeth, large ears or lip-plugs. They are used in the mapiko dance and in other dances. Although both male and female heads can be depicted, female heads are very rare. The dancer breathes and sees though a small opening in the mouth.
Mapiko is not just the name given to a mask (usually helmet mask), but also the name of a dance, the name of the terrifying force that performs in it, and also the name given to one of the stages of male initiation, when the initiate is introduced into the secrets of the Mapiko.
The masks themselves are made in a secret bush location known as the Mpolo, which women are forbidden to approach. When not in use, the masks are kept in the Mpolo, and were traditionally burned when broken or replaced with new masks.
Adapted from original source: http://www.bluegecko.org/ kenya/ tribes/ makonde/ carving-masks.htm [Tip: hold Ctrl and click a link to open it in a new tab. (Hide tip)] (Accessed 1 July 2007)
Outcome
Pupils will develop an appreciation of a mask’s various purposes and will create a mask.
Materials
- drawing paper
- card
- pencils
- modelling clay
- paper in various colours
- markers, crayons or coloured pencils
- poster colour
- beads, shells, etc.
- scissors
- glue
- Collect together some images of masks to share with your pupils.
- Discuss the images of the masks and their symbolism.
- Ask each pupil to create a preliminary drawing of his/her mask.
- Trace the pattern on card and then draw their design for the mask. Tell pupils that they may change the facial features on their masks. The pattern is only a guide for location of eyes and mouth in case they would like to wear their masks.
- Paint the masks and allow them to dry.
- Cut the masks out and prepare the materials that will be attached to masks such as hair and a band to secure it on their head.
- Give pupils time to decorate their masks.
Resource 3: An African mask
