
Resource 4: Measurement ‘circus’
![]() Teacher resource for planning or adapting to use with pupils
Teacher resource for planning or adapting to use with pupils
Examples of stations for Activity 2
Note: If you have a camera (or a mobile phone with a camera) it would be useful to take photos of pupils as they carry out some of the activities. Look out for really good technique to praise, such as reading a measuring cylinder at eye level, but also try to catch some of the variations in how different people interpret an activity (e.g. Station 6 extension or dragging the load in Station 7).
Station 1
Equipment and notes
Circuit set up with three bulbs connected in series (with a switch in series) to a low voltage dc supply or battery pack providing about 4 V. The voltmeter should be correctly connected across the three lamps using two leads, but the switch to control the supply to the circuit should be left open for students to close themselves.
Instructions for pupils
Close the switch and record the reading in volts.
Station 2
Equipment and notes
Top pan balance or kitchen scales;
Mystery object such as a 20 g mass, or a pebble, in a box or bag (so that pupils won’t see what it is and guess the answer).
Instructions for pupils
Place the bag (box) on the scales and record the mass.
Stations 3, 4 and 5
Equipment and notes
Stations 3 and 4 need identical small blocks of wood, about 2 cm thickness, but provide a ruler for Station 3 and provide a micrometer for Station 4;
Station 5 needs a small piece of sponge about 1 cm thick, plus either a ruler or a micrometer. All three stations need a small diagram to show which dimension pupils should be measuring.
Instructions for pupils
Measure the thickness of the object.
Station 6
Equipment and notes
Measuring cylinder or measuring jug with some water in it. Check that the water level hasn’t been changed after each group. Provide a cloth for mopping up any spillages.
Extension 1: A second measuring cylinder and a pebble to measure the volume of. Students could either lower the pebble into the measuring container and note the change in volume, or use the measuring equipment to collect and measure the water which runs off from a displacement can.
Extension 2: A third measuring cylinder and a collection of 10 small stones (pebbles/gravel/shingle, all roughly the same size and each less than 1 cm across). For this, students will need to adapt the method used for Extension 1. One stone alone will not displace much water, but, students could find the volume displaced by 10 and then use that value to get an average for 1 stone.
Instructions for pupils
How much water is in the container? Record the volume of water in the container.
Extension1: Find the volume of the pebble. (Hint – the pebble displaces its own volume of water).
Extension 2: You have 10 tiny stones. Find the volume of 1 stone.
Station 7
Equipment and notes
2 x Force meters (spring balance): one of them (A) should be hanging from a stand, ready to attach the load, the other (B) should be left on the bench;
A small heavy object to attach to the spring balances.
Watch out for students ‘dropping‘ the load onto the hook so that it falls off or bounces.
Make sure that both force meters are correctly zeroed at the start of the session. You add another aspect to the discussion by using a third force meter (C), set up like the first one but with the screw adjusted so that the ‘zero reading’ isn’t zero. Check every so often that no-one has corrected it.
Instructions for pupils
Attach the object to the hook on the force meter which is hanging up. What is the weight of the object in newtons? (Take care: support the load as you hook it on, then move your hand away.)
Now take the load off and hook it onto the other force meter so that the load is resting on the bench. How much force does it need to drag the load slowly and steadily along the bench?
Answers and things to discuss with your students
These stations not only provide opportunities to make measurements of a range of quantities, but also to discuss why measurements can vary:
The circuit in Station 1 gives an opportunity to read a voltmeter. As pupils don’t have to do anything to the circuit other than close a switch, any variations in the readings obtained are probably down to parallax error – where pupils have taken the reading from an angle instead of directly in front of it. If a digital meter is used, pupils can have difficulty with rapidly changing final numbers. If the circuit is left connected for a long time, it is possible that the values obtained will get lower.
The Station 2 activity is again a simple measurement using kitchen scales or a top pan balance. The issues here are the precision provided by the scale itself, and the variation in reading position.
Stations 3, 4 and 5 present difficulty because of learning to use a micrometer. The values for the two pieces of wood should show relatively little variation, but the sponge should show wider variation because the material will compress easily, so it is more difficult to judge when the micrometer is at the correct position before trying to read the scale.
Station 6 uses a measuring cylinder or a jug to measure the volume of water in the container. The issues in this case are to do with the precision offered by the scale on the jug or the measuring cylinder and also how pupils read the scale. The single pebble may result in more variation, depending on the equipment and method used. Pupils will get even more variation if they try to measure just one small stone, but if they calculate an average value from using 10 stones together there should be less variation. (If you didn’t tell them to use all 10 stones, you could also ask how many stones they used for the measurement.)
Station 7 uses force measurements. You would expect the same object to give rise to identical readings when hung from identical force meters, but pupils should find one set of results skewed because the equipment was not zeroed. Dragging the object along the bench is likely to give a very odd set of results, because pupils will have different ideas of how fast to drag it and at what angle they should pull from: some photos would be very helpful here. It is also difficult to pull steadily and to read a scale that is moving, even if it isn’t also changing at the same time.
Examples of questions about all the results
- Look at the results for (Station x): did everyone in your group agree on the value? If not, why was that?
- Which station’s results showed the most variation? Why do you think that is?
- Which quantity did you find it hardest to measure? Why/what made it difficult? Could you have improved your measurement still using this equipment? Could you have improved your measurement if you’d used different equipment?
- Did any station’s results show a steady change in the value (getting smaller or larger as you went down the column)? If so, why do you think that happened?
- Were any results different when you might have expected them to be the same? Why?
- Which measurements were most/least precise? Explain why.
- Which measurements were most/least accurate? Explain why.
Summary of precision, accuracy and variation for the teacher
Why do measurements vary?
- Variations caused by the equipment or by the way it is used:
- The scale isn’t fine enough for the quantity you are trying to measure.
- The equipment produces variations in the reading which aren’t due to actual changes in the quantity being measured.
- The scale hasn’t been zeroed before taking measurements
- The measurements are not being taken in controlled conditions (e.g. there are draughts, changing temperatures).
- Incorrect technique ( e.g. not reading a scale from directly in front of the needle or indicator, or level with the scale marker).
- Differences in technique/experimental method.
- The equipment has been damaged.
- Variations in the quantity being measured:
- There is natural variation in the quantity – there is no absolute, ‘true’ value, e.g. length of a leaf, diameter of a seed in the sense that if you chose another leaf or seed the value would be different, no matter how carefully you measured it.
- The value changes with time because of a factor that hasn’t been considered in setting up the experiment (e.g. the length of a wire may change if the load is left on it, a previously desiccated object might show an increase in volume because it has absorbed water from its surroundings, another object might show a decrease in mass because of losing water to its surroundings, water fresh from the tap may be at a different temperature from water which has been standing in a room for an hour or more…).
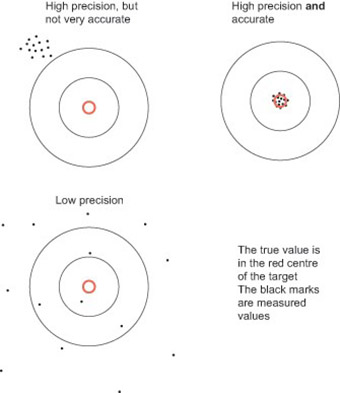
‘Accurate’ or ‘precise?’
Accuracy is about how close a measurement is to an agreed true value for specified conditions. A measurement is said to be accurate if it is close to the true value.
Precision is about how closely a set of measurements agree. A set of measurements that gives tight cluster of values is more precise than one with a wide variation in values.
Resource 3: Questions to ask about measurement