
Resource 1: A careful look at the torch bulb
![]() Teacher resource for planning or adapting to use with pupils
Teacher resource for planning or adapting to use with pupils
First make your teaching aid – a model torch bulb, and read this information about a torch bulb.
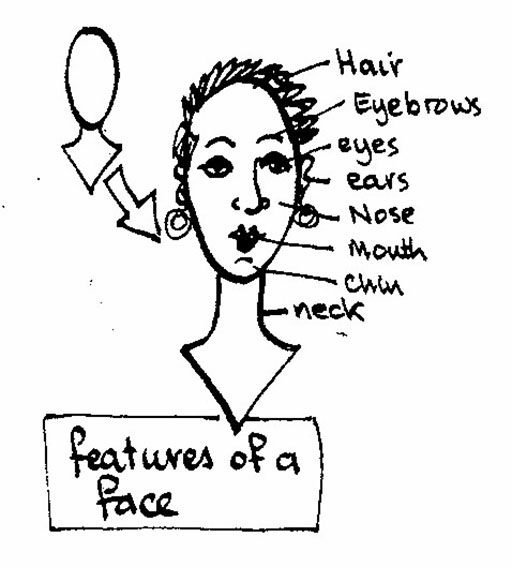
With younger pupils, we suggest that you draw in the features of a face to explain what we mean by features.
Now tell them that the class will do the same thing with the torch bulb.
Organise your class into groups of three/four:
Give each group of pupils a torch bulb and ask them to look at it carefully.
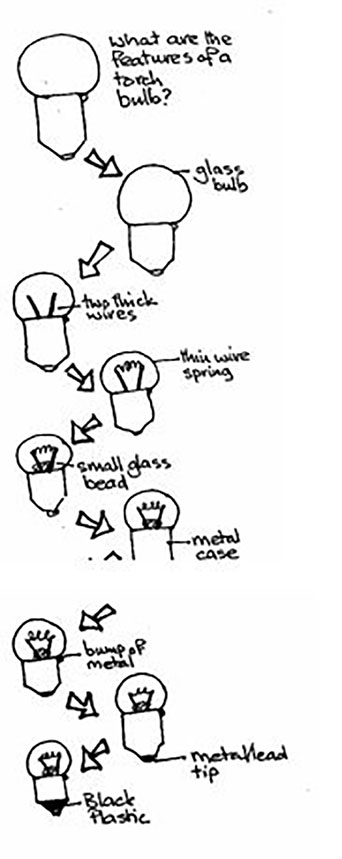
- What are the ‘features’ or parts of a bulb?
- Give them a few minutes to observe carefully.
- While they do this, draw the outline of a torch bulb on the board. (Or you can have a ready prepared drawing, which you put up at this point. You can also have labels, written on cards, ready for when they tell you what they observe.)
- When they seem ready, ask them to tell you what they see. You can be open to any suggestions and fill in the picture in a random way. Or you can decide to be systematic and guide their reporting by pointing to a place on the drawing and asking a specific question. As they answer, draw in and label the part – the notes below show you how to do this.
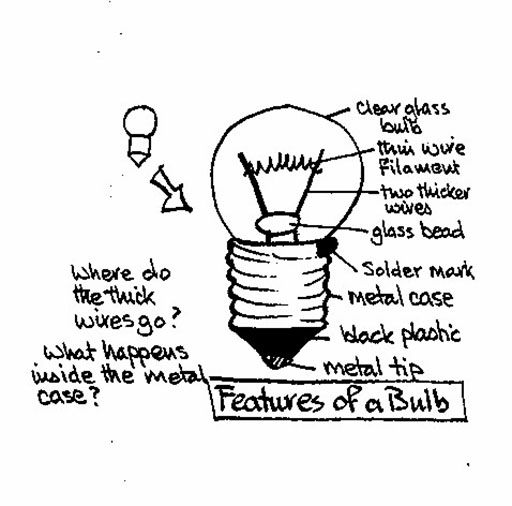
Recording observations in an ordered way
- Point to the round glass part. What do we see here? Answer: Glass ball
- What do we see inside the glass ball? Answer: Two thick wires
- What do we see between the two thick wires? Answer: a thin wire, like a curly hair, called a filament.
- What do we see between the two thick wires near the base/at the bottom? Answer: A small glass bead
- What is below the glass bulb? Answer: A metal drum/case/cylinder
- What can we observe on one side of the metal case, near the top? Answer: A little lump of metal
- What do we observe right at the bottom of the torch bulb? Answer: A metal/lead tip
- What do we observe between the metal case and the metal tip? Answer: Black plastic
- Is there anything else you have observed? Answer: Some may notice writing on the metal case.
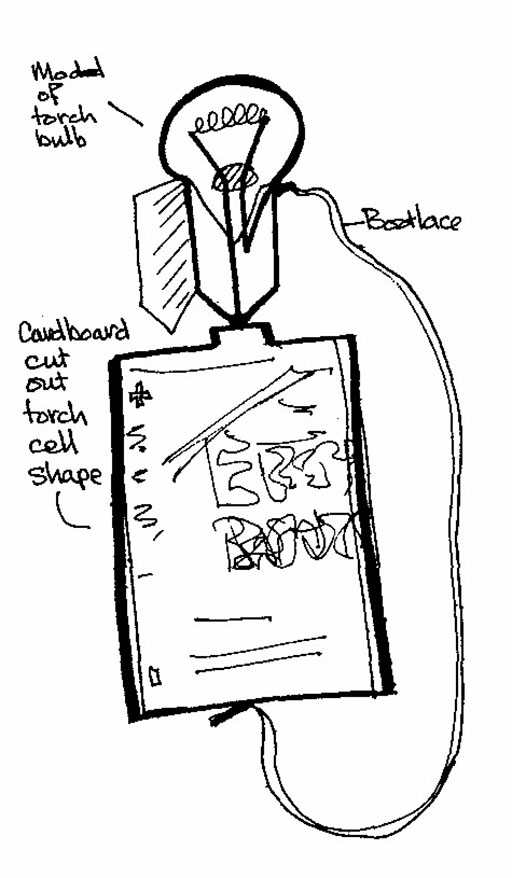
You also need to make a large 2-D (flat) model of a torch bulb for the part of the Activity where pupils observe a bulb carefully. You will also use this model when you conclude the Activity. 1. Cut out the large bulb shape. 2. Cut out the shape for the metal case of the bulb. 3. Glue the bottom of the bulb to the right side rectangle so that it fits over the shaded triangle. 4.Use a large black crayon or koki-pen to draw the thick wires, as shown. 5.Cut out a small oval bead shape from a coloured picture in a magazine and paste it over the black lines you have drawn (this represents the glass bead that prevents the two thick wires from touching). 6.Make the filament from a coil of thin wire, and fasten it across the ends of the thick black lines. One way is to stick the ends of the coil of wire through the cardboard and to use sticky tape on the wrong side (back) to fasten them down. 7.Fold the left-hand side of the base of the bulb over the right-hand side. Now your model of a torch bulb is nearly complete. 8.Use blobs of Prestic to represent the metal solder mark on the side of the case, and the bottom metal tip of the torch bulb. 9. Finally, shade the trapezium shape between the metal case and the metal tip of the torch cell. This shows the layer of black plastic that separates the metal cylinder from the metal tip. | 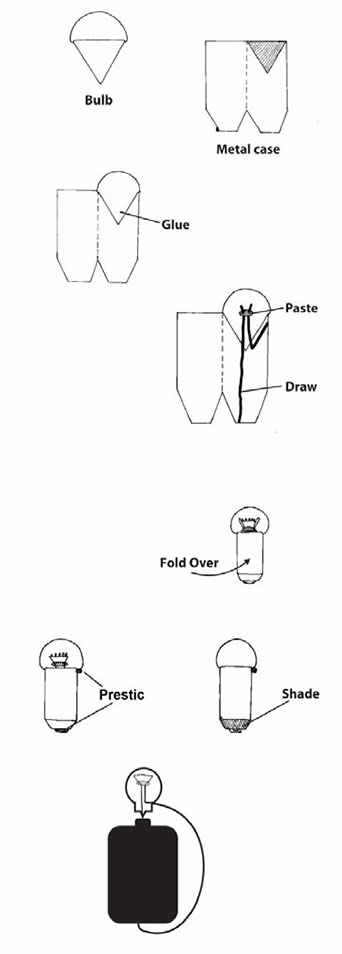 |
This model is specially designed so that you can demonstrate the arrangement of the inner parts of the bulb. What happens inside a light bulb will always be a strange mystery to pupils unless they have thought about what might be the case, and then had the chance to find out. It is possible to use a hack-saw blade to carefully cut open the metal case of an old screw-in bulb. Then the arrangement and direction of the wires is clear.
A model light bulb
Now show them the model you have made of the torch bulb. Ask: What do they think they would find, if they could open up the metal case? What would be inside? Where do the two wires go? Give them some time to think.
What do they predict will be the arrangement of wires that are hidden by the metal case?
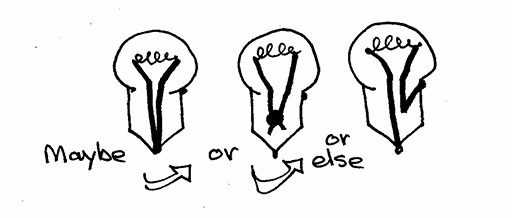
After a while, you can open up your model and show them how one wire is joined by solder to the metal case, and how the other goes to the metal tip at the bottom of the torch bulb.
Now use your model to demonstrate that there is a complete pathway, or circuit, for the electricity when the bulb lights. The electricity is free to travel in a complete pathway. It travels from the cell, through the wire to the metal case, and then to the one thick wire. From there, it goes through the thin wire filament. It causes the filament to light up, and goes back down the other thick wire to the torch cell again.
Adapted from: Umthamo 3, University of Fort HareDistance Education Projectpagination layout-hint="pagebreak"
3. Planning investigations