Resource 3: Force Diagrams
![]() Background information / subject knowledge for teacher
Background information / subject knowledge for teacher
Forces
This resource is for use with Activity 2.
Forces can change the shape of an object, can make it move faster or slower, or change the direction it is moving in.
If an object is not moving, or is moving at a steady speed in a straight line, then the forces on it must be balanced.
The bigger the force on an object, the bigger the acceleration (change in velocity) it produces. If something is accelerating (getting faster while moving in a straight line or moving in a curve) then the forces on it are not balanced.
Forces (and velocity and acceleration) are vector quantities – they have size and direction. (Scalar quantities like speed and mass just have size). We can show them as force arrows, where the arrows are drawn to scale and the length of the arrow represents the size of the force.
Note: In more advanced work, the combined effects of forces can be worked out by using force diagrams with all the force arrows drawn to scale. To find the size and direction of the combined effect (called the resultant force), all the force arrows are moved so they are drawn ‘nose to tail’, then the arrow from the start of the first arrow to the end of the last arrow is the resultant force arrow. The length of the arrow gives the size of the resultant force.
Using force diagrams with students
Asking students to draw diagrams of the forces acting on an object – or adding force arrows to an incomplete diagram – is a good way to explore what they think is happening, and to encourage discussion.
Providing pictures for labelling, rather than asking students to draw the objects, can help to avoid the problem of students worrying about their drawing ability or spending all the time making a pretty drawing instead of thinking about the science. The most important thing is for students to use arrows to identify the forces acting on an object and to show what direction they act in.
For older students, you can introduce some additional guidelines:
- Force arrows are straight arrows (not curved ones).
- The arrow should start from the part it is acting on, and points in the direction the force acts.
- The longer the arrow, the bigger the force.
- If two forces are balanced (so the object is either not moving, or is moving steadily) then the arrows will be the same size and start from the same point, but go in opposite directions.
- If two forces on an object are not balanced (so the object is accelerating), then the bigger force will be in the direction it is accelerating, and the arrow for that force will be bigger.
Identifying the forces acting on objects: some examples
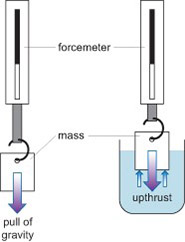
The forcemeter in Diagram 1shows that a smaller force is pulling on it when the mass is in water.
The mass hanging from the forcemeter pulls down the spring less when it is in water.
The mass is unchanged: the pull of gravity on it (red arrow, shown on both diagrams) is the same in air and in water, so its weight is unchanged. It appears to weigh less because there is an upthrust force (blue arrows, only on the right hand image) on the mass.
The balloon in Diagram 2 has only a small mass, so the pull of gravity is fairly small. You have to push down to make the balloon go further under water. The further you push the balloon under water, the harder you have to push to keep it there.
As you push the balloon down, you can see the water level rise: the water that you push out of the way (displace) as the balloon goes further under water.
The amount of upthrust depends on the volume of water that is displaced by the balloon.
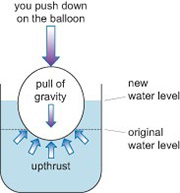 Diagram 2 Pushing a balloon under water | 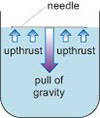 Diagram 3 A needle floating in water |
A needle does not weigh very much, but it doesn’t displace much water as it seems to lie on the surface; so what is keeping it up? There must be enough force pushing back up on the needle to counter the weight (Diagram 3).
Add a drop of detergent to the water. The needle should sink, because it was being held up by the surface tension of the water.
Identifying the forces during a bungee jump
There are three stages to consider:
- On the way down
- At the lowest point of the jump
- On the way back up
1. On the way down, there is no tension in the bungee rope. The most significant force on the jumper is their own weight, due to the pull of gravity. Some students may also suggest air resistance, but this will be relatively small. Air resistance acts on the surface (think of the jumper pushing through the air as they fall). | 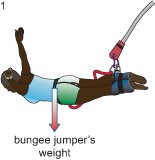 |
2. At the lowest point in the jump, the tension in the bungee rope is at its maximum, and is enough to stop them falling any further. | 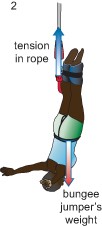 |
3. The elastic rope pulls the jumper back up: the rope is no longer so stretched, so the upward pull from the tension is less. |  |
Resource 2: Promoting Cross-curricular links and literacy skills


