
2. Using group work to understand ‘nets’
In this part, you will help pupils extend their understanding by moving from open to closed boxes. This means adding a lid to the box and explaining what changes need to be made to the net.
Using the same groups working together, means that pupils can build on their collective ideas. Putting your pupils into new groups, in this case, would mean they would have to revisit earlier ideas first, which would slow down the development of new ideas.
In this part, you show your pupils how there is not just one correct answer, but many possible answers. By not telling them too much, but asking questions to guide their thinking, you are giving them the satisfaction of discovering things for themselves. This will build their confidence and give them courage to try new ideas.
Case Study 2: Designing nets for closed boxes
Mr Okon was pleased with the progress of his pupils in Activity 1. He explained that, in mathematics, some words have special meanings. In mathematics, for example, the word ‘net’ is sometimes used to mean a plane shape (a flat, 2D shape), which can be folded to form a solid 3D object. He asked his pupils to add this term to their mathematical dictionary and put in a definition. As they had made a net of an open box previously, he asked them to make a net of a closed box. He suggested they looked at the nets they had drawn last time and think how they could add a lid. Using the same groups, Mr Okon asked them to discuss together how to add a lid and draw the new net. He gave the groups ten minutes and then asked each group to draw what they found on the board.
Then he asked each group to look at the different nets and agree whether they all worked.
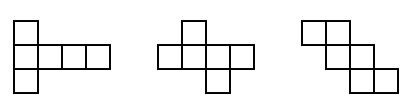
Activity 2: Which nets will fold to make a cube?
Make sure pupils understand what a cube is, then ask pairs of pupils to find as many different nets for a cube as they can. They should first draw each net, then cut it out and check that it makes a cube, before trying to draw a different net.
(You may want to show one or more examples such as those below to get them started.)
You might like to set this up as a competition, with a reward for the group that can make the most nets for cubes (see Resource 2: 11 nets for a cube).
Again, do not interfere or talk too much during this lesson; make space for the pupils to talk through their ideas and to enjoy the activity. Listen carefully to them and identify how they are able to solve their own problems.
Display the finished cubes and, if there is time, allow them to decorate them to celebrate what they have achieved.
Discuss how many different nets they have found. Ask them to make a wall chart of the 11 possibilities of a net for a cube.
1. Organising an investigation of 3D shapes