6.2 Active management of third stage of labour (AMTSL)
A birth attendant applying active management of third stage of labour (AMTSL) is the key to reducing the risk of the complications set out in Box 6.1. The term ‘active management’ indicates that you are not waiting for spontaneous placental delivery. Rather, you will intervene in a carefully programmed sequential manner, as follows:
- As soon as the baby is delivered, put it on the mother’s abdomen in skin-to-skin contact with her. Cover them with a blanket.
- Clamp the baby’s umbilical cord at two sites and cut it in between, as you learned to do in Study Session 5.
- Then follow the steps in Box 6.2. We describe each of them in detail in the next section.
Box 6.2 The six steps of AMTSL in sequence
- Check the uterus for the presence of a second baby.
- In less than one minute, administer a uterotonic drug (a hormone-like chemical that makes the uterus contract more powerfully).
- Apply controlled cord traction.
- After delivery of the placenta, immediately start massaging the uterus.
- Examine the placenta to make sure it is complete and none of it has been retained in the uterus.
- Examine the woman’s vagina, perineum and external genitalia for lacerations and active bleeding.
Step 1 Check the uterus – is there a second baby?
Immediately after the birth of the baby, check for the presence of a second baby by palpating the uterus through the mother’s abdomen. When you feel certain that the uterus does not contain a second baby, and you can feel that it has reduced in size to no larger than at 24 weeks of gestation, go to step 2. The reason for checking so carefully is because the drug you will administer to the mother in step 2 will make the uterus contract so powerfully that it will damage a baby that remains inside it. If you find that there is a twin, give the the uterotonic drug after the birth of the second baby.
Step 2 Administer a uterotonic drug to help the uterus contract
The commonly used uterotonic drugs in obstetric practice are:
- misoprostol (tablets)
- oxytocin (injectable)
- ergometrine (injectable).
These drugs help the uterus to continue contracting strongly and rhythmically after the baby is born: they facilitate placental delivery and help to prevent excessive bleeding from a relaxed (atonic) uterus. Although there are three possible drugs, for deliveries in low-resource settings, such as homes in rural areas of Ethiopia, on many occasions misoprostol may be the only one of these drugs that you will be able to use. Oxytocin is the drug recommended by the World Health Organization (WHO), but it may not be practical for the following reason:
Health Posts are supplied with a refrigerator and mobile icebox for transport of vaccines to outreach events, as described in the Immunization Module.
Oxytocin and ergometrine always have to be kept refrigerated at 2–8°C, so they are not suitable for a home delivery unless the household has a refrigerator, or you have a mobile icebox. They also have to be protected from exposure to light.
Dosages of uterotonic drugs
In less than one minute after the delivery of the baby, and after clamping and cutting the umbilical cord, give the mother one of the following:
- misoprostol 600 micrograms (µg), i.e. three 200 µg tablets by mouth with a drink of water.
OR (if you carry this in an icebox)
- oxytocin 10 international units (IU) injected deep into the woman’s thigh muscles (intramuscular injection, IM).
OR
- ergometrine 0.4–0.5 milligrams (mg) injected deep into the woman’s thigh muscles (intramuscular injection, IM).
When the uterus is well contracted it will feel very hard. This should occur between 2–7 minutes after the administration of the drug, depending on which one is given.
Note that ergometrine is not recommended for use by rural Health Extension Practitioners.
Advantages and disadvantages of the uterotonic drugs
Misoprostol is less effective than oxytocin and has more side-effects. However, in many rural situations you will have no other option but to use it because of the need to store oxytocin in a refrigerator or icebox. It will be important therefore to advise the mother that while it will be effective in preventing bleeding, she may also experience some side-effects. This applies whichever uterotonic drug you are giving, but especially in the case of misoprostol, which causes side-effects in a significant proportion of women. They are:
- Shivering: this may start 1 hour after taking misoprostol and will subside after 2–6 hours. Ask the family to offer the mother warm tea or ‘atmit’, as well as blankets.
- Fever: this is rarer, but may start after the shivering. It is not necessarily a sign of infection and it will disappear within 2–8 hours after taking the drug.
- Diarrhoea: may also occur and normally lasts less than a day.
- Nausea and vomiting: can also occur, but will subside 2–6 hours afterwards.
What is the great advantage that misoprotol has compared to the other uterotonic drugs?
It comes in tablet form, so injection equipment (syringes, needles) are not required, and it does not need to be stored in a refrigerator so it can be used where there is no way of keeping drugs very cold.
Oxytocin is the recommended uterotonic drug in all situations where it is feasible to use it, because it is more effective than the other drugs and has fewer side-effects. Oxytocin is a naturally occurring hormone in the woman’s body, which is involved in the onset and progression of uterine contractions during labour. Manufactured oxytocin is given after the delivery to ensure that the uterus goes on contracting rhythmically, like natural uterine contractions. However, it does not have a sustained action (the effect subsides quite quickly) and it must be stored in a refrigerator and protected from light.
Ergometrine is less widely used because it is such a strong uterotonic drug that it may hasten the closure of the cervix before the delivery of the placenta. It takes longer to act than oxytocin (6–7 minutes when given intramuscularly) and it causes marked spasm of the uterus by a series of rapid sustained contractions, which are unlike the natural uterine contractions. However, it is long-lasting, with an effect over approximately 2–4 hours.
![]() It is not planned to use ergometrine in the rural Health Extension Service. It must never be given to a woman with pre-eclampsia, eclampsia or high blood pressure, because it causes the blood vessels to constrict, forcing her blood pressure even higher.
It is not planned to use ergometrine in the rural Health Extension Service. It must never be given to a woman with pre-eclampsia, eclampsia or high blood pressure, because it causes the blood vessels to constrict, forcing her blood pressure even higher.
Step 3 Apply controlled cord traction with counter-pressure
When the uterus is well contracted it will feel very hard. This should occur 2–3 minutes after the administration of one of the uterotonic drugs. Then controlled cord traction with counter pressure is used to help to expel the placenta (see Figure 6.2 and Box 6.3).
![]() To avoid inversion of the uterus (turning inside out and coming out of the vagina), controlled cord traction should NEVER be applied without counter-pressure to the abdomen.
To avoid inversion of the uterus (turning inside out and coming out of the vagina), controlled cord traction should NEVER be applied without counter-pressure to the abdomen.
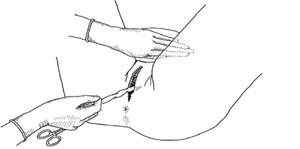
Box 6.3 How to do controlled cord traction with counter-pressure
- Clamp the umbilical cord close to the perineum (once pulsation of the blood vessels stops in the cord of a healthy newborn) and hold the cord in one hand.
- Place the other hand just above the woman’s pubic bone and stabilise the uterus by applying counter-pressure to the abdomen during controlled cord traction.
- Keep slight tension on the cord and await a strong uterine contraction (usually every 2–3 minutes).
- With the strong uterine contraction, encourage the mother to push and very gently pull downward on the cord to deliver the placenta. Continue to apply counter-pressure to the uterus.
- Between contractions, gently hold the cord and wait until the uterus is well contracted again.
- With the next contraction, repeat controlled cord traction with counter-pressure.
- If the placenta does not descend during 30–40 seconds of controlled cord traction do not continue to pull on the cord.
The following actions complete the rest of the delivery of the placenta.
As the placenta is delivered, it should be caught in both hands at the vulva to prevent the membranes tearing and some being left behind. Hold the placenta in two hands and gently turn it until the membranes are twisted (see Figure 6.3). Slowly pull to complete the delivery of the placenta.
Delivery of the placenta marks the end of the third stage of labour. At this time the uterus should be hard, round and movable when you palpate the abdomen. You should be able to feel it midway between the mother’s umbilicus (belly button) and her pubic bone. There should be no bleeding from the vagina. The bladder should be empty.
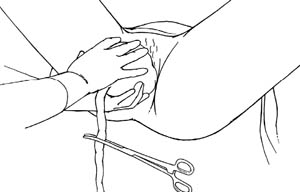
Step 4 Massage the uterus
Right after the placenta is delivered, rubbing the uterus is a good way to contract it and stop the bleeding. Many women need their uterus rubbed to help it to contract (Figure 6.4).
Step 5 Examine the placenta and fetal membranes
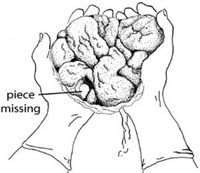
You must look carefully at the placenta to be sure that none of it is missing.
From your knowledge of the anatomy of the placenta (Antenatal Care Module, Study Session 5), which is the ‘maternal’ surface — the top side where the umbilical cord emerges, or the underside (bottom) of the pelvis?
The maternal surface of the placenta is the underside, opposite to the side where the umbilical cord emerges.
If a portion of the maternal surface (bottom of the placenta, see Figure 6.5) is missing, or there are torn membranes with blood vessels, suspect that retained placenta fragments remain in the uterus and refer the mother quickly.
Can you explain why?
She is more at risk of postpartum haemorrhage if a piece of the placenta is retained in the uterus.
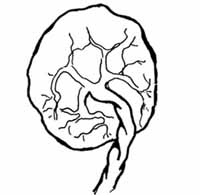
The irregular rounded shapes on the underside of the placenta are called lobes (some textbooks call them cotyledons). By contrast the top of the placenta (the side that was facing the baby) is smooth and shiny. The cord attaches on this side, and then spreads out into many deep-blue blood vessels that look like tree roots (Figure 6.6).
Checking the placenta for completeness
- Hold the placenta in the palms of your hands, with the maternal side facing upward. Make sure that all the lobules are present and fit together.
- Then hold the cord with one hand, allowing the placenta and membranes to hang down.
- Place the other hand inside the membranes, spreading the fingers out, to make sure that the membranes are complete (Figure 6.7).
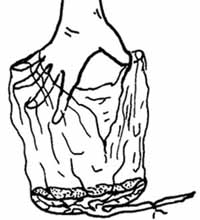 Figure 6.7 Hold the membranes open like this to check they are complete.
 - Ensure that the position of cord attachment to the placenta is normal, and inspect the cut end of the cord for the presence of two arteries and one vein (Figure 6.8).
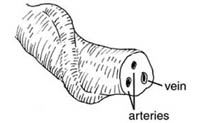 Figure 6.8 The cut end of the cord has two arteries and one vein.
 - Safely dispose of the placenta by either burying it where it will not be dug up by animals, or incinerate it if you have the facilities to do so in your community.
- If the membranes tear, gently examine the upper vagina and cervix of the woman. You must wear sterile/disinfected gloves and use a sponge forceps to remove any pieces of membrane that are present.
It is dangerous for the mother if any parts of the placenta or membranes are left behind in the uterus.
Step 6 Examining for cuts, tears and bleeding
The anatomical terms in this section were all explained and illustrated in Study Session 3 of the Antenatal Care Module, Part 1 (see Figure 3.2). To complete the management of the third stage of labour, do the following:
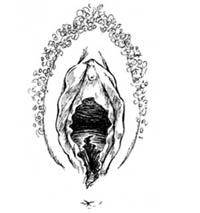
- Gently separate the labia and inspect the lower vagina and perineum for lacerations that may need to be repaired to prevent further blood loss (Figure 6.10).
- Gently cleanse the vulva and perineum with boiled (then cooled) warm water or a weak antiseptic solution.
- Apply a clean pad or cloth with firm pressure to the area that is bleeding for about 10 minutes. If bleeding continues after this time, refer the woman immediately, keeping the pressure applied to the wound.
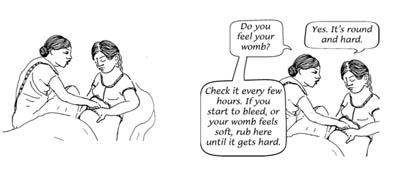
- Monitor the woman every 15 minutes - this means measuring her vital signs, massaging her uterus to ensure that it is contracted and checking for excessive vaginal bleeding.
Why is it important to complete the six steps of AMTSL in a particular order and what is that order?
Keeping to the exact order of actions is important, because the evidence on which AMTSL is based shows that if it is correctly applied (including in the right order) it can reduce the risk of PPH by 60%. Refer back to Box 6.2 if you can’t remember the order of the six steps.
6.1.2 Complications occurring during the third stage of labour