Resource 3: Measuring wind direction and speed
![]() Teacher resource for planning or adapting to use with pupils
Teacher resource for planning or adapting to use with pupils
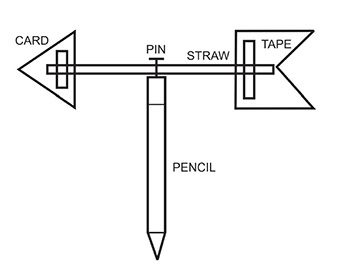
Making a wind vane to measure the direction of the wind
You will need:
- a straight pin
- a piece of card
- a straw
- scissors
- pencil (with eraser)
- tape
Do this:
- Cut the point and tail of an arrow out of a piece of card.
- Tape them onto the ends of the straw.
- Push the pin through the middle of the straw.
- Stick the pin into the eraser of the pencil. Make sure the straw can turn freely.

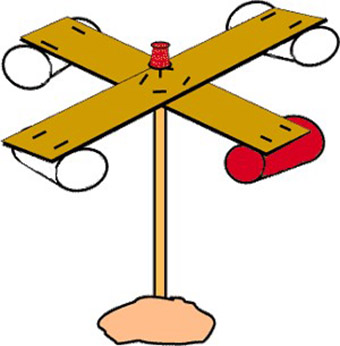
Making an anemometer to measure the speed of the wind

An anemometer is a device that tells you how fast the wind is blowing. A real one will be able to measure this accurately. Your model can give you an idea of how fast the wind is blowing, but will not be as accurate as a manufactured anemometer.
You will need:
- scissors
- four small paper cups (e.g. drinking cups)
- a marking pen
- two strips of stiff, corrugated cardboard – the same length
- a drawing pin
- a stick
- some clay
- a watch that shows seconds
To make the anemometer:
- Cut the rolled edges off the paper cups to make them lighter.
- Colour the outside of one cup with the marking pen so you can see it each time it spins around.
- Cross the cardboard strips so they make a plus (+) sign. Stick them together and mark the middle.
- Stick or pin the cross to the top of your stick through the middle point.
- Blow on the cups to make sure the cardboard spins around freely on the pin.
- Place the modelling clay on a surface outside, such as a wooden fence, a wall or a rock. Stick the sharpened end of the pencil into the clay so it stands up straight.
To measure wind speed with the anemometer:
Using the watch, count the number of times the coloured cup spins around in one minute. You are measuring the wind speed in revolutions (turns) per minute. Weather forecasters’ anemometers convert this speed into miles per hour (or kilometres per hour).
Resource 2: A weather observation chart


