
This content is associated with The Open University's Geography courses and qualifications.
To pinpoint your position on a map of the world you need to work out your co-ordinates, known as latitude and longitude. Latitude is your position north or south of the Equator. Lines, or parallels, are drawn around the Earth at intervals. The North Pole is assigned the latitude 90º north and the South Pole latitude 90º south.
Lines of longitude, or meridians, are drawn a little differently. The line of longitude corresponding to 0º, which passes through Greenwich in London, is called the Prime (or Greenwich) Meridian. Longitude lines run along the Earth’s surface in a north–south direction, and unlike latitude lines, they divide the globe into segments like those of an orange, rather than regular strips.
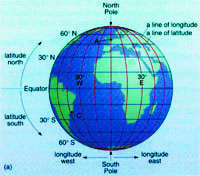
A geographical globe (a) viewed from above the Equator;

(b) viewed from above the North Pole
How to measure latitude
Being so far away and only one of a myriad stars visible to the naked eye, the North Star isn't as easy to find as the sun. Furthermore, you can only see it at night, which isn't always convenient. Its major limitation, however, is that it isn't visible from the southern hemisphere.
For our purposes, we shall therefore assume that we're in the northern hemisphere. You can use a simple quadrant to measure latitude using either the sun or the North Star. Both methods are described below.
- Make a quadrant similar to the one shown here. The aiming beam needs to be pivoted about its central point so that it can swing up and down. The protractor should be centred on the pivot, from which the plumb line should be suspended.
Using a compass, mark out a line on the ground that runs north to south. Make sure that your quadrant is set up so that its aiming beam is parallel to this north-south line.
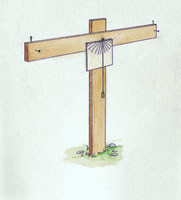
A quadrant for measuring latitude
- Measuring latitude using the sun can only be done at noon, when the sun is at its highest point in the sky. To determine when it's noon (without a watch or radio) place a stick at the southernmost end of your north-south line. Use a plumb line to make sure that the stick is vertical. When the shadow cast by the stick crosses the north-south line, it's noon.
- As soon as it's noon, align the sighting nails on the quadrant's aiming beam with the sun.
DO NOT USE THE SIGHT LINE TO LOOK DIRECTLY AT THE SUN.Instead, watch the shadows formed by the nails on the ground as you tilt the aiming beam up and down. At first, the nails will cast two separate shadows, so move the end of the beam up or down so that these two shadows move closer together.
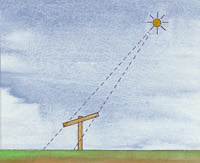
Two shadows on the groud - beam aimed incorrectly
When the shadows coincide, the beam is aimed exactly at the sun. Using the protractor, measure the smaller angle between the beam and the plumb line.
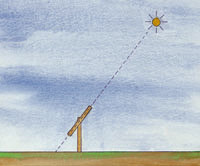
One shadow - beam aimed correctly
If the sun is directly over the Equator, this is your latitude reading.
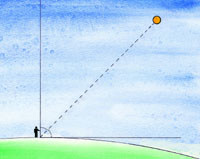
The angle to measure when using the sun or North Star. Note that the horizon is always 90º to the plumb line. Don't be fooled by mountain ranges!
- Unfortunately, this reading is only correct on 21 March and 21 September (the spring and autumn equinoxes). At midwinter (21 December) you should deduct 23.45º from your reading, and at midsummer (21 June) add 23.45º. This is because of the way in which the 'tilted' Earth orbits the sun.
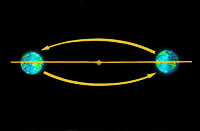
Solar declination - the seasonal consequence of the 'tilted' Earth's annual movement around the sun.
Although complex tables (almanacs) are used to obtain correction factors for any day of the year, you can accurately estimate the appropriate numbers for yourself. For example, if calculating the value at the beginning of May, you would be half-way between the spring equinox (when the sun is directly over the Equator) and the summer solstice (when the sun is directly above a point 23.45º north of the Equator). You would therefore need to add half of 23.45º, or 11.73º, to your reading.
Using the North Star to measure latitude
Once you've found the North Star it's simple to determine your latitude.
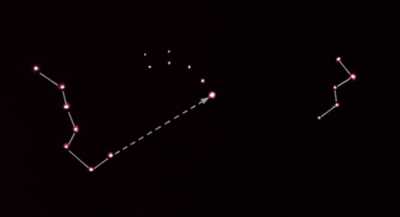
How to locate the North Star
- First, locate the Plough (Ursa Major), which is sometimes called the Big Dipper.
- Look along the back of the 'Plough blade'. About four blade-lengths along is the North Star. The constellation Cassiopeia is about the same distance from the North Star, but on the opposite side of it from the Plough.
- As the North Star is roughly in line with the Earth's axis of rotation, it never changes position, and measurements can be taken with the quadrant at any time of the night, whatever the season.
Use the sight line on the top of the aiming beam to align the beam with the North Star. Use the protractor to measure the angle between the beam and the horizon (which is 90º to the plumb line). This angle is your latitude.
How to measure longitude
It’s easy to work out your longitude using a radio, watch and sundial, but as castaways on Capraia we had none of these. Even though we built a radio, we still needed some sort of timepiece, so we made a pendulum of a certain, known length which we knew would swing with a fixed frequency (determined by this length).
The Earth rotates one full turn (360º of longitude) in one day. It therefore turns one degree of longitude in 1/360th of a day, or every four minutes. To calculate your longitude, you therefore simply need to work out the time difference between noon at your location and noon at the Prime Meridian.
What to do
- Find a radio station that broadcasts the ‘GMT (Greenwich Meantime) pips’ on the hour, giving the time at the Prime Meridian.
- Construct a device to work out local noon, like a north–south line.
- Time the difference between local noon, measured from the sun, and the 12 o’clock noon pips on the radio.
- If you reach local noon before the radio signal, you’re east of the Prime Meridian (0º longitude). If the radio signals noon while the sun is still climbing, you’re on a western longitude.
- For every four minutes that you time with your pendulum between the GMT radio signal noon and local noon, your longitude will increase by one degree, because that’s how much the Earth has rotated in four minutes. So, in parts of Cornwall for example, local noon would be 20 minutes after the ‘pips’, so the longitude would be 5º west.
For details of the calculation that we used to determine the longitude of our castaway island location, see ‘Difficulty with maths? No problem!’. - If you’re further away from the Prime Meridian, then the local time zone can be used, as long as 15º (the amount the Earth turns in one hour) east or west are added for every 60 minutes that the time zone is ahead of, or behind, GMT, respectively.
The Prime Meridian
The Prime Meridian is the imaginary line running between the North and South Poles that’s used to indicate 0º longitude. It passes through Greenwich in southeast London, and is therefore sometimes referred to as the Greenwich Meridian.
An international conference held in Washington D.C. in 1884 designated ‘the meridian passing through the centre of the transit instrument at the Observatory of Greenwich as the initial meridian for longitude.’ During the 1950s, the Greenwich Observatory moved to Herstmonceux Castle in East Sussex, where the skies were deemed to be clearer. In 1990, it moved again, to the Institute of Astronomy at the University of Cambridge, but the original site in Greenwich continues to serve as the location for 0º longitude.
As the prime meridian, the north–south line at Greenwich is used as the reference point for all other meridians of longitude, which are numbered east or west of it. The current system employs 24 standard meridians of longitude 15º apart, starting with the Prime Meridian.
The lines all run from the North to the South Pole, at right angles to the Equator. These meridians are the centres of 24 standard time zones. In theory, standard time becomes successively one hour earlier at each 15º longitude west of the Prime Meridian, and one hour later at each 15º longitude east. Time is the same throughout each zone. In practice, many of the zones have been subdivided or their shape altered for convenience.
The mean solar time at Greenwich is now called Universal Time (formerly called Greenwich Mean Time or GMT).
Study a free Geography course
-
Geography in education: exploring a definition
Learn more to access more details of Geography in education: exploring a definitionThis free course, Geography in education: exploring a definition, is aimed at geography teachers, or those with an interest in studying or teaching geography. It looks at the contribution that geography can make in the education of young people and the characteristics and purpose of geography as a subject.

-
Climate change: island life in a volatile world
Learn more to access more details of Climate change: island life in a volatile worldWhat impact will global warming really have? This free course, Climate change: island life in a volatile world, examines the potential problems faced by the people of the Pacific Island of Tuvalu as a result of rising sea levels. Where would you go if your island is only a few feet above sea level? Who would you blame?

Rate and Review
Rate this article
Review this article
Log into OpenLearn to leave reviews and join in the conversation.
Article reviews
The problem with the compass is that it will give you the magnetic North, not true north. In order to find the north-south line, I suggest the following: Use the vertical stick properly lined up with the string. Watch the shadow of the sun progress as time passes by. Keep marking the end of the shadow that is moving. With 2 points, a line can be drawn. More points will ensure you that the line is good. This line is East-West, the natural relative movement of the sun. To get the north-south, it must be a perpendicular line. I dont think it's logical to consider that someone got lost but was carrying a protractor to help with all of this, so I would assume that, besides not having any compass, there is no protractor either. No problem because it can be created with a little patience. The only single technological problem is the required watch to find longitude. There is no radio signal or receiver where I am lost. However, if a watch is available, it's logical to assume that the owner knows the timezone where it was set, so it will not be a problem to adjust the clock to be in GMT-0 timezone, or not do any adjustment except when calculating local time based on local noon and current watch read. Either way works.
I have one question though: Between equinox (0 degrees to adjust) and solstice (23.45 degrees to adjust), it's not a linear equation to simply calculate adjustment based on the number of days. Without the almanac and not relying on a wrong linear calculation, how would we properly find latitude?
Clovis Lacerda - 11 March 2017 6:21pm
one piece of paper in the back pocket and the correct latitude can be found with the proper declination of the sun.
https://astronavigationdemystified.com/survival-declination-table/
Also, as I had mentioned, this video shows how to find East-West using the movement of the sun and the shadow of the vertical stick.
https://www.youtube.com/watch?v=kZL0qGkoJIk
The single instrument that is required is the watch, to find longitude.