

3.1 Measuring a transit
In Figure 12 (repeated below) you saw how a transiting planet changes the measured brightness of its star as it blocks some of the star’s light. But what exactly do astronomers need to do to detect a transiting planet?
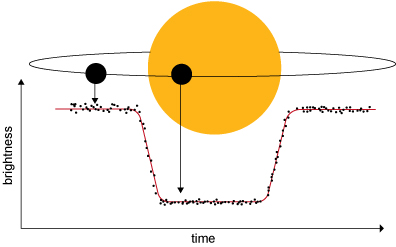
The basic technique for detecting a transiting planet is to observe a star over a period of time and measure how bright it is. If a dip in brightness, such as that shown in Figure 12, is observed, then a planet may have been detected. Planets orbit regularly, so if the dip is caused by a transiting planet, it should also recur regularly. And the time between dips should be of equal length: it’s the time taken by the planet to complete each orbit.
The dip in brightness needs to have the specific U-shape shown in Figure 12 to be caused by a transiting planet. V-shaped dips are more likely to be caused by a pair of stars orbiting each other, just eclipsing each other’s edges. Dips with other shapes could be caused by spotty regions on the surface of a star coming into view, like the sunspots you saw in Figure 4. Unfortunately, there are lots of things that can make a star appear slightly less bright.
You’ve learned that planets are much smaller than stars, so when a planet transits it doesn’t block out much starlight at all. Jupiter would only block out about 1 per cent of the light of the Sun if it were possible to observe its transit from afar. Fortunately, it is not particularly difficult to measure the brightness of a star to within 1 per cent. In fact, there are quite a few amateur astronomers who are now doing this as a hobby.