4.4.1 Steps in conducting an accessibility and safety audit
Figure 4.6 suggests the main steps to take. Each of these steps is described in more detail below.
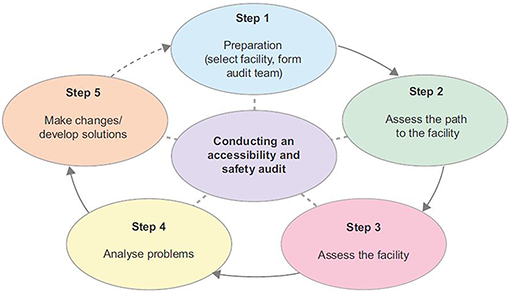
Step 1 Preparation for the audit process
The first step in preparation is identifying the facility to be audited, which could be a water point or latrine at household or community level, or within an institution such as a school or health centre/post. You can also use the same basic process to audit accessibility in any public building or office.
Preparation also includes selecting the team of people to conduct the audit and the key aspect is ensuring all the different users are represented. The audit team should include people of different ages, genders and abilities, as appropriate for the facility being audited. For example, for community facilities this should include men and women of different ages, children, and people with a range of impairments including those who use a wheelchair or crutches, and people with visual impairments. For a school water point, the team could include teachers, other staff, students (boys and girls) with and without disabilities, a representative from the local education office, and the school director. If possible, it may also be helpful to include engineers who have the capacity to design the facility based on the information obtained from the audit process.
If you were organising an audit team for a rural health post, who would you want to be included in the team?
You would need to include the health extension workers based at the health post and representative members of the community: men and women, old and young including children, persons with disabilities of different types, and pregnant women. You could also involve engineers and officials from the water or health bureau.
Once the team is decided, they will probably need some training. This need not be complicated but everyone must understand the purpose of the audit and what they are expected to do. For a larger team, there are specific roles to be allocated, either by asking for volunteers or assigning roles to individuals. The roles include the coordinator (who may be you!), measurer, interviewer, note-taker, drawer of diagrams, and photographer. You may also need to consider asking someone to represent a type of user who is not available for the team. For example, frail older people may not be able to participate in the audit themselves but someone else could have the role of considering their needs.
Table 4.1 shows the items of equipment needed for the roles in a larger team. Some other items may sometimes be useful. For example, if there is no wheelchair user in the team, a wheelchair could be used by a person without a disability for the audit activity.
| Role of team member | Equipment |
| Co-ordinator | Notebook and pen |
| Interviewer | Notebook and pen/voice recorder |
| Note taker(s) | Notebook and pen each |
| Measurer | Tape measure |
| Drawer of diagrams | Notebook, pencil and eraser |
| Photographer | Camera |
Note that a simpler audit can be undertaken by a smaller group without the need for as much equipment. For example, distances can be measured by pacing out or using a stick rather than using a tape measure. A less formal assessment can be very effective if the task is approached by a small group with enquiring and open minds.
If you are carrying out an audit of a community water point but you don’t have a visually impaired person in your team, how could you identify their accessibility and safety problems?
You can ask someone from the team to cover their eyes with a cloth (blindfold) so they have a similar experience to someone who cannot see.
Step 2 Assess the path to the facility
The action starts with assessment of the path that leads to the facility. The audit team walk or wheel along the path and make notes about who can access the facility and who cannot, and what the difficulties are. Questions to be considered include:
- What is the path made of?
- How wide is it? Is it wide enough for all users?
- Is the path clean and clear of debris such as fallen branches that could trip people up?
- Are slopes too steep?
- Are there parts of the path which make girls, boys or women feel unsafe? If so, what is the cause and what could be done about it?
Notes in answer to the questions are made by the note taker as the team progresses. In assessing the path make sure the challenges for everyone in the team are noted. The measurer, photographer and diagrammer also do their part as the team moves along. The interviewer can ask questions of users who are not part of the audit team and record their responses too. Any suggestions for improvements should be recorded. It’s important to take a note of suggestions as and when people make them because they may be forgotten later.
Step 3 Assess the facility
In this step everyone in the team checks out how easy or difficult it is for them to use the facility itself. As before, notes, measurements, drawings and photographs should be taken. Questions for this step will be different for water points and latrines and will vary with the needs of the location (school, health centre, etc.). These are some example questions for auditing latrines:
- If there are steps, are they a manageable height? Is there a handrail for support?
- Is the entrance flat and wide enough for a wheelchair user to enter?
- Is there a secure door? Is it easy to open? Does it open inwards or outwards?
- Inside, is there a raised seat? Are there handrails for support? If yes, are they positioned appropriately? Are they at the right height?
- What are the dimensions of the space inside each cubicle?
- Are the latrines clean (floors, walls, doors)?
- Do all groups of people feel safe when using the latrine? (particularly adolescent girls, women and children of different ages)
- Are there facilities for girls and women to dispose of sanitary protection waste? And washing facilities for menstrual hygiene?
- Is water available for handwashing? Is there soap? Can water and soap be reached by someone sitting in a wheelchair? And by a small child?
Note that in answer to these and similar questions about physical accessibility problems, it is advisable to be as precise as possible because details will help when identifying solutions for the problem (Jones, 2012). For example, terms like ‘not accessible’ are unhelpful but specific notes such as ‘slope of the ramp is too steep’ or ‘handrails are too high’ are much more useful, and even more so if measurements are included.
Step 4 Analyse the problems
When the assessment is complete, the audit team meet to bring together the various notes and other records. They discuss the results and make a list of all the problems encountered. The team can then move on to the next step of finding solutions.
Step 5 Make changes and develop solutions
Some suggestions for change will have been noted during the audit, other solutions may emerge from discussions afterwards. One thing to keep in mind is whether suggested solutions are feasible. Local circumstances including the nature of the location and the availability of funds may make some options unrealistic, at least at the current time.
One way to manage the process of identifying feasible changes is to group them into short-term, medium-term and long-term options. Short-term solutions are those which can be done immediately or that do not need further planning and allocation of resources. Examples could be removing debris from a path or adding a guide rope leading to a latrine. Medium-term solutions need some planning and resources. Examples here include putting in a handrail or installing a ramp and, if funds are available, could be more. For projects that are already in progress with a fixed budget, it may be possible to make adjustments by shuffling resources from one budget line to another. Long-term solutions are more substantial and require consultation with the community, planning and allocation of adequate resources.
Conducting accessibility and safety audits can bring other longer-term benefits. The process can change attitudes and awareness among participants, including the service providers. This can encourage change in the policies and procedures of a given organisation and help them shift from conventional service provision to inclusive service provision.
Some time after the audit is completed and changes have been made, it is advisable to return and repeat the process to check that the situation has improved. This is indicated in Figure 4.6 by the dotted arrow from Step 5 back to Step 1.
(Note: This description of accessibility and safety audits is adapted from resources prepared by WaterAid and the Water, Engineering and Development Centre (WEDC) at Loughborough University in the UK. For further details including worksheets for conducting audits go to https://wedc-knowledge.lboro.ac.uk/ collections/ equity-inclusion/ general.html [Tip: hold Ctrl and click a link to open it in a new tab. (Hide tip)] )
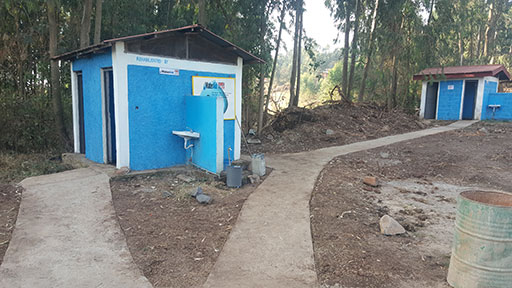
Is the facility in Figure 4.7 inclusive? Explain your answer.
It has some features of inclusive sanitation, that is, a level concrete path but there appears to be a small step up from the path into the latrine. Also, it would not be convenient for wheelchair users to use the handwashing facility because the path does not extend to the washbasin. In addition, there are no markers on the path to help visually impaired people to follow it.
4.4 Accessibility and safety audit