8.4.1 The ABCDE-T approach
The simple way of remembering what to do first, second and third to save the life of a person with an emergency condition is to use a system known by the letters ABCDE-T (Box 8.2).
Box 8.2 The ABCDE-T of basic life support
You should perform these actions in the following sequence:
- A is airway care
- B is breathing
- C is circulation of the blood
- D is disability and brain and spinal cord damage
- E is exposure and examination of the person’s body
- T is transfer to the nearest health facility.
‘A’ stands for airway care
Your first action is to keep the airway open. As you already know, the commonest cause of blockage of the airway is food or another foreign body lodged in the windpipe. Airway obstruction can also occur when a person is unconsciousness after a blow to the head or neck, or because they have lost a lot of blood from an injury.
The obstruction after a head injury may also be due to a broken tooth, blood clots or the person’s tongue falling back into the throat and blocking the airway. This is particularly likely to happen if they are lying flat on their back.
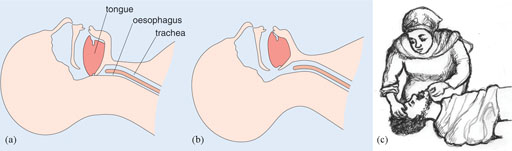
Figure 8.7(a) illustrates how the airway gets blocked easily by the tongue falling back into the throat. In Figure 8.7(b) and (c), note how the action of lifting the chin also lifts the tongue and opens the airways, allowing the person to breathe. Remember that when you lift the chin, you must not move the neck! You may aggravate a possible neck or spinal injury in the process.
‘B’ stands for breathing
Once you are sure that the airway is open, the next step is to check whether the person is breathing or not. Listen for sounds of breathing and feel for breath on your cheek when you bend close to the person’s mouth. Also look for chest movements (rising and falling) as breath moves in and out. If the person is breathing steadily, you can put him or her in the recovery position (see Figure 8.8). Notice the position of the injured person’s legs and arms, which stabilise him on his side with his airway open. Lying the person on their side is to prevent choking if they vomit and to keep the tongue from falling back into the throat and blocking it.

If the person is not breathing at all, begin rescue breathing, i.e. breathing for the person, also known as ‘mouth-to-mouth resuscitation’. The steps of rescue breathing are shown in Box 8.3.
Box 8.3 Steps in rescue breathing for an adult patient
- Make sure that the airway is open
- Pinch the nose shut to prevent air from escaping and tilt the person’s chin upwards to open their mouth
- Fill your own lungs with air and steadily blow into the person’s mouth until the chest rises. This should take about two seconds
- Feel for the person’s pulse to make sure their heart is beating, but don’t waste time measuring the pulse rate
- Repeat the rescue breaths about every five seconds. Do this for about one minute, giving about 12 rescue breaths in that time
- Feel for a pulse between every rescue breath. Continue rescue breathing as long as a pulse is present but the person is not spontaneously breathing on their own
If the patient is a child:
- Follow the steps above, but you need to give smaller, faster rescue breaths. Give one rescue breath about every three seconds. Do this for about one minute, giving about 20 rescue breaths in that time. Then continue with step 6.
‘C’ stands for circulation
Once you are sure that the person is breathing, then check for any site that is bleeding. Count the person’s pulse and measure the blood pressure. If there is any bleeding give first aid to stop the bleeding (look back at Box 7.1 in the previous study session). If the person has got any signs of shock, start pre-referral intravenous (IV) fluid therapy, if you have been trained to do so.
If a person has a haemorrhage or septic shock, what do you expect to find when you take the pulse and blood pressure?
The pulse will be rapid (possibly over 100 beats per minute), but weak and fluttering. The blood pressure will be low and falling; the diastolic pressure may be below 60 mmHg.
‘D’ stands for disability and brain and spinal cord damage
Next you assess the person for any possible head or spinal injuries, as described in the previous study session (Section 7.4).
Do you remember the signs of head or spinal injuries?
The person may have difficulty breathing, pain in the neck, head or back, blood or fluid coming from the nose, ears or cuts on the scalp, tingling or loss of sensation in the hands, fingers, feet or toes, confusion, loss of control of urination and defaecation, difficulty with balance and walking, or partial or complete paralysis.
‘E’ stands for exposure
Expose the person to your full attention; this means open their clothes and if possible remove their clothing. You must do this very carefully, avoiding moving the limbs, head or neck if you suspect a limb fracture, head or spinal injury. Look at the whole person to be certain that you have not missed any injury. Examine the abdomen for swelling, tenderness or ‘guarding’ the internal organs with rigid muscles, which may indicate internal injury, acute appendicitis or intestinal obstruction.
‘T’ stands for transfer
When you have stabilised the patient by treating any immediately life-threatening conditions, transfer your patient to the nearest health facility as quickly as possible. Remember to take all the precautions to reduce trauma and support life during the journey, as described in this and the previous study session.
What else should you remember to do?
Write a clear referral note giving the patient’s name, address, age, the circumstances that led up to the emergency, your assessment of their condition, and any actions you have taken. Sign and date the referral note and print your name and contact details so the higher level health facility can communicate with you about the patient.
This concludes Part 1 of this Module. In Part 2, we turn to the important subject of mental health problems in rural communities.
8.4 Basic life support techniques