

1.2 Setting your location
Transcript
Stellarium can show what the sky will look like from any position on the Earth. From different points on the Earth’s surface, an observer would be looking in different directions out into space, meaning that the sky will look very different in Australia for example than it does in the United Kingdom. In order to get a view on the screen that corresponds to the sky where you are (or in Tenerife, where the COAST facility is located) it is important to specify the location.
Important: When started, the Stellarium software takes up the entire screen, covering up any other windows you may have open (including this website). On a desktop or laptop computer, you can use the F11 key to switch between full-screen and a windowed view of Stellarium. Alternatively, or if you are working on a mobile device, you may want to make separate notes or print out the instructions for each activity so that you can continue to work while the screen is filled with the Stellarium display.
Having started the software, the location you wish to use can be specified using the Location window.
Activity _unit2.2.1 Activity 1 Setting your location
If you are planning to look at the night sky where you are, it would be best to set the location to your own home town or location.
For the main part of this module you will be planning and making observations using the COAST telescope in Tenerife. For this purpose it makes sense to set the location to Tenerife, as follows:
- Move your mouse to the lower left-hand side of the Stellarium screen. The main menu, consisting of a vertical line of icons, will appear.
- Click on the icon at the top of this menu (an eight-pointed symbol representing a compass rose) to open the Location window.
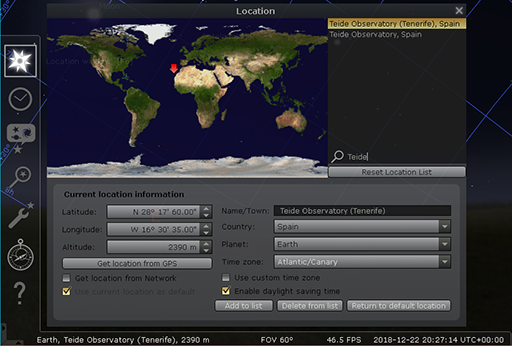
- The right-hand side of the Location window contains a list of pre-set locations. To set the location of the COAST telescope, type ‘Teide’ into the search box (indicated by a magnifying glass symbol) and then select ‘Teide Observatory (Tenerife), Spain’ from the resulting list.
- Tick the box labelled ‘Use current location as default’ at the bottom left of the Location window. You can now close the location window using the ‘x’ at the top right.
Stellarium will remember the location and use it each time the program is started. Of course, you can also change the location as often as you like so when not working with COAST you may want to set the location to your home or favourite observing location instead.
Note: if you are using Stellarium on a mobile device some of these controls will be in a different place. Start by tapping on the six white squares in the lower left corner of the screen, and then the three-bar menu. This brings up the Settings menu from which you can adjust the location.