

1.3 Controlling how Stellarium displays the sky
With your location set you can now start to take a look around you in the virtual world of the night sky. Using the Stellarium controls you can reveal the stars and constellations and experience the vibrant imaginations of the Ancient Greeks and the people, animals and objects that they devised.
To do this you can use the icons in the main toolbar at the bottom of the Stellarium screen.
Activity _unit2.2.2 Activity 2 Exploring the Stellarium display options
You can configure the way that Stellarium displays the night sky by using the toolbar icons to switch various displays and overlays on and off.
- If the display shows a daytime scene, first adjust the time using the clock icon on the left-hand menu (directly below the Location window icon) until the night sky is shown.
- Move your mouse to the small strip of writing at the bottom of the Stellarium screen. The main toolbar, consisting of a horizontal line of icons, will appear.
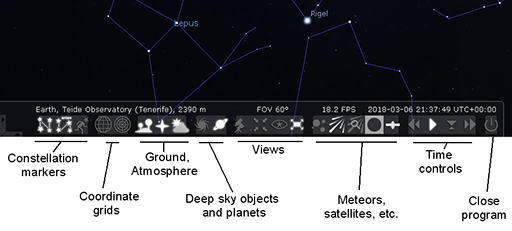
- The first three icons on the left can be used to switch on displays of constellation lines, names of constellations, and artwork depicting the mythical creature or person representing each constellation. Each display can be switched off again by clicking the icon a second time.
- The next two icons control the display of grid lines for the two types of coordinate systems used to locate objects. These will be covered in detail later in the course.
- The three icons to the right of the grid line icons allow you to switch off the display of the ground, the cardinal points ((‘N, S, E, W’ labels) and to remove the simulated effects of the atmosphere. These can be useful for locating objects, but for most purposes you would probably want to leave these switched on.
Take a few moments to explore these options and how they affect the display. There are a number of other options further to the right of these, some of which you will explore later in the course.
Note: if you are using Stellarium on a mobile device some of these controls will be in a different place. Start by tapping on the six white squares in the lower left corner of the screen. This will bring up a selection of icons, including the ones described above.