

4 Plan your own variable star observations using COAST
In the final observing project for this course, you will make observations of a periodic variable star chosen from a list of eclipsing binary stars identified by SuperWASP. These are suitable for a one-week project as the periods are short (between three and five days) and the stars have not been previously studied in any great detail; by contributing data points to the light curve you will be making a valuable addition to the body of scientific knowledge about these objects
Activity _unit8.5.1 Activity 4 Request observations of SuperWASP eclipsing binary
In this exercise you will use the knowledge and experience that you have gained from your observations of Messier objects in earlier weeks to help you to plan your observations of the eclipsing binary star.
1. Select target and plan observations
The table below gives a list of potential eclipsing binary stars identified by SuperWASP. Just as with the Messier objects that you observed in Week 4, these are located in different parts of the sky, and so different objects in this list will be best placed for observing at different times of the year.
| Object | RA | Dec |
| EW1 | 05h 48m 29.96s | +33° 48’ 18.5’’ |
| EW2 | 05h 28m 55.47s | +38° 19’ 15.3’’ |
| EB1 | 03h 58m 52.20s | +41° 07’ 06.0’’ |
| EB2 | 20h 43m 00.15s | +38° 27’ 21.4’’ |
| EB3 | 20h 11m 08.31s | +13° 16’ 30.2’’ |
| EB4 | 20h 43m 20.70s | +12° 18’ 19.2’’ |
| EA1 | 17h 40m 38.44s | +11° 36’ 23.9’’ |
| EA2 | 17h 15m 18.34s | +35° 45’ 41.7’’ |
| EA3 | 12h 37m 39.00s | +09° 47’ 13.9’’ |
| EA4 | 09h 11m 17.71s | +39° 15’ 50.0’’ |
The celestial coordinates (RA and Dec) are listed alongside each object. Using your knowledge of how the RA determines when an object is well placed for observation, select a target from this list that will be observable over the next week. You may wish to refer back to Section 2.1 of Week 4 to help you with this. You can also use Stellarium to check – it will be difficult to identify the individual stars from this list and they may not be shown at all, but you can still check that the coordinates are visible at night during the week that you will be observing.
2. Request images from COAST
Log in to the telescope.org website and select Use telescope from the menu on the left hand side. Previously, you selected Messier objects from a list, but this time you will enter the coordinates of your chosen target directly. Select or click here to enter coordinates under the Enter the name or catalogue ID box. This brings you to a screen where you can enter the RA and Dec coordinates from the table. Enter the coordinates carefully as shown in this example:
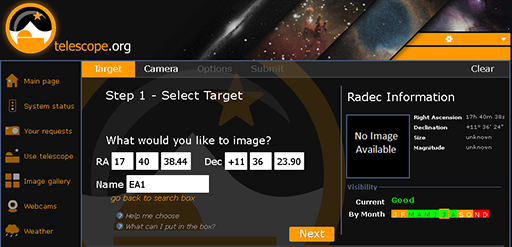
Enter the name of your target in the Name box that appears below the coordinates and click Next to take you to the Step 3 – Customize screen.
3. Filter selection
In order to compare results, it is important that all measurements are made using the same filters. For this investigation we will use the green (V) filter. This is a standard filter for this type of work as it covers the middle part of the visible spectrum. On the Step 3 – Customize screen, select the (V) filter option under pick a filter (advanced) on the right-hand side.
4. Exposure bracketing
As part of your imaging request you will need to select an exposure time. In order to determine the correct exposure, you should request several images with a wide spread of different exposure times: for instance 15, 30, 60 and 120 seconds. This technique of doubling the exposure each time is known as exposure bracketing. When you get this first set of images back you can choose the image with the correct exposure and use this exposure time for any further images you want to request. This is another example of using information from one set of observations to help you plan subsequent observations.
For each image, confirm your request by pressing Submit on the Confirm request screen.
You are now ready for the final phase of the project. When your images of your chosen target come back you will be able to measure the brightness of the variable star and add your results to the light curve by following the instructions given next week.