

2.1 Aperture photometry
In discussing the FITS file format you have already seen that every pixel in an image has a value – a number that corresponds to the brightness of that pixel. However, measuring the brightness of a star in an image involves a little more than looking at one number in one pixel.
ITQ _unit9.3.1
-
Open one of your images in telescope.org and use the zoom slider on the Edit page to zoom in as far as you can on one of your images. Comparing one of the brighter stars with one of the fainter ones in your image, what do you notice about the star images?
-
The brighter stars appear larger. This is because each star image is spread over several pixels. As well as having brighter pixels, the brightest stars appear larger on the image, with their light covering more pixels.
A technical way of describing this is that the resolution of the detector is greater than the point spread of the star images; in other words, the pixels on the detector are smaller than the star images. This means that to measure the brightness of a star, it is important to add up the counts from all of the pixels making up the image of the star.
One way of doing this is shown in Figure 1. A circle (the central aperture) is drawn around the star image, and the values of all the pixels within that circle are added together.
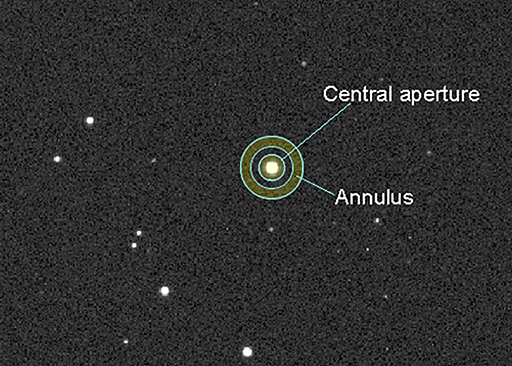
As you may have noticed when looking at your images, the background is dark but may not be completely black. This is especially obvious when adjusting the sliders for brightness and contrast, and can be seen in Figure 1 – the background pixels are a dark grey, rather than completely black. This means that their pixel values are not exactly zero. Even at the very darkest sites there is always some background light, as well as instrumental noise in the detector, and this must be subtracted off.
An important principle in measuring anything is to make sure that you are measuring only the thing that you are interested in. In this case, you need to subtract any background counts to leave only the counts that are from the star itself. This is done by drawing a ring (annulus) around the central circle, covering only dark sky away from the star. The average count from pixels in this ring is subtracted from each pixel in the central zone, leaving only the values for the brightness of the star itself.
This can be done using aperture photometry software, which accepts a FITS file image and allows you to position the aperture and annulus. The software then does the necessary calculations for the overall count and the background subtraction.