

3.2 States of matter tricky topic
Now watch Video 1, the first part of a mapping diagram for the states of matter tricky topic in which you will see the common mistakes made when mapping specific stumbling blocks and their problem examples. You will meet this tricky topic again in Week 6 but for now it will be useful to know that there are three states of matter: solids, liquids and gases and materials can be changed from one state to another by heating or cooling. The stumbling blocks in this tricky topic have been identified as:
- particle movements in all states of matter
- ‘existence’ of gases
- differences between melting and freezing
- differences between evaporation and condensation
- differences between heat and temperature.
Now you are in a position to look further into the tricky topic you found from your needs analysis in Week 2.
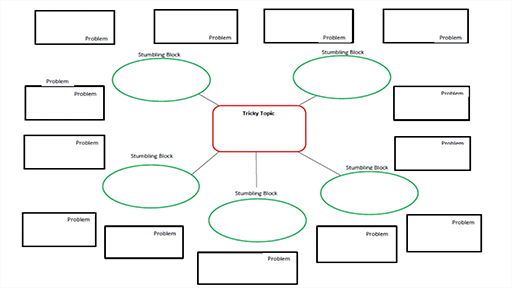
Activity 5 Structure your tricky topic
- Start by revisiting your list of problem examples from Week 2, Activity 1. If you were not able to share these with colleagues or friends last week, do so now if possible. Try to build your list up with others’ ideas. You may want to write these down again in free-form mind-map fashion, along with any other problem examples that you have found in your tricky topic.
- Group your problem examples into stumbling blocks. Using a highlighter or pens, split the list of problem examples into groups according to a common theme. Give names to these groups, which will form your key stumbling blocks that define several problem examples. If a problem does not merge with others it may already be a stumbling block in itself.
- Capture your structure. Download a blank tricky topics mapping diagram from http://tricky-topics-guide.ac.uk/ downloads/ [Tip: hold Ctrl and click a link to open it in a new tab. (Hide tip)] and fill it in.
- Complete your structure by distilling the problems. Use the problem distiller (see Week 2, Table 4) to classify why students have these specific problems in your tricky topic. You can add problem distiller categories to each of the problem examples in the Structure chart you created (see Figure 3 for example) or you could structure your tricky topic like the moles tricky topic which was the solution to Activity 3 in Week 2 (see Week 2, Figure 9).
- Reflect on this activity. Start by answering these questions:
- How well do the title of your tricky topic and stumbling blocks reflect the problems?
- How well does your structure reflect your tricky topic?
- What went well in this process?
- What problems did you have?
- Feedback your tricky topic, stumbling blocks and experiences in structuring to the tricky topics team using the feedback section of IRIS Connect under Week 3, Activity 5.

Now sit back and admire your tricky topic structure! You will use this when you design your learning intervention later in the course.
You probably worked alone on the activities in this section and, of course, the tricky topics process can be conducted alone, once the initial needs analysis has been completed. However, as you have seen from the tricky topics guide website, the tricky topics process is normally conducted through a collaborative process in which teachers/practitioners come together to share their knowledge. In the next section you will see the different ways in which the tricky topic process can be conducted collaboratively.