

2.4 Considerations for interpreting sections
Activity 2 introduced you to the idea of comparing the content of different slides, but there are a number of other considerations to take into account when interpreting samples.
Orientation
Most histological sections are 2D slices, from a 3D piece of tissue. Exactly what will be seen on the microscope slide depends on the plane of the section; that is, the position of the microtome cut, in relation to the anatomical structures in the tissue.
Clinicians attempt to cut tissues in a plane that allows the underlying structure of that tissue to be seen and interpreted most easily. For example, sections of the intestine and skin are usually cut in transverse section (across the tube), so that all layers of the tissue are visible. Similarly, skin sections are cut perpendicular to the surface of the skin.
Positioning the tissue before embedding and knowing its orientation are, therefore, critically important, so that the sectioning is done in the correct plane. For biopsy specimens there is no latitude for deciding the plane of the section, as the direction of the needle tract determines what tissue is available and how it is oriented.
Pathologists expect to view sections in their best orientation as this then gives them the best opportunity of identifying abnormalities. Many anatomical structures are not readily visible in thin, 2D sections, simply because most of the structure is not present. In this case, the 3D structure needs to be interpreted from what can be seen.
In order to give you some insight into this problem, spend a few minutes looking at the three structures in the figure below and thinking about what the different sections would look like if they were taken along the planes indicated by lines shown (i.e. A–A’, B–B’ and C–C’). You can try making simple diagrams of the sections that would result from sectioning along these lines, if you wish.
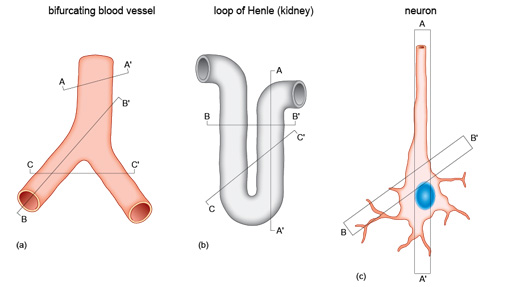
This exercise should make you appreciate that it is not just the orientation of the section, but also the position (depth) into the tissue or tissue block that affects the appearance of the structures. For example, the blood vessel in (a) can appear as one or two structures, depending on the level of the section within the block.
For this reason, it may be necessary to section a block at different levels to obtain suitable slides. (The initial cut-up of the tissue should have ensured that the area of interest is within the block so it should not be necessary to hunt through the block to find it.)
Size of sample
Another problem in interpreting sections is that some structures are too big to be seen in a thin section, because much of the cell and its overall architecture cannot be seen. The neuron (image (c)) in Figure 10 is a good example of this.
One solution is to cut thicker sections in order to capture more structures. However, as noted earlier, resolution is generally better in thin sections because in thick sections some cells will overlie others so that distinguishing details of individual cells or the tissue structure may be more difficult. Moreover staining thick sections requires much longer for the stains or antibodies to permeate the tissue, which slows the process of analysing and interpreting the material.