
Adding resources
The various resources available mean that almost any kind of web content can be added to the course.
Book
Adding a book
To add a book, switch editing on, go to your course’s homepage and click on the + Add an activity or resource button.
This will give you a screen full of options. Click on the Book icon to open the New Book page.
Add the title of your new book in the Name field. Adding a summary of the book in the Description field is optional.
If you click on the Appearance arrow, there are further options in the Chapter formatting drop-down for you to choose how the link is displayed. We recommend that you use Open as the preferred display option.
- None: Chapter and subchapter titles have no formatting.
- Numbers: The default option, where chapters and subchapter titles are numbered 1, 1.1, 1.2, 2, etc.
- Bullets: Subchapters are indented and displayed with bullets in the table of contents.
- Indented: Subchapters are indented in the table of contents.
Usually the chapter title is displayed both in the table of contents on the left-hand side of the screen and as a heading above the content in the main area of the screen. You tick the Custom titles tickbox, the chapter title appears in the table of contents but is not displayed as a heading above the content: you can add a different title (perhaps one that is longer than the chapter title) as part of the content.
Click on the Save and display button to open the Add new chapter page.
Add the chapter’s title in the Chapter title field and type the main text of the chapter (or copy and paste it from elsewhere) into the Content field.
Click on the Save changes button.
This generates a Table of contents at the top of the left-hand side of the screen. The title of the first chapter will appear here and the content will appear in the main area of the screen.
To add another chapter, click on the + (add or plus) symbol alongside the chapter you’ve just created in the Table of contents.
This will take you back to the Add a chapter page.
Again, fill in the Chapter title and Content fields, and click on Save changes.
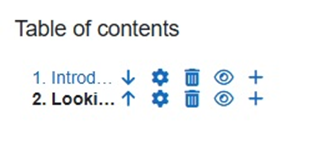
As you add more chapters you can:
- change the order of the chapters by clicking on the arrow icon
- edit a chapter by clicking on the cog icon
- delete a chapter by clicking on the dustbin/trashcan icon
- hide or reveal a chapter by clicking on the eye icon
- add a new chapter by clicking on the plus icon.