Navigating the virtual gallery
Now, let’s prepare you for your journey into the BEAP Virtual Gallery.
Whether you're a first-time visitor or a returning explorer needing a refresh, this section provides a guide to help you navigate and move easily around the space.
The gallery is meant to be an experiential learning journey. This simply means learning by doing and experiencing things yourself. It also means recognising that people will have different needs and ways of wanting to learn, so there are several options for moving about the gallery. This gives you a choice to encounter the gallery and exhibits in a way that best suits you.
Important Note: ArtSteps doesn’t currently allow you pick up where you left. So, whether self-guided or directed tour, if you leave before finishing you’ll start at the hallway entry again. The navigation is quick, so you’ll be able to get back to where you were in no time.
Route 1 – The Explorer
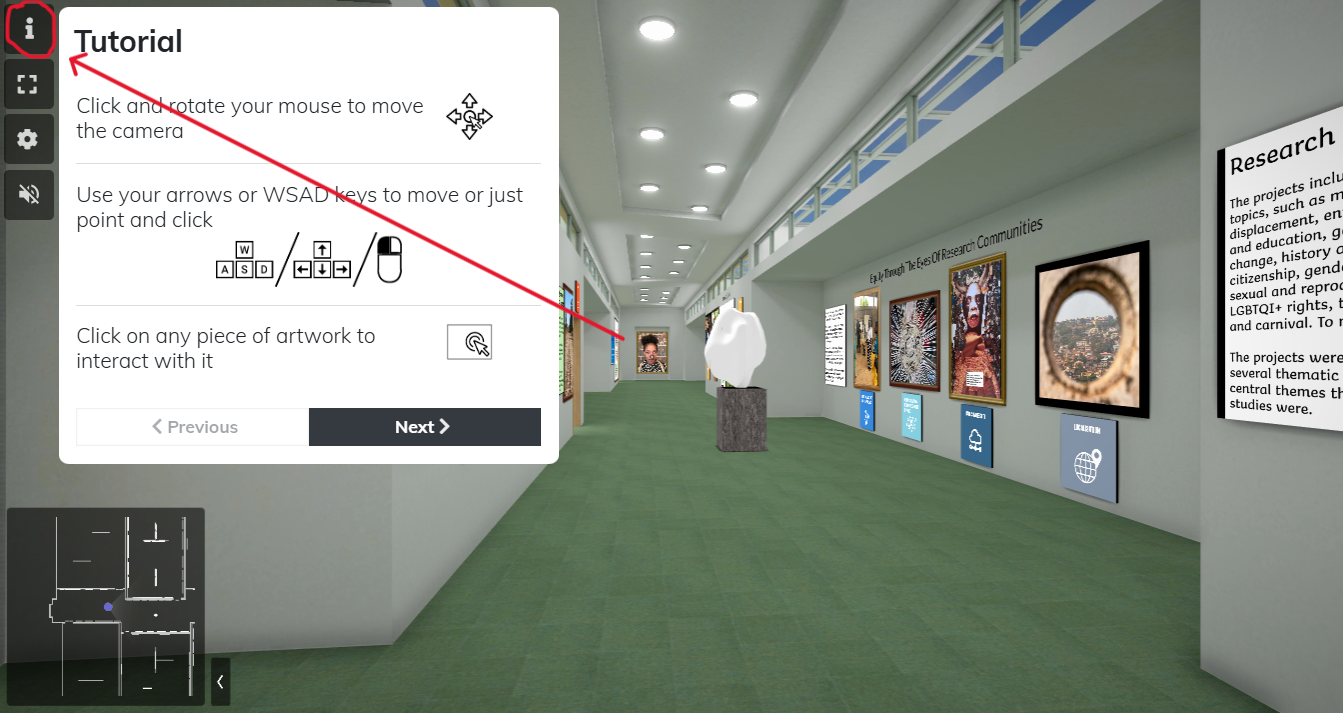
Some people will prefer to explore the gallery by themselves. If so, jump straight in; that’s fine. Just skip to the gallery link that is in the next drop-down section - ‘Enter The Gallery’. You can always come back here if you want help with any part of the gallery’s functions. Just be aware that ArtsSteps includes an – in gallery - tutorial in the top left of the screen that you can refer to at any time. Alternatively, pop back here for clarifications.
Route 2 – Preparing To Self-Guide
For those that like to know more about how to move around and interact with the space, there are two more structured options.
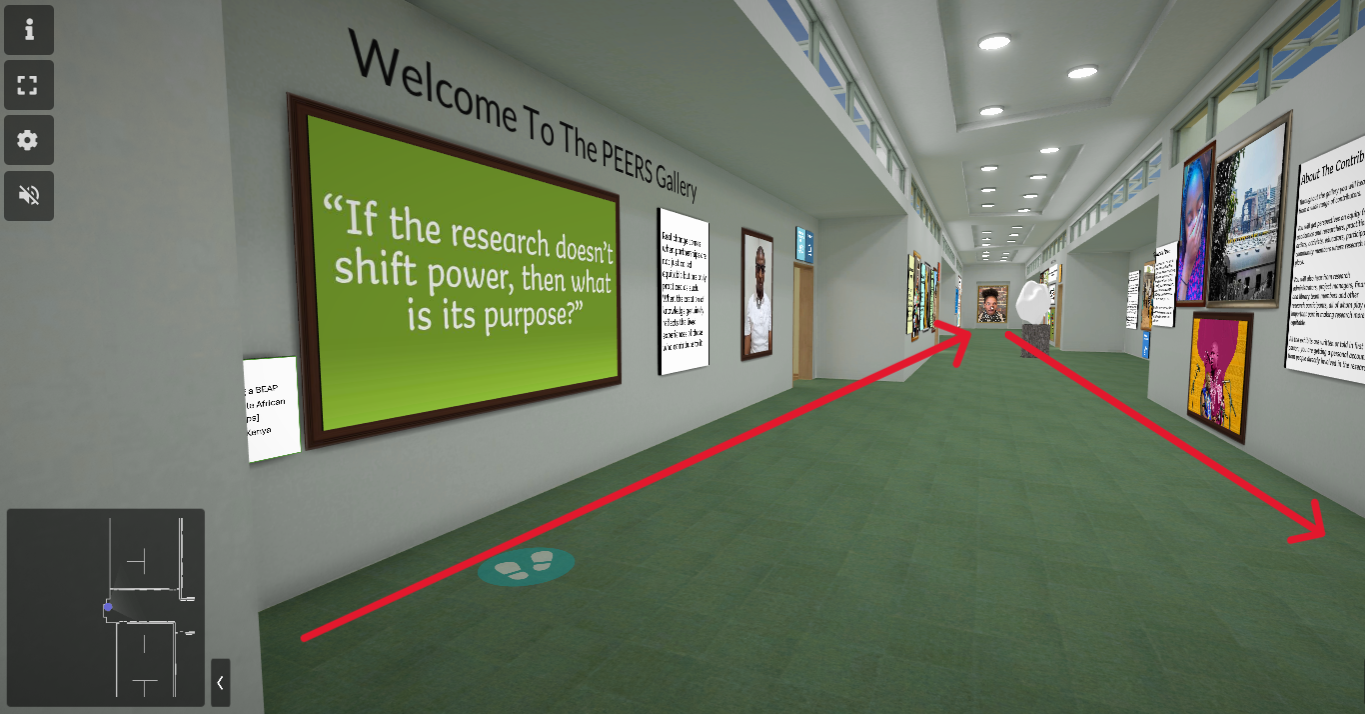
Entering the Gallery
- After clicking on the link, you’ll enter the gallery at the end of the central corridor.
- If you follow the left hand wall around, the text, videos and exhibits provide all the information about the gallery and what you will find within it before you go off to explore the eight rooms.
Basic Movement Controls
- Use your mouse or trackpad to look around.
- Click and drag the mouse to adjust your viewpoint
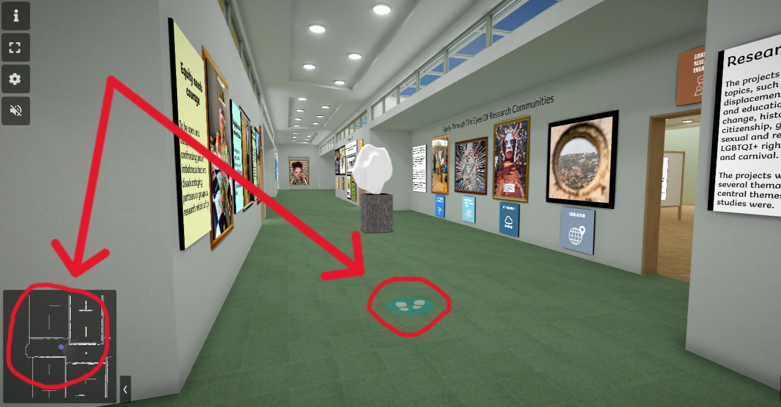
Three Ways To Walk Through the Space
- Click on the footprint icon to move to different areas of the gallery.
- Click on the mini map in the bottom left hand corner to fast move between rooms or,
- Use the four arrow keys on your keyboard to navigate forwards and backwards, and left and right.
Zooming In and Out
- Scroll up or down using your mouse wheel to zoom in and out.
- If using a trackpad, pinch to zoom.
Interacting with Exhibits
- There is a mixture of text plaques, images and videos on walls. Not everything is interactable though.
- Central corridor - if you see this icon next to an exhibit you can click on it.

-
- In all of the rooms, the written plaques on the walls are not interactive, but all of the photos on the wall will be. Click on to reveal the story behind the image.
- To interact, click on the artwork or object you want to look at. One click and you will be positioned directly in front of the exhibit.
- A second click on the exhibit opens up a new screen with the story text and reflection. Many exhibits will have a clickable link to take you to other websites where you can learn more about that particular project.
- Audio - some exhibits you can hear the person telling their story, as well as read about it. If this is an option, a clickable play button will appear in the open window along with the text.
Exiting the Gallery
- Click the exit button or simply close the browser tab when you’re done exploring.
Route 3 – Taking The Guided Tour
If you would prefer the more structured experience, we have set up a guided tour. When you first enter the gallery, in the bottom centre of the screen, you will see a set of icons.

The tour does not take you around each individual exhibit. Instead, the drop down menu [seen above] has 9 guide points. There are 8 that correspond to the rooms. Clicking on one of these guide points will take you to the entry point of that room - placing you in front of the plaques that explain the institutional or community issue. You are then free to explore the exhibits in the room using arrow keys and other methods described in step 2 above.
You can open up the drop down menu and fast track to another room at any point.
The ninth guide point is 'start' and will take you back to the entrance of the central corridor.
The steps to use the navigation buttons are outlined here but, should you prefer, click here for a video tutorial.
Play
- Starts the tour and will take you to the first standpoint.
- Pressing play at any other time will take you to the next standpoint.
Next and Previous
- Pressing left of play takes you back to the previous standpoint
- Pressing right of play takes you forward to the next standpoint
Encountering Individual exhibits
- We have designed the tour so it positions you directly in front of individual exhibits. There may be two or three in front of you, dependent on the section of the wall you are at.
- You need to click on all the exhibits individually for it to open and view the content.
‘Go To’ Guide Points Drop Down
Just to the right of the play button is a smaller downward pointing arrow. Clicking on this opens up a drop down menu that you can use to navigate faster around the gallery. It doesn’t have a navigation point for each individual exhibit but you can skip sections. There are 9 points:
- Entry to the gallery.
- 8 points that move you to the start of the tour for each of the rooms.