Activity 2.2
Activity 2.2 My timeline
Before the session: If you are working offline, gather what you may need for a creative session, such as paper, pens of different colours, templates, arts and crafts. If working online make sure there is access to a printer.
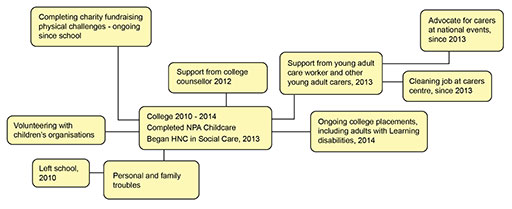
Having looked at the timeline examples in Session 2, learners can create their own timelines. What they decide to include in the timeframe is up to them – it can include their whole life since childhood, or focus on recent study or work experiences, or just their life as a carer. They should reflect on this before the group activity. They do not need to include anything that they want to keep private.
The timeline can be done in a number of ways. You can work as a group or allow learners to choose the method they prefer. Remember, not everyone will choose to be creative and there should be no expectations of what the timelines will look like. Here are just some ideas:
- Using a pen and paper, position positive experiences higher than negative ones to create a simple timeline (there is a template in the Reflection Log).
- On a computer, using Microsoft Word or a similar programme, the timeline can be represented as a diagram.
- Another option is to use bubbl.us [Tip: hold Ctrl and click a link to open it in a new tab. (Hide tip)] , which is free online software, to create images similar to the ones used in the course. Go to bubbl.us and click on Learn more – this will show you how to get started. This online tool can be used for free but requires you to sign up for a free account. (This is not an Open University website and the OU is not responsible for third party websites such as this or the information you choose to share with them.) If you prefer not to use bubbl.us, or any other online tools, don’t worry – pen and paper will do just as well!
- Encourage learners to think of creative ways to visualise the timelines, getting as artistic as they choose. Some learners have produced timelines using Celtic strapwork, with the low points going under the high points to create a pattern. Others, who are adept at crafts, have even created woven timelines.
- If learners prefer, they can just make a list of the high points and low points of the period of their life and reflect on these.
- Learners can also draw sketches or cartoons, with or without words.
Carers may have other ways of representing their timeline. What is important in this activity is their understanding from their experience. Try to put low points lower down the page and high points above them, just as Lesley and Scott have done, but some learners may have fewer ups and downs and can just list them side by side.
If learners are working online, remind them to save and/or print out their timelines, as they will be referring to them in Activities 2.4 and 2.5. These activities can be done as part of the same group session or learners can choose to take their timelines home and complete the activities individually.
Session 2