1 Getting to know your calculator
The first 11 sections describe how to use the calculator and how to perform different types of calculations. Section 12 contains a calculator reference guide that you can refer to as needed for some of the main key sequences.
This course is not an exhaustive list of all the calculator’s features. If you are using a different calculator, you should use the corresponding features of your own calculator to do the activities in this guide. You may need to refer to your calculator manual to do this.
You may be able to download the manual for your calculator from the manufacturer’s website.
The first step in using your calculator effectively is to make sure that you are familiar with the layout of the keys on the keypad, and that you can understand the information on the display.
Figure 1 shows the different parts of the Casio fx-83ES calculator.

If you are using a different model of calculator, make sure that you can identify similar functions on your model.
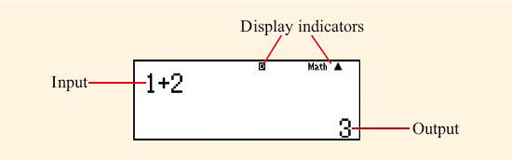
The calculator is switched on using the ![]() key at the top right-hand corner of the keypad. Figure 2 shows the different elements of this calculator’s display.
key at the top right-hand corner of the keypad. Figure 2 shows the different elements of this calculator’s display.
Throughout this section, calculator keys will be indicated using the symbol on the key enclosed in a box, for example ![]() .
.
The lower half of the keypad contains the number keys, keys for the basic operations of addition, subtraction, division and multiplication, and the ![]() key, which is pressed when you want the calculator to display the result of the calculation you have entered. The keys
key, which is pressed when you want the calculator to display the result of the calculation you have entered. The keys ![]()
![]() used to insert brackets into a calculation are in the centre of the row above the number keys.
used to insert brackets into a calculation are in the centre of the row above the number keys.
Many keys on the calculator have more than one use. The main function of a key is printed in white on the key itself. The second function of the key is printed in yellow above the key, and is accessed by pressing the ![]() button before pressing the key. When you press the
button before pressing the key. When you press the ![]() button, the symbol ‘
button, the symbol ‘![]() ’ appears at the top left-hand corner of the calculator display to remind you that the button has been pressed. It disappears when you press another key. Some keys also have a third function, printed above the key in red. These functions allow numerical values stored in the calculator memories to be used within calculations and are accessed by pressing the
’ appears at the top left-hand corner of the calculator display to remind you that the button has been pressed. It disappears when you press another key. Some keys also have a third function, printed above the key in red. These functions allow numerical values stored in the calculator memories to be used within calculations and are accessed by pressing the ![]() button before the appropriate key. When the
button before the appropriate key. When the ![]() button is pressed, the symbol ‘
button is pressed, the symbol ‘![]() ’ is shown at the top of the calculator display. You will learn how to use the calculator memories later in section 4.
’ is shown at the top of the calculator display. You will learn how to use the calculator memories later in section 4.
The calculator manual describes this second function as the ‘alternate’ function of the key.
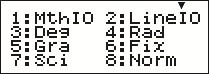
Some calculator operations are accessed through a system of menus that are displayed on the calculator screen, as shown in Figure 3. The required menu option is selected by pressing the number key associated with the option, as given on the calculator screen.
When describing how to use various calculator functions, this guide gives the exact keys that you need to press using the symbols shown on the keys. This is known as a ‘key sequence’. If the key sequence accesses the second function of a key, or a function from a menu, the name of this function will be given in brackets at the appropriate point in the key sequence. Names in brackets are thus not keys that you press but simply describe the function that is accessed using the previous key sequence. For example, to turn off the calculator, press ![]()
![]() (OFF). In this notation, (OFF) is not a key that you press, but is the name of the second function of the
(OFF). In this notation, (OFF) is not a key that you press, but is the name of the second function of the ![]() key, which is accessed with the
key, which is accessed with the ![]() key.
key.
The calculator has many modes of operation that affect how mathematics is entered and displayed. These will be described later in this guide, but before progressing any further you should reset your calculator to the default course settings.
Activity 1 Initialising your calculator
To initialise your calculator to the default course settings, turn it on and then enter the following two key sequences:
![]()
![]() (CLR)
(CLR) ![]() (Setup)
(Setup) ![]() (Yes)
(Yes) ![]()
![]()
![]() (SETUP)
(SETUP) ![]() (Norm)
(Norm) ![]()
Note that in the first key sequence, ‘CLR’ (which is short for ‘clear’) is the second function of the ![]() key, and ‘Setup’ is the name of the on-screen menu option corresponding to the
key, and ‘Setup’ is the name of the on-screen menu option corresponding to the ![]() key. ‘Yes’ is the name of the on-screen menu option corresponding to the
key. ‘Yes’ is the name of the on-screen menu option corresponding to the ![]() key. This key sequence clears all previous ‘setup’ settings on the calculator.
key. This key sequence clears all previous ‘setup’ settings on the calculator.
In the second key sequence, ‘SETUP’ is the name of the second function of the ![]() key, and ‘Norm’ (short for ‘normal’) is the on-screen menu option corresponding to the
key, and ‘Norm’ (short for ‘normal’) is the on-screen menu option corresponding to the ![]() key. Pressing the key
key. Pressing the key ![]() selects to use ‘Normal 2’ mode, which will be described in more detail in section 5.
selects to use ‘Normal 2’ mode, which will be described in more detail in section 5.
Note the difference between ‘SETUP’, the second function of the ![]() key, and the menu option ‘Setup’.
key, and the menu option ‘Setup’.
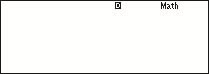
Your calculator will now be working in ‘Math’ mode, and the word Math will be shown near the right-hand side of the top of the calculator display, as shown in Figure 4 below. Math mode is the recommended way of using your calculator during this course as it allows mathematics to be entered and displayed in a similar way to how you would write it on paper.