24.6.3 Performing an HIV test using the Uni-gold rapid test kit
The procedure for this test is very similar to that used for the KHB and STAT-PAK tests. However, there are some differences. The procedure for the Uni-gold test is outlined below.
First, collect the test items and other necessary laboratory supplies. Remove the Uni-gold device from its packaging, and label it using a code number or a client identification number. The Uni-gold also has a sample port and an area where the control and test lines are read.
Unlike the other tests, blood is collected from the punctured finger using a pipette and then two drops of blood (60 µl) are placed into the sample port of the Uni-gold device (see Figure 24.9). Two drops of running buffer (60 µl) are then also added to the sample port.
µl means ‘microlitre’.

Now wait for ten minutes (and no longer than twenty minutes) for the test to develop. The control line will be the first to show, and this indicates that the test is working correctly and is valid.
Reading the result of a Uni-gold test
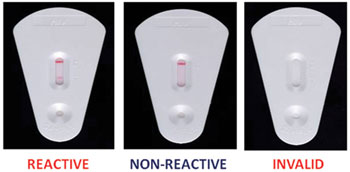
After ten minutes the test result is ready. Interpretation of the Uni-gold device is similar to the other devices, and this is shown in Figure 24.10. If the result is invalid, the procedure is repeated using a new Uni-gold device. The result must be recorded on a worksheet, together with any relevant information.

How would you interpret the result of a Uni-gold test?
A reactive result indicates that the person who supplied the blood is HIV-positive, whereas a non-reactive result indicates that they are HIV-negative.
24.6.2 Performing an HIV test using the STAT-PAK rapid test kit
