

5.1 Skill 4: The pattern maker
In this skill, you will make patterns by controlling how tiles are positioned next to each other and playing with Truchet tiles. To do that, we have provided you with a p5.js pattern-maker program that makes it easier to control the arrangement of four individual tiles to make a repeating pattern.
This will be the longest program you have seen so far, but don’t worry, you don’t have to understand every single line of code. The goal of the course is to teach you to play with code, not learn programming.
All the parts of the program that you have to tweak are marked with comments. Specifically, there are a number of variables at the top of the code that control how the program works, as well as four separate tile functions. You shouldn’t have to scroll much to find all the relevant bits. In each tile function, there are comments that show you where the code for the tile design starts and ends.
Near the bottom of the code is a comment:
//--- Don’t change code below here –--
Please heed this warning. The setup and draw functions and the coordinate definitions are all located below that comment. There is no need for you to look at this code, understand it, or make any changes.
Since the programs in these skills are quite long, you might prefer to work in the external p5.js editor [Tip: hold Ctrl and click a link to open it in a new tab. (Hide tip)] to be able see more of the code. To do that, copy and paste the example code there.
The pattern-maker program (Program 12) draws four tiles that we refer to as Tile1, Tile2, Tile3, and Tile4. These are the tiles I generated in Programs 8-11 (Skill 3: Design 4 tiles).
The tiles are arranged in a rosette shape, which is repeated in a sequence until the width and height of the canvas is covered.

The canvas is 300 pixels tall and wide, and each tile is 50 pixels square. So, the program keeps drawing these tile rosettes until it gets to the edge of the canvas and then starts again on the next line.
The result is that, with the default settings, the pattern maker will draw 3 × 3 rosettes on the screen to draw 36 individual tiles.
Try changing the value of the variable tileSize in Program 12 Pattern maker to see what happens.

The part of the code that controls the way the tiles are arranged is called an array, which is a special kind of variable that can hold multiple bits of data. It looks like this:
tileSequence = [1,2,3,4]
You can make your own creative pattern by changing the sequence of the tiles in this array. Video 7 explains how to do this.
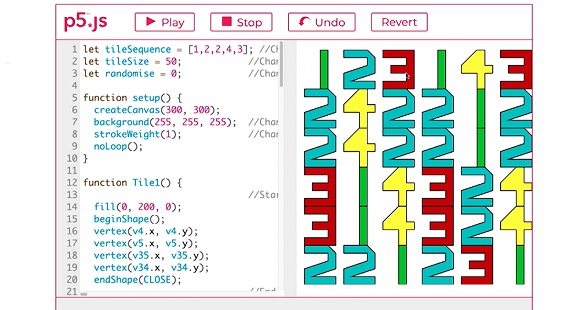
Transcript: Video 7 Changing the sequence of tiles
Activity 7 Change the tile sequence
Use Program 12 Pattern maker to change the sequence in which the tiles repeat themselves.
- Try changing the order of the tiles in the tileSequence array, for example 1,3,2,4.
- Try repeating some of the tiles in the sequence, for example 1,2,2,4.
- Try adding more than four tiles in to the sequence, for example 1,2,2,3,4.
Notice how the tiles sometimes shift and the overall pattern changes in surprising ways as the tiles create diagonal repetitions.
What is happening here? By increasing or decreasing the number of tiles in the sequence, you are shifting the sequence of the tiles to stretch across multiple rosettes. The effect is that not every rosette is the same anymore.
By adding or removing a single number in the tileSequence, you are creating an entirely different design and your own aesthetic judgement about these patterns becomes important.
If you add eight tiles into the tileSequence array, then you are defining two rosettes and will end up with something more controlled and regular. If you want to create something more unpredictable, then use more or fewer tiles to create shifting patterns that extend across multiple rosettes.
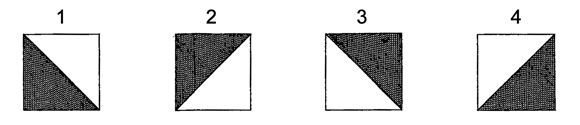
In the next activity, you will recreate the eighteenth-century tiles and patterns of Sebastien Truchet. The tiles are drawn using the dot-to-dot notation system, with three vertices to draw a series of black triangles. The four versions of the Truchet tile are numbered Tile1–Tile4 in Program 13.
Activity 8 Recreate the Truchet patterns
Here are the four rotations of the Truchet tiles, numbered 1–4.
Use Program 13 Truchet tiles to recreate the three Truchet patterns below by changing the numbers in the tileSequence array. Note, that the first pattern requires just a single tile. The second pattern requires four tiles. The third pattern requires eight tiles to make two rosettes.
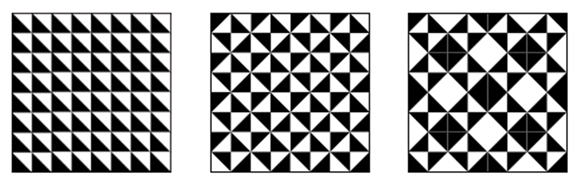
If you find this tricky, don’t worry! Take a look at the discussion below and see if the solutions help you to understand how the patterns are made.
If you find this easy, recreate some of the other Truchet patterns illustrated in the Introduction, or create your own by playing with the code.
Comment
Here are some solutions to recreate the Truchet tiles:
First pattern: tileSequence = [1]
Second pattern: tileSequence = [2,1,3,4]
Third pattern: tileSequence = [2,1,3,4,4,3,1,2]