

3 The black keys
As mentioned earlier, the white notes on keyboard instruments comprise a 7-note pitch system that is part of a larger 12-note one. You can reconfirm this by looking at Figure 6, which shows a single octave of a keyboard. The seven white keys (C, D, E, F, G, A and B) and five black keys together make a twelve-note collection. (Note the repetition of the C isn’t included in this count.)
Each of the black notes has two names: one ending in the word sharp and the other in the word flat. Black notes are sometimes named with reference to the white notes immediately below (to the left of) them. Following this logic, the black key with C immediately below it is C sharp (C♯), and the black key with D immediately below it is D sharp (D♯). These designations – including F sharp, G sharp and A sharp – constitute one of the sets of labels on the black keys in Figure 6.
One way to remember the meaning of the word ‘sharp’ is to think of C sharp as ‘higher’ or ‘brighter’ than C.
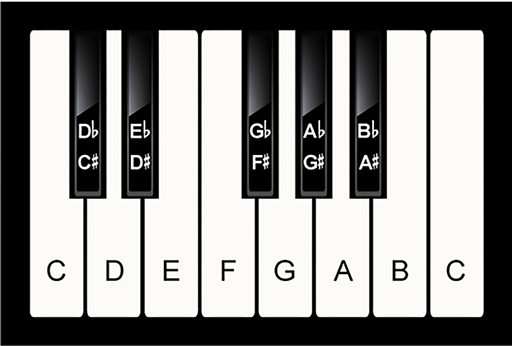
The black notes are also named with reference to the white keys immediately above (to the right of) them. Thus, the black key with D immediately above it is named D flat (D♭), the black key with E immediately above it is named E flat (E♭) and so on (G flat, A flat and B flat). These designations constitute the other set of labels on the black keys in Figure 6. Which designation gets used for a given note – F♯ or G♭, for instance – depends on the musical context.
One way to remember the meaning of the word ‘flat’ is to think of D flat as ‘lower’ or more ‘dispirited’ than D.
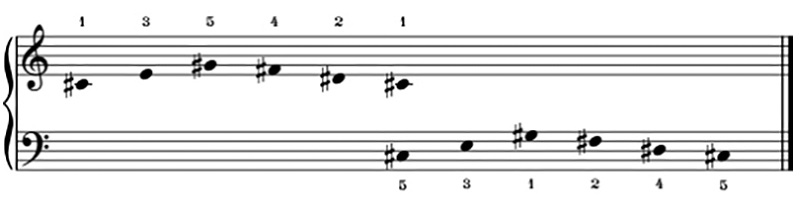
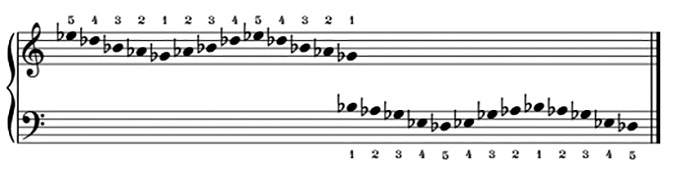
In staff notation, a sharp sign (♯) immediately to the left of a note indicates that the note should be raised: it turns C into C sharp, F into F sharp and so on. Similarly, a flat sign (♭) immediately to the left of a note indicates that the note should be lowered: it turns D into D flat, A into A flat and so on. The sharp and flat signs are called accidentals. The next activity connects these terms and symbols to sounds and the ability to make them.
Activity 5
Play the patterns outlined in Examples 3 and 4, using your right hand to play the notes in the treble clef and your left hand to play the ones in the bass clef. Then play each pattern while saying or singing the relevant note names out loud. Don’t forget to include the word ‘sharp’ or ‘flat’ where appropriate.
Work towards realising the exercises at a steady, even pace, but don’t worry if you don’t get to this point within the allotted time. As with other activities, it may be helpful to come back to this one more than once.
Comment
You should be able to determine the notes above with the help of the figures or mnemonics introduced earlier in the chapter. You may also want to check against the following lists. As you get better at reading staff notation, you will find it easier to read the notation than the lists of notes given below.
Example 3 RH: C♯, E, G♯, F♯, D♯, C♯; LH: C♯, E, G♯, F♯, D♯, C♯.
Example 4 RH: E♭, D♭, B♭, A♭, G♭, A♭, B♭, D♭, E♭, D♭, B♭, A♭, G♭ LH: B♭, A♭, G♭, E♭, D♭, E♭, G♭, A♭, B♭, A♭, G♭, E♭, D♭