

4 Intervals
Just as some keys are physically closer to or farther away from one another on the keyboard, so too are the notes those keys generate. The distance between any two notes, smaller or larger, is called an interval.
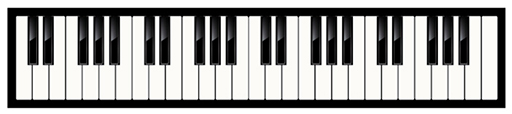
You have already seen how some white notes are closer to one another than others. C and D are separated by a black key, as are D and E, but B and C are right next to one another, as are E and F. You can confirm this with the help of Figure 8.
(The names of the notes are not written on the keyboard in Figure 8; this is to encourage you to memorise the pattern and names of the notes. You are welcome to open Figure 6 in a separate tab/window if you need a reminder.)
This section focuses on three intervals. The first is the octave, which arrives each time the cycle of twelve white and black notes repeats. For example, the F♯ above middle C is an octave away from the F♯ below middle C.
The second interval is called a half step or semitone and is found between any two notes that are directly adjacent (right beside one another). C and C♯ are a semitone apart, as are E♭ and E♮. E and F, and B and C, mentioned earlier, are also a semitone apart.
The third interval is twice as large as a semitone and is called a step or tone. This interval exists between any two notes, black or white, that are separated by one other note. Thus, C and D are a tone apart, as are A and B, G♭ and A♭, and E and F♯.
Activity 7
In this three-part activity, you will familiarise yourself with the sounds of the semitone, the tone, and the octave. You will also practise identifying and writing these intervals.
Part 1
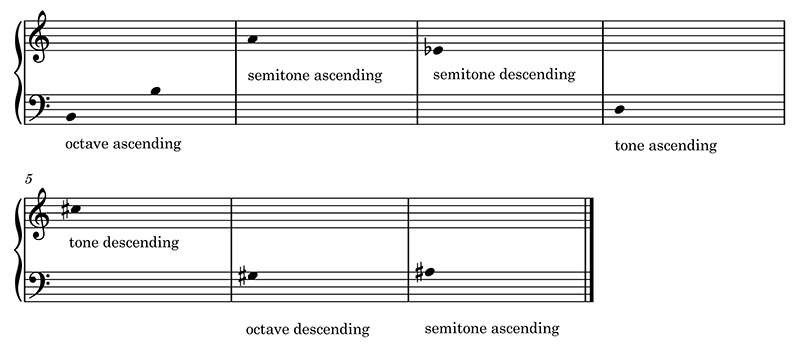
Each bar in Example 8 contains a pair of notes separated by an interval. Some of the intervals are semitones, some are tones, and some are octaves.
Start by getting familiar with the sounds of these intervals. Using your keyboard, play the first, then the second note in each pair so that you hear one going to the other. Then play each pair of notes simultaneously.

Next, using the text box below, provide the following information for each of the intervals in Example 8:
- the two note names
- the interval
- the direction of the interval (ascending or descending)
The first interval has been completed for you.
Discussion
Here are the answers:
- B to A: tone, descending
- G to G♯: semitone, ascending
- B♭ to C: tone, ascending
- E to E: octave, descending
- D♭ to C: semitone, descending
- A♭ to A♭: octave, ascending
- B to C♯: tone, ascending
Part 2
Now play the intervals in Example 8 again, this time singing the note names as you play. Sing in a range that is comfortable for you, and don’t forget to name the relevant accidentals.
Finally, try to realise the intervals yourself. Play and sing the first note in each interval, then try to sing the second note without playing it. Pay attention especially to the subtle difference between semitones and tones.
Part 3
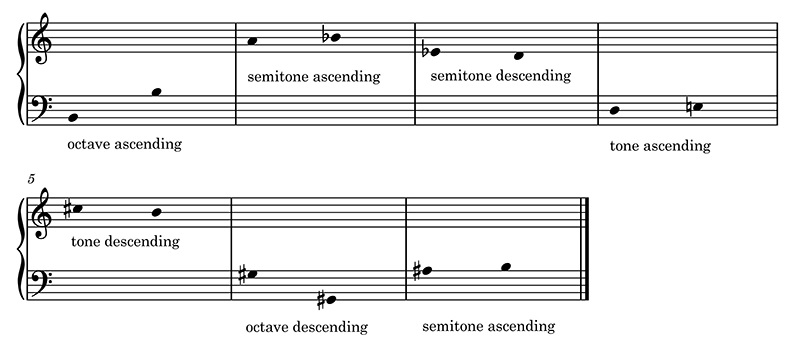
Print out Example 9 – downloadable here as a PDF [Tip: hold Ctrl and click a link to open it in a new tab. (Hide tip)] – and work through the exercises that follow. Example 9 is similar to Example 8, except that (aside from the first bar) only the first note in each interval is given.
- Use your keyboard (or keyboard app) to find and play the first note in each bar. Then use the information given about the interval to work out the note that should follow.
- Write each missing note onto the appropriate line or space on the paper. Be sure to include any necessary accidentals.
- Now play the completed intervals, singing the note names as you play. Sing in a range that is comfortable for you, and don’t forget to name the relevant accidentals.
- Next, try to realise the intervals yourself. Play and sing the first note in each interval, then try to sing the second note without playing it.
Comment
The answers are shown below in a completed version of Example 9. Keep in mind that there may be more than one correct answer in at least one case. For example, it would be fine to write A sharp rather than B flat in the second bar.
You may notice that there is a natural sign beside the E in bar 4. This is called a courtesy accidental, and it reminds a musician that the E flat in bar 3 no longer holds.
A fourth interval, mentioned a few times in the remainder of this course, is the unison. Musicians are in unison when they sing or play the same notes in the same octave and at the same time.