Preparation 3: Workshop set up
Background
You
need a good place to hold a workshop and it is very often the details
that make the difference between a good and bad workshop. So it’s
important to plan ahead to make sure your employer is ready (P1), your
workshop plan and activity resources are ready (P.2), and, of course,
that your venue and team is ready!
You need
People/participants:
- 1 representative of a local micro, small to medium company with a problem sheet.
- 15-30 undergraduate students (Y2-3) wither from one area or even better with mixed specialization divided in groups of min 3 to max 5
- 2-3 Workshop facilitators
- Optional: a teacher-facilitator per group
Equipment:
- 1 large room equipped with:
- Projector and laptop
- Whiteboard
- Tables and chairs for 4-6 students max
- 30 LEGO pieces (or similar building blocks) per participant
- 3 tubs of Playdough per table
- Large A2-A1 pieces of paper
- Colour pens, pencils, thick felt tip marker
- Workshop presentation slide deck with activity instructions
- Break refreshments
Time: 2-4 days
Method
- Invite all participants to a 4-hour workshop. Make your invitation engaging and interesting - you are setting up the attitude you want in the workshop.
- Set up a large room with tables around which you place 5 chairs, ideally with natural light and good ventilation (including heating/cooling).
- Allow for space for each table to hang work on the walls or other available surfaces.
- Distribute equipment to each table before participants arrive.
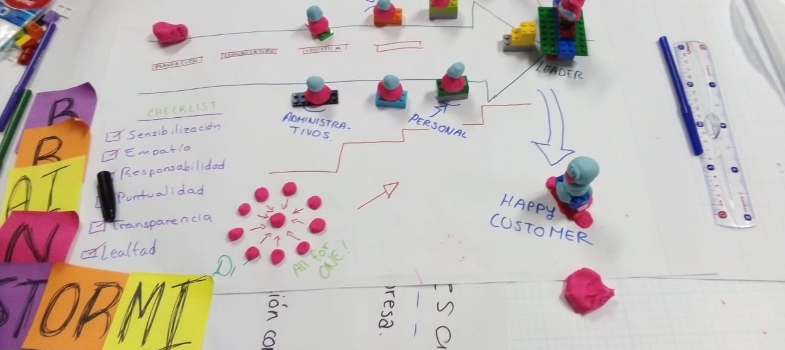
Example
Picture of room set up
Potential limitations or challenges
If the workshop venue is in your institution, students might not be able to imagine that they are in a real-world context. So, ideally seek a Worksop venue outside of your educational institution. This adds importance to the event.
If it is a big group, the workshop facilitators might not be able to manage to get around the room to clarify the tasks. A teacher-facilitator could be placed at each team table to help the workshop facilitators. The teacher-facilitator’s role is challenging. While the teacher should not lead the team, they should be able to guide them whenever the team doesn’t know where to start, doesn’t understand the instructions, or when they are stuck.
Associated training activity
Once you have completed reading all the recipes (and activities) and your Workshop Plan from P2. Preparation 2, prepare a workshop presentation slide deck (in medium of your choice, such as ppt)
Include alternative activities slides as backup to allow you to change activities if the workshop needs it. Think about what could go wrong and how alternative activities might help.
Send the deck around to your peer group and trainers for comments. You will be able to refine this slide deck throughout the training.
Advanced training
Keep a record of each presentation you use and what activities you ran in each session.
As you reflect and iterate your workshop(s), keep a log of what you changed and whether it had the effect you intended.
Over time, let this build into a practitioner’s diary shared with your teaching team. As it does, think about any larger patterns that may emerge (e.g. things that never work; things that always work; things you wish you could change; etc.).
Use this diary to demonstrate your professional development and competency, possibly even to support professional membership or institutional advancement (!!). Think also of sharing your practice with other teachers and even publishing your work as scholarship.