
4.3 Photographs showing the detail: collapsed piers
Figures 23 and 24 present the east- and west-facing views of a collapsed pier, pier 5, which lay just ahead of the train before it was lost in the disaster. Figure 23 shows parts of two tiers of what was presumably the lowest part of the cast-iron pier on this platform. The columns point towards the east, indicating the lowest tiers fell in this direction during the collapse.
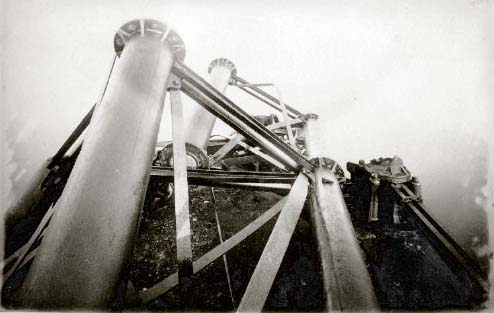
The reverse angle picture, the view looking west (Figure 24), shows the lower columns of this set of tiers, which at the right have broken at a flange. The parts are above one another in the picture. The columns are still held together, however, by their wrought iron struts – the double members that were horizontal in the original upstanding pier. On the other hand, many of the original diagonal single tie bars have broken away, and in some cases, become grossly deformed during the collapse. For example, there is just such a tie bar in the centre of Figure 24, which has been bent double. It indicates the material behaved in a ductile and tough manner during the collapse.
More bent tie bars can just be seen in the centre of Figure 23, hidden behind and between the columns. Other tie bars seen in Figure 23 appear partly intact and straight, and are still attached at their upper points.
The horizontal struts at the base of the pier are still intact, four being visible in Figure 24, running between the large flange castings bolted into the masonry platform. A similar broken base casting is visible at the right-hand side of Figure 23. There are jagged pieces of cast-iron pointing up from these massive base flanges, which from their sharp edges, must represent the edges of fractures in the lowest parts of the cast-iron columns. A bolt can be seen lying on the top of a column in both pictures: was it placed there by the photographer to act as a scale for the pictures?
There is a prominent round tie rod on the platform itself, one of which has an end connection (lower part in the centre of Figure 24) still attached. The component was one of the horizontal reinforcing rods, which crossed – either south-west to north-east, or south-east to north-west – from opposite columns in the original pier (see plan view in Figure 15). The end connection was made from grey cast-iron, and fitted at the column heads, between the lugs for the tie bars and struts (Figure 16). Figures 25 and 26 show similar views of the platform of pier 4 – south of pier 5 – which was the pier over which the train had just passed when the disaster happened.
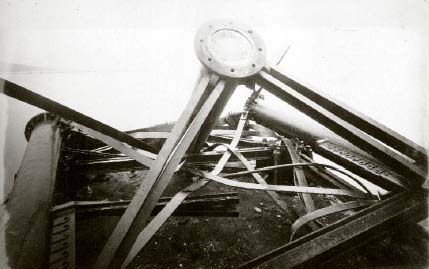
Question 4
Describe the damage to pier 4, relating it in a systematic way to the component parts of the structure. Use the design drawings of the components in Section 3.3 to discuss your findings. Compare the overall appearance with the damage visible on pier 5, and compare the damage of specific components one with another.
Answer
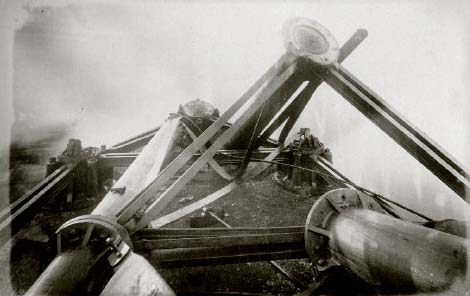
Starting first with the east-facing view (Figure 25), there are three fallen columns that dominate the scene. They appear to have collapsed to the east, just like those on pier 5, and there is more evidence of the ductile nature of the tie bars.
There are at least six bent and distorted tie bars visible in the picture, the distortion varying substantially. The slightly distorted bar at extreme right shows an intact bolt hole, which must have connected the tie bar to an upper lug, because the gib and cottered joints lay at the lower end of all the tie bars (Figure 16). Most of the double struts appear intact and in place, although there are several that appear out of position, and could have failed.
The columns at right and left have an unusual structure at their upper ends, with a cast-in flange with numerous bolt holes. This feature is not seen in the specification drawings (Figure 16). The holes presumably gave variable positions for attaching the horizontal struts, although in both cases, only the top hole was used. The adjacent lugs have fractured cleanly across the section of the cast-iron lugs in both columns. The left-hand broken lug is just below the end of the ladder top seen at right in the picture. The large base castings appear bereft of upstanding features.
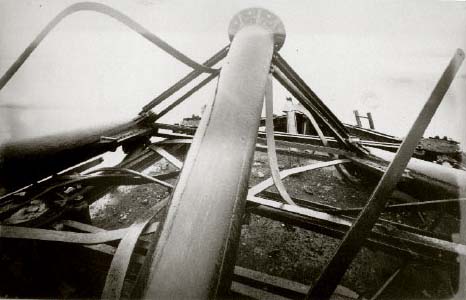
The view looking west (Figure 26) shows the bases of the columns from the previous plate, and the upper parts (lower in the picture) show the curious features (with what look like piano keys) seen in the previous picture, but now in greater detail. The overall appearance is of greater complexity, especially in the way the tie bars appear to be woven inside one another. Most are very distorted. The centre column shows a bare flange from the top of a column, with no brittle fractures evident.
A gib and cottered joint (see also Figure 18) can be seen (right-of-centre), just below the intact flange. It is a lower junction, because the joint is close to the base of the column (see also Figure 16).
One of the struts visible shows some slight distortion, but is otherwise intact. It shows an intact and crisp end (centre), suggesting that either the bolts or the lug failed. Although the platform visible in both plates appears rather bare, there do appear to be traces of small debris.
Overall, the nature of the damage to both piers 4 and 5 is similar, showing collapse of the lowest tier towards the east, as one would expect from the final resting place of the high girders (see also Figure 22). It is interesting to observe that the collapsed tiers shown in Figures 25 and 26 represent the lower parts of only one set of three columns from the original pier (see also Figure 16). The east-most set is presumably in the water to the east, near to the girders.