
2 Issues with learning about operations on fractions
Research suggests that one of the main hindrances for students when learning to understand operations on fractions is that they are often taught procedures and rules without building on the conceptual understanding behind why these rules and procedures work (Fazio and Siegler, 2011). It is suggested that ‘one way to improve students’ conceptual understanding is to use manipulatives and visual representations of fractions. Studies that have taught fraction arithmetic using visual representations of fractions have shown positive effects on students’ computational skills’ (Fazio and Siegler, 2011, p. 12). In this unit you explore using visual representation as part of your teaching the topic of operating on fractions.
The next activity aims to address the issue of visualisation when adding and subtracting fractions, and finding out why a common denominator is needed for these operations. In order to develop the students’ visualisation skills, it will be important to give students sufficient time and opportunity to come up with their own methods and approaches. If they are not completely correct, any misconceptions revealed can then be addressed in whole-class discussions.
Before attempting to use the activities in this unit with your students, it would be a good idea to complete all, or at least part, of the activities yourself. It would be even better if you could try them out with a colleague as that will help you when you reflect on the experience. Trying for yourself will mean you get insights into learners’ experiences that can, in turn, influence your own teaching and experiences as a teacher.
When you are ready, use the activities with your students and reflect again on the way the activity went and the learning that happened. This will help you to develop a more student-focused teaching environment.
Activity 1: Visualising adding and subtracting fractions
Part 1: Adding fractions
Square paper will help the students to do this activity faster and with more precision. This activity works well in pairs or small groups so that students can generate more ideas between themselves. Make sure the groups are small enough and the drawings big enough so all students in the group can see and participate. Coloured pencils and scissors are useful but not essential. An important aspect of this activity is to allow plenty of time for the students to work on each part, so that they have a good understanding of what they need to do and enough time to think about, visualise and discuss the operations on fractions. This may mean giving the students at least two lessons to carry out all of the tasks in this activity.
(same denominator)
Ask your students to:
- draw three rectangles with a length of 6 cm and a height of 2 cm
- colour in or shade of the first rectangle
- colour in or shade of the second rectangle
- cut out both the coloured or shaded s and place them together in the third rectangle so that it shows.
How will they work out the answer to by using these rectangles? Give them three minutes or so to think of a way.
Discuss with the class how it could be done. Ask some students to come and draw their suggestions on the blackboard. A solution could look like Figure 1:
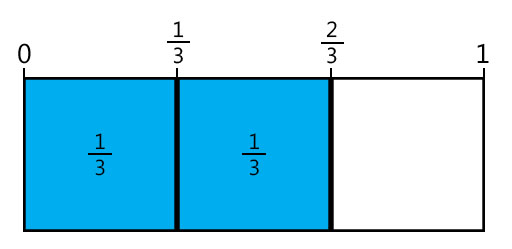
(Note to teacher: if there are no scissors or coloured pencils available, students can draw both fractions in one rectangle and use shading to indicate the two fractions.)
(same denominator)
- Ask the students to do the same as they did with , but now for fractions . Make sure they use the same size rectangles because they will re-use these in the next question (different denominator)
- Tell the students to place together their cut out and shaded and in the third rectangle so that it shows .
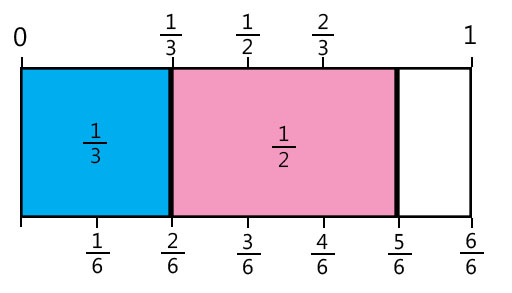
- Ask the students how they will work out the answer to by using these rectangles. Give them five minutes or so to think of a way.
- Discuss with the whole class how it could be done. Ask some students to come and draw their suggestions on the blackboard. If needed give a hint that using a common denominator (how many equal parts the whole is divided into) might help.
A solution could look like Figure 2:
Other fraction sums
The same approach can be used for other fraction sums. It helps students to use rectangles with a lengths that are a common multiple of the two denominators. For example, for working out , use a rectangle of length 8; for working out , use a rectangle of length 14. Asking students to suggest the size of rectangle is an important step in understanding adding fractions.
Part 2: Subtracting fractions
Your students should know that subtraction is the same as ‘taking away’, and that ‘taking away’ can be done physically. For example, 8 – 3 is the same as having eight objects and then taking away three. Using the same approach as in Part 1, can be shown by drawing and then erasing of this. If the fractions and are cut out, the fraction piece of can be covered by the fraction piece of and the students then work out what is left uncovered. Or a part of the fraction piece can be cut off of the same measurement as the fraction piece .
(same denominator)
Ask your students to:
- draw three rectangles with a length of 6 cm and a height of 2 cm
- colour in or shade of the first rectangle
- colour in or shade of the second rectangle
- cut out both coloured or shaded fraction pieces and place them together in the third rectangle so that it shows
How will they work out the answer to by using these rectangles? Give them three minutes or so to think of a way.
Discuss with the whole class how it could be done. Ask some students to come and draw their suggestions on the blackboard.
(same denominator)
- Ask the students to do the same as they did with , but now for fractions . Make sure they use the same size rectangles, because they will re-use them in the next question.
- Discuss with the students why is the same as one whole.
(different denominator)
Ask your students to place together their cut-out and shaded and in the third rectangle so that it shows .
How will they work out the answer to using these rectangles? Give them five minutes or so to think of a way.
Discuss with the class how it could be done. Ask some students to come and draw their suggestions on the blackboard. If required, give a hint that using a common denominator (how many equal parts the whole is divided into) might help.
Other fraction differences
The same approach can be used for other fraction sums. As before, it will help students to build their understanding if they use rectangles that have a length that is a common multiple of the two denominators and that their attention is drawn to this. For example, for working out , use a rectangle of length 8; for working out , use a rectangle of length 21.
Video: Planning lessons |
Case Study 1: Mrs Mehta reflects on using Activity 1
This is the account of a teacher who tried Activity 1 with her elementary students.
I was rather shaken by reading about mathematical trauma – I could immediately think of several students who might be experiencing this. I also have to admit that up to now, I have taken the stance that some students ‘get it’ and others do not. Perhaps this is because I myself never struggled with mathematics that much, and have never thought about mathematics in a really negative way – just that it can be difficult sometimes.
So before starting on this activity I made myself promise I would really really try to support students by giving them enough time and opportunity to come up with their own methods and approaches, even if not completely correct – and not interfere or just tell them how to do it.
I had expected this activity to require quite a bit of prompting and supporting to get them to engage, but they all got busy straight away. The students worked in groups of four or five. There were not enough scissors for each group, but the students were happy with passing the few scissors that there were, from group to group. I noticed that they actually also used the opportunity of having a quick look at each other’s work – and picked up ideas from each other that way as well.
They worked out the rule for adding fractions with a common denominator pretty easily. Finding the method for adding fractions with a different denominator was harder, and we actually had two whole-class discussions. In the first one, after some five minutes, I ended up talking about equivalent fractions and that 3/6 is the same as ½, and so on. On reflection I was not that happy that I just told them about that – but I thought they had understood that concept from previous lessons on equivalent fractions. Somehow they had not internalised that learning. After I reminded them, I gave them another ten minutes to work out the answers, but I added that I wanted more than one answer. During the second whole-class discussion, we shared that , and I think the students learned much more about equivalent fractions.
Perhaps as a result of those deep discussions when adding fractions, they worked out the rules for subtracting fractions really quickly, and they could argue well about why they needed a common denominator. We even started discussing why you could end up with a negative fraction.
Pause for thought Mrs Mehta’s lesson used visualisation effectively to support students’ understanding of operations on fractions. However, even when a lesson goes well, there may be some students who still do not fully understand what the mathematical ideas being taught. Thinking about Mrs Mehta’s lesson, what opportunities did the lesson present for monitoring and giving feedback to students on their learning? You may want to have a look at the Resource 2, ‘Monitoring and giving feedback’, to help you think about this. |
Reflecting on your teaching practice
When you do such an exercise with your class, reflect afterwards on what went well and what went less well. Consider the questions that led to the students being interested and being able to progress, and those you needed to clarify. Such reflection always helps with finding a ‘script’ that helps you engage the students to find mathematics interesting and enjoyable. If they do not understand and cannot do something, they are less likely to become involved. Use this reflective exercise every time you undertake the activities, noting, as Mrs Mehta did some quite small things that made a difference.
Pause for thought Good questions to trigger such reflection are:
|
1 Some issues with learning mathematics – ‘mathematical trauma’