
3 Ways to demonstrate grouping and decomposition
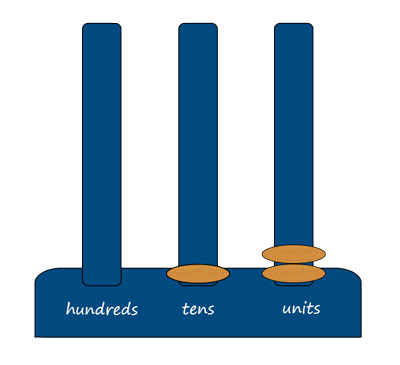
Abacuses can be used to give a concrete representation of how the number system works when adding or subtracting numbers. On a basic spike abacus only nine beads or rings will fit onto each spike, so that can lead to a natural discussion of what needs to be done when the number you are adding on reaches ten.
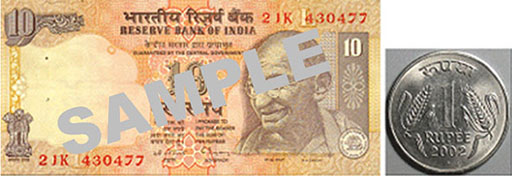
Money can also represent ideas of composition and decomposition. Many students will have begun to understand that ten single rupee coins will buy the same as one Rs. 10 note. Show the class some Rs. 1 coins and Rs. 10 and Rs. 100 notes – this will help bring the real world into the classroom.
You can show them that composition and decomposition does really happen. You could use stones to represent single rupees and pieces of paper with Rs. 10 and Rs. 100 written on them so that the students can actually work using their own ‘money’. Perhaps you could bring in some small items that the students can pretend to buy using their pretend money. Working out change is another way to model decomposition.
Two of the activities in this unit use strips of paper with 10 dots on them to represent tens. These can be easily ripped into singles in order to show decomposition. Make sure that your students understand the ‘count all together’ method of counting before doing the next activity, which is designed to help them understand that if the units ‘make a ten’ then you add that ten onto the other tens.
Before attempting to use the activities in this unit with your students, it would be a good idea to complete all, or at least part, of the activities yourself. It would be even better if you could try them out with a colleague as that will help you when you reflect on the experience. Trying for yourself will mean you get insights into a learner’s experiences that can in turn influence your teaching and your experiences as a teacher. When you are ready, use the activities with your students and reflect again on the way the activity went and the learning that happened. This will help you to develop a more learner-focused teaching environment.
Activity 1: ‘Make a ten’ – learning the written addition algorithm
Preparation
Make many strips of paper of the same length and then draw ten equally spaced dots on each of these strips as shown in Figure 7. Rip several of these strips into ten single dots. If you have access to a computer with a printer you may be able to save some time by creating and printing out strips.
The activity
Part 1

- Ask the students to show you 24 using the strips and then to show you 36 and several other numbers.
- Make sure that they notice that the left-hand digit indicates how many strips of 10 are needed and the right-hand digit indicates how many separate ones (or units) there are.
- Ask the students how many ones (units) are needed to make one strip
Part 2
Now lead the students through addition.
- Add 24 and 12:
- Show 24 in strips.
- Now put 12 in strips next to it.
- Now put them together. How many have you got? (You have 3 ten strips and 6 ones, so 24 + 12 = 36.)
- Add a few more numbers together like this, but make sure there is no ‘carry’ – that is, the ones digits do not add to 10 or more.
- Add 24 and 38:
- Show 24 in strips.
- Put 38 in strips next to it.
- Put them together. How many do you have? (You have 5 tens strips and 12 ones.)
- Is there a problem with this? Hopefully someone will say that if you put 10 dots together, you could make a ten strip so you have 6 tens strips. If not, show them that when they can ‘make a ten’ they have to add it to the tens column in the decimal system.
- Ask the students to do several more similar sums using their strips.
Have a few sheets with 100 dots on them to represent the 100 column so that students who grasp the ideas quickly can move on to adding numbers where the tens digits add to more than 10.
Video: Using local resources |
Case Study 1: Mrs Kapur reflects on using Activity 1
This is the account of a teacher who tried Activity 1 with her elementary students.
I wanted to teach my students the written addition algorithm and I knew from previous years that many of them would just add the columns separately as Satish had done in the ‘Pause for thought’. I liked the simplicity of the idea of strips of 10 dots on spare paper that could be ripped into singles.
I knew it would take a long time to prepare, so I set up two helpful students to do it in the lunch break. Yogesh and Rani took far more care over spacing the dots than I would have done, and they made the dots bold and black which was great.
I asked the students to work in groups of four so that I had enough strips for each group and showed the class how to use the strips to represent numbers. I stressed that numbers had developed this way because we have ten fingers and that the strips showed handfuls. The class had seen two-digit numbers before so they knew that this was the way that numbers were written. I made sure that they knew we were doing this to help them understand the arithmetic better.
Each group laid out their strips as instructed and then pushed them altogether and counted what they had. They enjoyed doing this, laughing about pushing the carefully laid-out strips and singles together and then sorting out what they had, before copying down the sum that their strips represented that I wrote on the board.
Then we moved on to the sums where the ones digit added to ten or more. I was worried that they would not notice that ten ones make a ten. However, as I moved around the class I overheard several of them talking and realised that they had already noticed that the singles were just a ten strip ripped up.
So this time when I asked them to put all their strips together a few hands shot up to ask if they could change ten of their bits of paper for a single strip. I asked them why they would want to do that, and they said because the ones bits of paper are messy and it’s easier to use the ten strips. I was so happy at this explanation of why when you can ‘make a ten’ you can get rid of ten of those troublesome bits of paper and just add up the tens strips.
I asked them to use the strips to do several more sums before I showed them how to do this type of addition using the formal written algorithm. I wanted them to play a little with this idea so that they really knew what was happening when you ‘carry’ one into the tens column. I observed what was happening, and most groups laid out their strips for the two numbers and then immediately counted out ten singles and exchanged them for a ten strip. I thought they were ready for the formal algorithm so I showed them ‘how people write this down in their books’.
In the next lesson we carried on using the strips and I saw that several of them had made their own at home, which was great as that saved me a job, and they obviously thought that this would help them. I wrote the sums on the board. They used the strips to show what was happening and then wrote it out with the ‘carry’ in the right place. I saw that several of the students were saying, OK, well those singles will ‘make a ten’ with this many left over, so the strips had helped them to say what they were doing. Two or three groups had stopped using the strips altogether by the end of the lesson but they still talked about ‘making a ten strip’.
I was really pleased with how this representation helped them with the idea of carrying a ten into the next column. I made sure that I asked a student to collect up all the strips and singles carefully after each lesson as I could see we would use them for lots more lessons in the future.
Reflecting on your teaching practice
When you do such an exercise with your class, reflect afterwards on what went well and what went less well. Consider the questions that led to the students being interested and being able to progress, and those you needed to clarify. Such reflection always helps with finding a ‘script’ that helps you engage the students to find mathematics interesting and enjoyable. If students do not understand and cannot do something, they are less likely to become involved. Use this reflective exercise every time you undertake the activities, noting as Mrs Kapur did some quite small things that made a difference.
Pause for thought Good questions to trigger such reflection are:
|
Using a number line for subtraction