
3 Developing time-effective formulae for perimeter
Learning formulae often relies on memorisation, or learning ‘by rote’. Some students become very good at this method of learning, whilst others struggle. However, for all students the key question is, what kind of learning does memorisation afford?
Memorisation does not focus on comprehension, nor on building understanding, nor does it support an exploration of what concepts could mean, or how they are connected to other areas of mathematics. This method focuses on accurate reproduction of remembered routines. It can therefore become problematic when studying more complex aspects of a subject or learning formulae and algorithms that entail complex steps. Because there is little or no understanding of the underlying meaning, elements get missed out, details muddled up, stress increases and exams can be failed.
These barriers to learning about formulae can be overcome if the students are given the opportunity to deduce the formulae themselves and give meaning to the formulae, even from a young age.
In the next activity the aim is to give your students the opportunity to deduce formulae themselves by building on the understanding they developed in Activity 1. This entails using their examples and asking them to construct different ways to express formulae for calculating the perimeter of rectangles. You will also ask them to think about why these different expressions are equivalent, and tell them the purpose for developing formulae, which is to become more efficient and save time.
Activity 2: Formulae and time-efficiency
For this task, use the feedback of Part 2 of Activity 1 that you wrote down on the blackboard.
- Ask the students, in pairs, to discuss for three minutes how they could come up with a way to calculate perimeter of a rectangle that would take less time (there might already be some examples on the blackboard).
- Take their feedback and discuss it with the class. Make sure the students end up with the different forms for calculation of perimeter (otherwise ask the students whether they know of any others), for example: length + width + length + width and 2(l + w) and 2l + 2w.
- Let the students discuss why these different formulae will give the same results.
Video: Using pair work |
Case Study 2 : Mrs Aparajeeta reflects on using Activity 2
I liked doing this activity. It was very fast paced. There were quite a few examples on the blackboard from Activity 1, but I still asked quickly for some more examples. I did this because I wanted to make the link clear with Activity 1, give the students even more ownership of the mathematics they were doing, and also because I thought it might give students a better opportunity to experience generalising from many examples.
Asking the students to first discuss with a partner also worked well. It gave them the opportunity to phrase their thinking, to sort out any questions they had between themselves and not be exposed to comments from the whole class. This also worked for me, as the teacher, because they had practised what they would be saying and so we got really nice and comprehensible arguments in the class discussion!
Pause for thought
|
Activity 3: Working out the area of shapes using the counting squares method
To prepare for this task ask your students to point to the areas of several objects they can see in the classroom.
Part 1: Whole-class discussion on the method of counting squares to calculate area
Show students a combined shape, drawn on squared paper without measurements, for which it would be difficult to calculate the area using formulae. The idea is that the students have to think of another approach to working out the area instead of using formulae. An example is the shape in Figure 1.
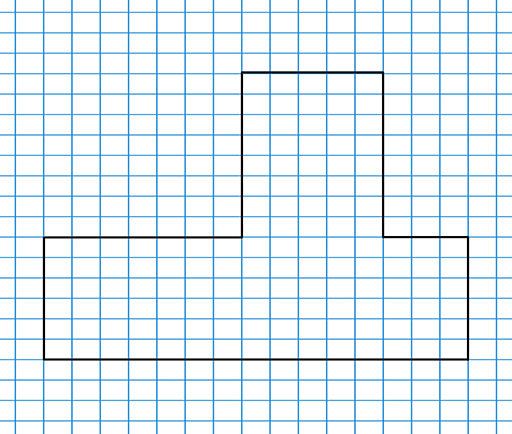
- Ask the students to point out what the perimeter of this shape would be. Then ask them to point out what the area of this shape would be.
- Ask the students for suggestions on how they could find the area of this shape. If students do not come up with the option of counting squares, suggest this as a simple and effective way when working with squared paper.
Part 2: Constructing shapes with the same area
- On squared paper (1 cm2 squared paper works well here) ask students, working in pairs, to construct at least three shapes with an area of 12. You may wish to specify that the length of each
side must be in whole units. However, if you choose not to set this condition, you may find that some of your more enterprising students experiment with fractions of units to create additional shapes. This will help them to extend their thinking further.
Ask students to share their work with others sitting near to them, and then to report back on how they constructed their favourite example.
Video: Planning lessons |
Case Study 3: Mrs Aparajeeta reflects on using Activity 3
As with the first part of Activity 1, the students actually found it hard to point out what the area and perimeter were for the shape. They wanted to calculate it using formulae. But I insisted, and asked students to come to the blackboard to show with their hands and fingers the area and perimeter.
One of the misconceptions that surprised me was when a student pointed to the longest length and the longest height and said that was the area, suggesting that they actually did not know what area is. So I am really pleased I persevered and did not just tell them, or point out what the area and perimeter were.
When I asked the students to find the area of the combined shape, at first some of the students were puzzled. Some of the students even partitioned the shape into rectangles and squares and calculated the area of these using the formula that they remembered. So I prompted them to think of another method that would work.
Student Sarika and her group then suggested counting the squares. Once that idea had been explored and demonstrated with the whole class I asked the students to make at least three shapes with an area of 12 cm2. I was amazed at the number of examples the students came up with, and their complexity.
The activity also made me think about tweaking tasks that I know are good and rich to turn them into other rich tasks. In the coming weeks I will put aside the tasks I use that I think are rich, and think about how I could tweak them so I can also use them as rich tasks for teaching other mathematical concepts.
Pause for thought
|
2 Developing an understanding of perimeter