
1 Using embodiment of angles to make learning about angles more meaningful
Pause for thought Whenever you look around, there are angles everywhere. Look around you now and make a list of ten angles that you can see. Do you notice any mathematical relationships between them? |
Mathematics is often perceived as something you do in the mathematics classroom, perhaps with some applications to real life in manufacturing and architecture. But much more excitingly, mathematics also relates to us as humans and to our lives – and the angles in our bodies are a beautiful example of this. We bend our arms and legs at an angle, we turn our heads at an angle, we move our fingers at different angles. Doing activities like these with students requires them to ‘be’ or ‘do’ the mathematics – to represent maths in a bodily form.
According to research (Dreyfus, 1996; Gibbs, 2006), the ideas behind ‘body mathematics’ are:
- embodiment – giving concrete form to an abstract concept
- embodied cognition – using the body to shape the thinking of the mind.
As such, the aims of ‘body mathematics’ are to:
- overcome the barrier of seeing maths as a theoretical subject, far removed from the students’ life experiences
- build imagery for mathematical concepts
- make an emotional and playful link with mathematical properties.
Your body is full of angles, and angles are an important part of you! So in the first activity you will ask your students to find examples of angles using parts of their body.
Before attempting to use the activities in this unit with your students, it would be a good idea to complete all, or at least part, of the activities yourself. It would be even better if you could try them out with a colleague as that will help you when you reflect on the experience. Trying them for yourself will mean you get insights into a learner’s experiences which can, in turn, influence your teaching and your experiences as a teacher.
Before starting a series of lessons on a mathematical topic such as angles, it is important to find out what the students already know and can do prior to instruction, and to share with the students what you expect them to learn from the series of lessons. You can use Resource 2 to help you plan how you will assess your students’ progress and performance during the activities in this unit.
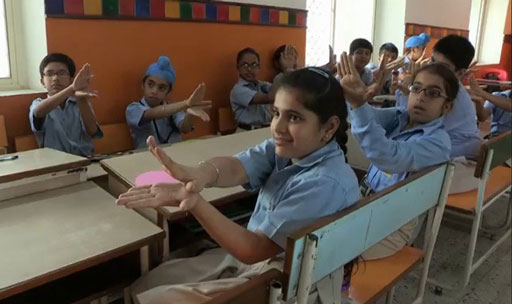
Activity 1: Embodying angles
Part 1: Using hands
Ask your students to show the following angles using their two hands joined at the wrist:
- an angle of 90 degrees
- an angle of 0 degrees
- an angle of 180 degrees
- an angle of 45 degrees
- an angle of 135 degrees
- a straight angle
- an obtuse angle
- a right angle
- an acute angle.
Different examples are possible for the obtuse and acute angle. Discussing the validity of these different examples offers a good opportunity to talk about definitions and possible variations within these definitions.
It is also an appropriate time to introduce (or reinforce) the shorthand notation of the degree symbol – for example, 90° for a right angle.
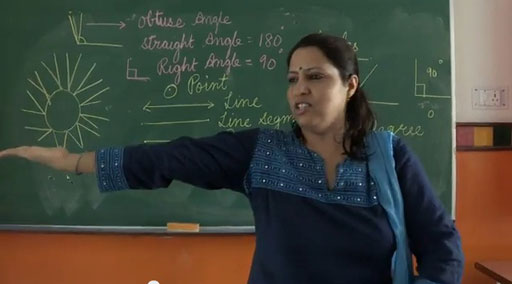
Part 2: Using one arm
- Repeat the questions from Part 1, now asking the students to use one arm, with their armpit acting as the centre of rotation of the angle. To depict the angle of 0°, the arm would hang down, and be held against the side of the body.
- Point out that an angle is not a static position, but that the word ‘angle’ describes the amount of a turn – that is, an angle is a measurement of a turn or rotation.
Part 3: Using other parts of the body to depict angles
- Arrange the students into groups of four or five. Ask them to come up with other ways to depict angles using other parts of their body and to prepare to show the same angles as in Parts 1 and 2. Give them a few minutes to prepare for this.
- Ask the students, in their groups, to demonstrate to the whole class what they came up with.
- Discuss with the class whether these examples are valid mathematically, or show them what is lacking.
Case Study 1: Mrs Nagaraju reflects on using Activity 1
This is the account of a teacher who tried Activity 1 with her elementary students.
I have used hands in the past to show angles when I introduced the concept of angle. However, I seldom asked students to do it themselves – I just demonstrated it to them. On reading this activity I thought it would not be much different, but anyway, I would give it a go. I saw it as building on something I already did, and that it did not involve much change to my teaching, to be honest.
Well, it was very different. The students were so involved, so interested, I have never seen them so engaged with making angles! When I asked them to depict an obtuse angle, many different examples were shown. So I asked the students to keep their hands as they were and to look around them at what other students had come up with.
We then had a lovely mathematical discussion about what an obtuse angle was, what it limits are, what the possible variations are. We automatically then had a similar discussion about an acute angle, a right angle and also talked about a reflex angle.
The students loved the third part and came up with many ideas such as using both arms held up in front of them, rolling eyes, bending fingers, turning heads and problems that gives when trying to show a reflex angle, and so on.
In the feedback part of the activity the students surprised me by being critical of themselves and of others but in a supportive way – saying things like ‘if you made your back a bit straighter it would make a better right angle, because the lines that make an angle should be straight’ or as one of my students phrased it ‘to be critical in a good way’. As a teacher I learned so much more about my students’ thinking and learning.
Reflecting on your teaching practice
When you do such an exercise with your class, reflect afterwards on what went well and what went less well. Consider the questions that led to the students being interested and being able to progress, and those you needed to clarify. Such reflection always helps with finding a ‘script’ that helps you engage the students to find mathematics interesting and enjoyable. If they do not understand and cannot do something, they are less likely to become involved. Use this reflective exercise every time you undertake the activities, noting as Mrs Nagaraju did some quite small things that made a difference.
Pause for thought Good questions to trigger such reflection are:
|
What you can learn in this unit