
2 Methods and benefits of using groupwork
Groupwork can be used in so many ways to help students and other learners, including adults, to explore and share ideas in an atmosphere that is supportive but challenging. Groups give individuals confidence to take risks and try out new or strange ideas in a community that is supportive and will not ridicule them. Many ideas can be disposed of because they do not hold up on investigation, but no one has lost status.
Another important aspect of using groups is that by being able to talk, the brain is stimulated to think more deeply. Students can therefore achieve more because they are challenged and supported, and thinking is extended. It takes time to be confident in using groupwork and exploring the ways to set up groups, but once established, appropriate use of groups will help many more of your students make better progress.
There are several ways to organise groupwork. Understanding their potential is important in helping you use them more effectively for students’ learning. Table 1 shows the advantages of four ways of organising groups. Look at it closely.
Table 1 Advantages of types of groups.
| Group composition | Advantages |
|---|---|
| Mixed ability groups | The more able students can explain their ideas and thinking. The less able students can gain new ideas and extend their understanding without exposing their lack of knowledge to a wide audience. |
| Same ability groups | All students are the same ability and learning can be supported or extending according to their collective needs. Different kinds of task can be given to different ability groups. More structured activities will help. |
| Friendship groups | Students may be more motivated and comfortable to participate with friends. |
| Random groups | Students have the opportunity to work with students they know less well. Groups can be quicker to organise, because students do not necessarily have to move places. |
Pause for thought When would you use each type of group listed in Table 1? How would you set up these different types of groups? Make notes on the type of group you would like to try first. |
Now read the case study below before you plan and teach your own lesson with groups. As you read, think how you could try something like this in your classroom using one of the group types listed above.
Case Study 2: Grouping the class for practical investigations
Mrs Vimala was teaching her class about floating and sinking, and wanted them to have a chance to predict which objects would float or sink before they tested their predictions in groups.
I have 43 children and only enough equipment for four groups, so I decided to teach the class in two halves. I hoped that by working with half the class (21 students) I could give them more time to talk, think and share ideas with their classmates.
While I did the floating and sinking activity with half the class, the other half did some research work in groups on another aspect of our topic using a sheet of information that I had prepared. They had to answer some questions and solve a problem that they wrote up in their books. I would look at this work when the whole class finished the floating and sinking activity.
I sorted out four sets of similar objects and called the first half of the class to the front half of the classroom while the others were working at the back.
At the front I divided the students into four groups, gave them their collection and asked them to predict the ‘floaters’ and ‘sinkers’ by filling in a sheet [see Resource 2]. I encouraged them to reach a consensus if possible, but if there was any disagreement they should put objects they were not sure of in the ‘not sure’ circle. As they discussed their ideas I went around the back half of the class and helped any students who needed support before returning to the front of the class and listening to the students talking about what floats. I only intervened if they were really confused, or I asked simple questions like ‘Why do you think that?’, so that they had to think more about why they think objects float or sink.
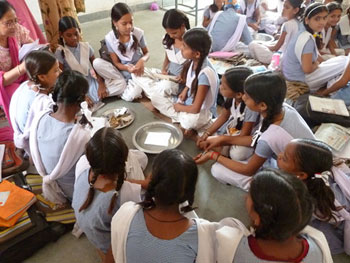
When all the groups had finished I gave them each a bowl of water [Figure 2]. I used old washing up bowls and a big empty tin, as we do not have much equipment in school. I give them five minutes to test their ideas and record their results by ticking those that did what they predicted and leaving the others unmarked. Out of all the objects they tested, the students suggested that a stone, a coin, a piece of concrete, pieces of wood, a piece of metal, a spoon, a pan, a dish, a feather, some paper and a pencil would sink.
Next I asked the students to discuss in their groups why they thought things sank or floated. I listed their key ideas before I then asked them to take one object that sank and work out a way to make it float. After giving them time to discuss this, I ask for volunteers to come out and try to make their sinkers float. One student put his coin on a piece of wood that floated and the coin ‘floated’ because it was on the wood. I asked whether this was true floating, which prompted much discussion. For their homework I ask them to write their own ideas about why things floated or sank.
At the end of the session I was very pleased at how interested the students were and impressed at their level of thinking about why things float or sink. My next lesson will help the whole class clarify their ideas when they have all completed the task. What pleased me most was the way that some students who very rarely speak in whole class lessons participated much more in the smaller groups – and they had much to say.
Pause for thought Think about how you might use some or all of Mrs Vimla’s strategies and actions to stimulate group activity in your teaching. This teacher wanted to have closer contact and interaction with a smaller number of students so that she could find out their current understanding of floating and sinking. How can you use groupwork to explore your students’ thinking more? |
Activity 1: Planning and teaching using groupwork
Using your thoughts about which type of group you would like to use with your class plan, either on your own or with a colleague plan a lesson about water and its properties related to floating and sinking. Think about the following:
- What science do you want the students to learn about? What are your learning objectives?
- How will working in groups support student learning?
- How will you support those with special educational needs as they work in groups?
- How you are going to introduce your class to the idea of working together?
- What type of group will you use?
- How will your organise the groups? Or will you work with one group at a time, or a few groups at a time?
- How will you explain what they have to do so that they are able to work well together?
- What do you want your students to learn about working together?
- What equipment will you need? How will this determine how you do the activity?
- What will you do as the students work in groups?
- How will you know and assess what the students have learnt?
Having planned your lesson, gather together your resources for the session and – when you are ready – teach the lesson.
Activity 2: How did it go?
Immediately after the lesson, answer the following questions about the experience for yourself:
- How did the lesson go?
- What worked well? Why did it go well?
- What did not go quite as you hoped?
- Why do think this was?
- What could you do next time to improve your skills in using groups?
Make notes about your responses before doing the last activity, which is to ask your class what they liked about the lesson.
Activity 3: What do your students like about groupwork?
Spend at least 15 minutes doing this with your class. Write these questions on the board:
- What do you like about working in groups?
- Do you think it helped you to learn about the science?
- Why do you think this?
- What would you like to change to help you learn more?
Explain how you want their constructive feedback on what they liked and what could be improved when they work in groups. The purpose of using groups is to help them learn better. Do not go round the groups while they are talking.
They may not want to talk directly to you, so they could write their responses if they prefer. Give the students time to talk in groups before asking them to either give a group feedback or individual responses to the questions, either orally or in writing.
It is important that you listen to your students’ perspectives on what they think about working in groups. Thank them for their time and responses, and take these away to examine more closely. Most students have their own ideas about what makes a good teacher and what helps them learn best.
Pause for thought
|
Look at the video on groupwork. As you watch try to link what you see to your own experience and think about how you can further develop your skills.
Video: Using groupwork |
1 Using groupwork to explore ideas