
2 Observation skills
Encouraging careful observation usually leads your students to ask questions. This is the beginning of a scientific investigation! Also, scientists need to be able to repeat the experiments of other scientists exactly to check the conclusions and findings. This means observing systematically and recording observations carefully. It may also involve deciding what to look for, feel or hear before starting so that everyone observes in the same way. This allows the data gathered to be compared across groups. This activity is one way to help your students to develop the necessary skills and understanding about the importance of the rigorous nature of science investigations.
Many of the ideas that are associated with this topic are difficult for students to grasp because of their abstract nature. It is not possible to actually see that the Earth is spinning on its axis – it requires imagination. Also, in everyday language we talk about the sun moving across the sky, when in fact it is the Earth that is spinning. Although we can see the effects of that spinning, we can’t feel the movement. Just explaining how this all happens tends to confuse students, or they hold the real explanation and their own ideas as two parallel sets of ideas that do not relate to each other. So for many of these ideas, you need to use models to help students understand. It is, therefore, very important that you give your students the chance to observe, record and investigate these changes for themselves before introducing them to the models that will help them assimilate the accepted ideas of how they are formed or happen.
Pause for thought
|
Case Study 2: Observing the Moon
The phases of the Moon are something that students will have observed informally. In this activity, Mrs Chadha explains how she helped her students to make and record more systematic observations of the phases of the Moon over time. You may want to now read Resource 2, ‘Using local resources’, to explore the issues about working beyond the classroom.
I told the students that they were going to observe the Moon closely for one month. I chose to start the activity when the Moon was full so that it was easier for them to see the changes. They had to draw a picture of the moon every night. I decided to get them to do this as a group so that each member of the group had to do two observations each week. Each group produced two drawings of the Moon each night, in case one student forgot.
Every day I reminded the students to look at the Moon before they went to bed and draw its shape in their notebook with the date. I checked who was going to draw the Moon for their group.
Because most of the Indian festivals are based on the lunar calendar, I asked the students to interview their family elder about the festivals or rituals observed by them and mark these on the drawings they made while observing the phases of the Moon. Some of them recorded the talk on their phones and we were able to listen to some in groups in class.
As the drawings were made, students put them on the wall to see how it was changing. They really enjoyed seeing their drawings displayed and the progress of the task.
After one complete lunar cycle (28 days), we looked at the drawings and I asked the students if they could see a pattern. They noticed the change in the shape of the Moon in the sky and that in one month the shapes showed a regular change until they again became a full moon. The students really enjoyed this activity and asked lots of questions about the Moon. I was really pleased with the displays that gradually went up on the walls. It was very satisfying to see the students enjoy their learning. I thought in the next lesson I would use a model to explain the phases of the Moon and relate this to their displays.
During the following month many of my students commented about the shape of the Moon the night before and I saw many of them looking at their chart again and comparing the sequence of shapes.
Pause for thought Mrs Chadha noticed how motivated her students were by this task. Why do you think this was? What effect do you think this will have on their learning? How could you use some of these ideas? |
Linking their observations of the phases of the Moon with the religious festivals related to different parts could be a good starting point to interest your students. Making contexts meaningful and relevant to students will heighten their interest and awareness so that they observe more closely and accurately. By providing opportunities for close observation, students will open their minds to the world and become more interested and motivated to find out more.
What you expect your students to be able to do will depend on their age. Older students might be expected to make more detailed observations and make notes. You could do this activity with young students as a simple observation activity, or use it as the basis of understanding why the Moon appears to change once the students are familiar with the rotation of the Earth, day and night, and the Moon being a satellite of the Earth. In Resource 5 there is a template that you could use to help students record their observations; see also Resource 4, which looks at using resources.
The ideas that students bring about shadows, night and day, the seasons, and the night sky can also make it difficult for them to develop a more scientific understanding. Many cultures around the world have created fascinating stories and myths to explain the mystery of the changing appearance of the Moon. Some of these stories remain part of our culture and continue to be shared today. Our understanding of the Moon has nevertheless been transformed since the first humans landed there in 1969.
The everyday language that we use to talk about the Moon can be misleading too. We talk about ‘moonlight’ and the ‘shining Moon’. It is not surprising, therefore, that students can find it difficult to understand that the Moon is not a light source, but simply reflects the Sun’s light. Most students will have observed the Moon passing through its different phases, and may be familiar with the terms ‘new moon’, ‘crescent’, ‘full moon’, etc. However, they may believe that these phases are created by the Earth casting a shadow on the Moon, rather than light being reflected to the Earth from the Moon at different angles (Driver et al., 1992).
These concepts can be challenging to teach, especially if classroom resources are limited. The simple activity below may help your students develop a better understanding of why the Moon appears to radiate light and to change in size and shape.
Activity 3: Understanding the phases of the moon
This activity is suitable for older elementary students but similar activities using modelling can be used with younger students. For this classroom activity you will need a torch and a large white ball. (You could use a melon or other large round fruit if a ball is not available.) You will be demonstrating a model of the cause of the phases of the Moon (see Resource 4). Practice the demonstration before you do it with the students, so that you are confident and know what questions you are going to ask and how you will respond to your students’ questions.
- You need to do this demonstration in a dark room. Before beginning the activity, block out as much light as possible from the classroom. Use rugs, curtains or pieces of cloth or paper to block as much light as possible from the windows and doors.
- Create a large space in the room by moving the chairs and desks to the sides.
- Ask the students to sit close together in a circle near the centre of the room. You may need to create an inner and outer circle, depending on how big your class is. Explain that the circle they are in represents the Earth. The torch represents the Sun and the ball represents the Moon.
- Switch off the lights. Hold up the ball and ask the students if they can see it clearly. Ask them if the ‘Moon’ is radiating light.
- Ask one student to stand away from the circle and hold the torch and switch it on. Place the ball in the beam of light from the torch. Explain that the ‘Moon’ is not lighting up, but is reflecting light from the ‘Sun’ (Figure 3).
Figure 3 An activity that helps students to understand the phases of the moon.
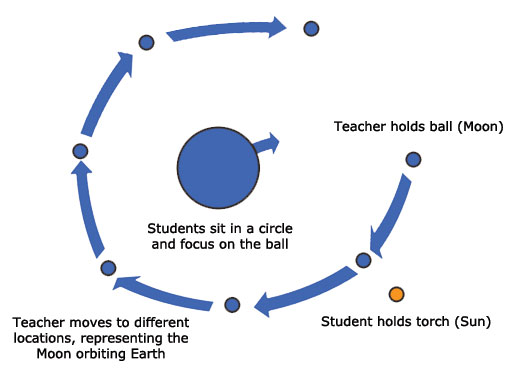
- Ask the students to sit still, look straight ahead and not follow you with their eyes. Ask the student with the torch to remain still. Then move around the circle with the ‘Moon’, stopping at regular intervals to give the students time to observe what they see. Explain that you are the ‘Moon’ orbiting the ‘Earth’.
- Ask the students, ‘Does the Moon change shape as it passes?’ and ‘How much of the Moon can you see?’ (Prompt them by asking ‘All of it?’, ‘Half of it?’, ‘Not all of it?’, etc.)
- Rearrange the students and repeat the activity several times so that all the students have the opportunity to make clear observations. Students with less understanding of how day and night work will need more time and opportunities to try this activity and similar activities to help them accept the ideas.
- As you are orbiting the ‘Earth’, keep the same part of the ‘Moon’ facing towards the students. Explain that the same part of the Moon always faces the Earth.
After completing this demonstration, ask your students to draw a diagram of the Sun, the Moon and the Earth, using arrows to indicate how light is reflected from the Sun.
A light source (such as a torch, lamp or candle) and a ball can also be used to demonstrate that we experience daytime when our part of the Earth faces the Sun, and that the parts of the Earth facing away from the Sun are experiencing night time.
Once the activity has been completed, note your answers to the following questions:
- What did you like about this activity?
- What went well? How do you know this?
- What didn’t go as you expected? Why?
What would you do differently next time to improve the effectiveness of the activity?
Activity 3 used a mixture of modelling and observation to help students understand the phases of the Moon. You can use this technique to help your students understand day and night. Students sit around the room. One student stands in the centre with the torch, representing the Sun, and another student represents the Earth. By turning around slowly, they can observe how half of the Earth is dark and half is light. You can also use this idea to help them understand how the Earth orbits the Sun and that a year is one orbit.
With younger students, learning about objects in the sky should be entirely observational and qualitative in nature. This is to develop their skills in observing and help them to become more accurate and competent at gathering data. The Sun, Moon, stars, clouds, birds and aircraft all have properties, locations and movements that can be observed and described over time. Observations and patterns are also an important part of learning about living things in the environment. For example, looking at where and how plants grow.
1 Developing observation skills