
1 Using different types of models to represent carbon compounds
When students learn to use electron dot structures to represent carbon compounds, these diagrams relate a molecular formula such as CH4 or C2H6 to the number of covalent bonds available as a consequence of the number of valence electrons for each kind of atom.
Once this concept is established, electron dot structures are not a convenient way to represent anything other than the simplest molecules, as large numbers of circles and dots can become a distraction: it will be a useful approach again when students need to learn about reaction mechanisms, but for now the model has served its purpose and students begin to use diagrams of molecular structure which represent each covalent bond by a single line.
Both of these models identify the numbers of bonds in a molecule, but they do not convey information about the true shape of the molecules, or that parts of molecules are able to rotate relative to each other. Students have previously learnt that particles in a gas are in rapid motion relative to each other, but have treated the molecules as simple spheres in rapid motion. Those who go on to study chemistry further will learn about infra-red spectroscopy and will relate spectral features to rotation and vibration around particular bonds within molecules. Class X students are still building their use of mental models, however, as a first step they need to recognise that the diagrams they have been using are two-dimensional representations of three-dimensional molecular structures.
One of the problems for students in learning about carbon compounds is that they sometimes treat a diagram of structure too literally. For example, when they are asked to work out structural isomers for a given formula, many students cannot see that some of the structures that they have drawn are equivalent. It is much easier to do this once students have seen a physical model of the molecule and have seen the effect of rotating it.
[If you have access to computer applications that allow students to generate molecular structures and see them rotating, this would also be very useful.]
Pause for thought
|

Case Study 1: Comparing molecular models to diagrams
Mrs Gupta constructed some molecular models and compared these to diagrams of the structures.
I wanted to teach about functional groups, and from past experience, I knew that many of my students would find it difficult to see that certain substitution positions are actually equivalent, if I only relied on using diagrams of the structure. I decided to use molecular models to help my students review what they already knew about alkanes in order to prepare for learning about functional groups. At the same time, I wanted to remind my class that the diagrams in the textbook are only one way of representing a molecule’s structure. Using the physical models would help them to realise some of the limitations of using diagrams.
Before the lesson, I constructed a model of a methane molecule and of a hexane molecule. I kept the hexane molecule out of sight and began the lesson by showing the model of a methane molecule to my class. I told them it was a molecular model of methane and asked them what they noticed about it. They told me they could see four white balls attached to a black ball by plastic rods. They said that the four white balls must be hydrogen atoms, the black ball must be a carbon atom and the rods must be the bonds, like the lines in the diagrams.
Next, I told them all to look at Table 4.2 in the textbook and asked, ‘What is different about the model from what you can see in the table?’ Nobody answered. ‘Look at the angles’, I said. ‘Can you see any right angles? Is the molecule flat?’ Now they knew what to look for, of course they could see that the model was not flat, but formed a tetrahedron with all the hydrogen atoms as far away from each other as possible.
I got out the other model that I had made before the lesson. I told one of my students, ‘Count how many carbon atoms there are and how many hydrogen atoms, then tell the rest of the class.’ Then I asked what they thought it must be. They identified it as hexane, because there were six carbon atoms.
We looked again at the two models and compared them to the diagrams in the table. This time, my students were ready to tell me that these molecular models were certainly not flat, and in fact were beginning to look a bit wiggly. The ‘spine’ of the molecule was not straight; the carbon atoms at each could rotate around, so the hydrogen atoms and their bonds were like propellers on a boat or plane.
I passed the methane model to a student and asked him to turn it into a butane molecule. At the same time, I passed the hexane model to a student and told her to turn it into another model of a butane molecule.
So I then had two identical butane molecules. I explained that it was possible to make a new carbon compound by replacing one of the hydrogen atoms by a chlorine atom and that we would represent the chlorine atom in the models by using a green ball with one link point. I gave a ‘butane molecule’ and a ‘chlorine atom’ to two students and asked them to make a new molecule.
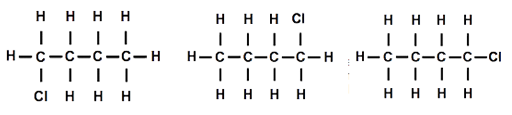
Both students had replaced a hydrogen atom on one end of the molecule. I held both models up for everyone to see ‘Are they the same or different?’ I asked. As one hydrogen seemed to be at the opposite end from the other hydrogen, everyone thought they must be different, but as I rotated the molecules around the ‘spine’ of the molecule, then end over end and then made the ends of the molecule rotate, they began to see that the molecules were actually the same. I drew three diagrams of the structure that looked different but actually represented the same molecular structure [Figure 2].
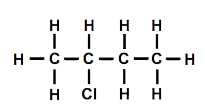
I asked my students how I could make one of the molecules different from the other. After a few moments thought, someone suggested that replacing a hydrogen connected to a carbon in the middle of the chain should make a different molecule. I drew a diagram of the structure [Figure 3].
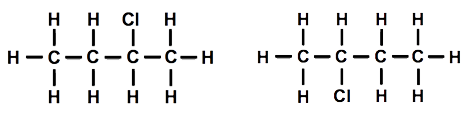
Then one student suggested that we could move the chlorine atom to another carbon atom. We tried this out, and it was indeed different. Using the other model and moving the chlorine atom so that it was attached to one of the carbon atoms in the middle, we also established that it was impossible to tell middle carbon atoms apart once the model was rotated, even though the diagrams might look different [Figure 4].
Even though I only have one modelling kit, I think using it with my students helped them to understand the relationship between the physical models and the diagrams in the book. Now that I’ve used the models in my lessons, I might organise my students into groups and let each group have a turn at building with the modelling kit.
Activity 1: Building models
This activity will help you to develop your planning and in-class teaching.
You will need a molecular modelling kit for this activity (either a ‘ball and stick’ type or a ‘space-filling’ type). Alternatively, you can use toothpicks and modelling clay to represent bonds and atoms.
Look at Section 4.2.2 in the Class X textbook.
Figures 4.8a, 4.8b and 4.9 show the carbon skeleton of a molecule and then the complete molecule.
- In what way does showing the skeleton first help students understand the structure of the molecules?
- What features would you draw attention to in discussing these diagrams with your students?
- What do the diagrams suggest about the branched structure?
Now create models for each of the structures shown in Figures 4.8a, 4.8b and 4.9. Compare these models to the related diagrams in the textbook.
- In what ways are they similar?
- In what ways are they different?
- What features would you draw attention to on these models, if you were to show them to your class? How would you do this?
Why this approach is important