
2 Planning for effective demonstrations
Pause for thought Think of a demonstration you saw when you were a student at university or college.
|
Before planning how to carry out any demonstration with your class, it is important to ask yourself: ‘What do I want my students to learn?’ and ‘When will my students learn that from this demonstration?’ If a demonstration does not deliver what you want your students to learn, then no matter how impressive it is, it is not an effective demonstration.
Case Study 2: Ask a colleague to help you plan your demonstrations
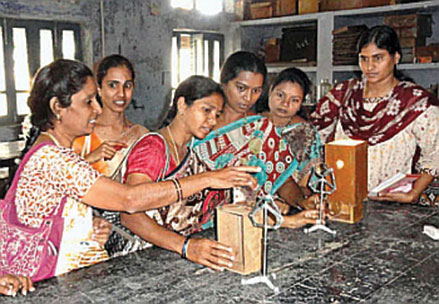
Miss Bulsara asked another science teacher to review her plans for a demonstration of images formed by a convex lens (Activity 10.12).
This is the first time I have taught this topic. There are a lot of points to cover in the practical activity about images in lenses, and I was worried that my students might lose interest or become distracted if the demonstration took too long. I wanted to get someone else’s opinion on what I was planning to do, so I asked my colleague Mrs Gupta if we could meet after school in the room where I will teach the lesson, and talk through the demonstration.
The room has a nice, large demonstration bench, so I put my equipment tray down on the bench and began to set up the demonstration.
Mrs Gupta asked ‘Which lens are you planning to use first? It will affect how you set up the lines and the lens holder.’
I hadn’t decided, so I spent a few minutes checking the focal length of three different convex lenses, then putting one of them in a lens stand and drawing the parallel lines on the table. I made a note on my plan about which lens to use for the demonstration and how far apart the lines needed to be. I would need this information to help me set up quickly in the lesson.
I was starting to mark the F and 2F positions when Mrs Gupta commented, ‘This is a very quiet class today, isn’t it?’
We laughed, because I was so absorbed in following the instructions that I had forgotten about how it would appear to my students. I was about to say, ‘I’m marking this line as F’ when I stopped myself. Perhaps it would be better to ask one of my students why they thought I had lines drawn at these particular distances, and why I was labelling them F and 2F? Another quick note to myself on the plan!
I set up the screen and lit the candle, then made a few adjustments to get a nice sharp image on the screen with the candle as far away as possible.
‘Where will your students be? Will everyone be able to see the image?’ asked Mrs Gupta. It was worth checking. It would have been difficult for some of my students to see the image from where they would normally stand. Another quick note on my plan!
I drew up a table like Table 10.4 on the blackboard, with all the different object positions in the first column but with everything else left blank. After showing everyone the first example, for all the other object positions I planned to ask a student to show me where I should place the candle each time, and someone else where they thought the image would be. I would ask someone else to describe the image they could see on the screen.
I was going to tell my students to fill in the information themselves during the demonstration, so they would need to keep paying attention. But Mrs Gupta suggested that this might be more of a distraction, especially when everyone would know that the table with all the answers was in the book. Instead, I decided to fill in the table on the board as we worked through all the different positions, so students could see how we had arrived at the completed table. Another note on the plan!
By the end of our discussion, I felt I had a plan that would really help me to deliver a more effective demonstration. Our discussion had also made me think about what I could do to improve my demonstrations for other topics, too.
Pause for thought
|
Now try planning your own demonstration in Activity 2.
Activity 2: Planning for effective demonstrations
This activity will help you to develop your planning for effective demonstrations.
Look at Activity 11.3 in the Class X textbook. You are going to prepare a plan for a lesson including this activity as a demonstration, addressing each of points 1 to 8 below, and then carry out the plan. Refer to Resource 2 for general suggestions about how you might address points 3 to 8.
- What do I want my students to learn?
- When will my students learn that from this demonstration? What is it that they need to observe or hear?
- What do I need to do to make sure the demonstration works as intended?
- What do I need to do to ensure that it is physically possible for everyone to see what I want them to see?
- What do I need to do to ensure that everyone is ready to see what I want them to see?
- What can I do to keep my students actively involved during the demonstration rather than simply watching it?
- How will I prepare my students for the demonstration?
- How will I help them to consolidate what they have learned from the demonstration?
Compare your plans to the suggestions in Resource 2. Were there any suggestions you hadn’t thought of? Which suggestions did you find most useful?
Carry out your plan as soon as possible. Afterwards, discuss the lesson with a colleague. What went well? Did your students learn what you wanted them to learn? Where could you improve your plan for next time?
Remember that scientific observation has to be taught. Students will only be able to make good scientific observations when students know what to look for, how to look for it and how to recognise the significance of what they see. It is also important to teach students about observations: that our senses can be mistaken and that observations are influenced by theories that we hold. So all observations should be critically evaluated. These ideas can be explored with your students by using planned questions during the demonstration.
1 Choosing when to do a demonstration